 Searching...
Creating and Deploying an Amazon Machine Image
AMM 2.16+ fully supports Amazon Web Services (“AWS”). This section describes how to deploy the AMM as an Amazon Machine Image (“AMI”) on AWS. Note that the following links from Amazon provide additional detail:
- https://docs.aws.amazon.com/vm-import/latest/userguide/what-is-vmimport.html
- http://docs.aws.amazon.com/cli/latest/userguide/installing.html
Preparation
If you are obtaining an AMI from Support, you do not need to look into procedures for performing a VM import or installing the AWS CLI, as it is pre-installed.
Before the AMM image can be deployed on AWS, you must first have an AWS account and you must share the AWS account number and region with Sierra Wireless Support. Support can then share the AMI privately with your account. The AMI will only be available in the region provided.
Once the AMI is launched you can then configure it via SSH and access the web UI once the configuration is completed. Sierra Wireless strongly recommends limiting access for SSH and HTTP(S) sessions to trusted IPs or ranges, and changing the default login credentials.
The process requires that the user deploying the AMI have sufficient (IAM) permissions to launch an ec2 instance. The user must then create and attach EBS volumes, security groups, and an Elastic IP to the instance. This general process is as follows:
- Launch an appropriately sized M5 instance from the private AMI.
- Add an EBS volume (data drive).
- Create a security group.
- Allocate and assign an Elastic IP.
- Confirm SSH and web UI access.
Launching an AMM Instance
- AMM customers in the US West region should log in to the AWS EC2 console with their own user account and select the region from the top right (e.g., Oregon, N California, etc); this should be the same account as that provided to Support when the AMI was requested.
- Select Services -> EC2 and then select AMIs in the navigation panel.
- From the EC2 console, select AMIs. Change the filter drop down for the search box to Private images. If you do not see the AMI listed, confirm the region selected and the account number provided to support.
- Select the AMI, right click, and select the Launch menu.
- Choose an appropriate instance type according to recommendations from Sierra Wireless and click Next. Note that changing the instance sizing from the pre-configured values also requires the AMM configuration to be modified to utilize a larger resource pool.
- Select the preferred subnet and click Next.
- Click Add New Volume and then update the size as per the storage recommendations in this user guide or as obtained from Support, based on your gateway count and data retention period.
- Choose a volume type of gp2 or better. Click Next to add tags.
- Add a name tag setting the Key to Name and the Value to AMM.
- Click Next to add a security group and name it AMM-SG.
- Configure the security group with the following
inbound rules:
and outbound rules:
Type Protocol Port Range Source TCP Rule TCP 2222 We advise limiting SSH access to a trusted IP range and Sierra Wireless secure proxies for support (Cproxy1 52.43.77.2 / 32 and Cproxy2 35.182.110.106 / 32) UDP Rule UDP 1194 0.0.0.0/0 OpenVPN Management Tunnel (ALEOS 1190 through 1193, MGOS 1194 through 1197 for AMM 2.16.2+) UDP 1190 through 1197 0.0.0.0/0 HTTP Rule HTTP 80 0.0.0.0/0 HTTPS Rule HTTPS 443 0.0.0.0/0 GNX UDP 9494 through 9495 0.0.0.0/0 MGOS TCP 150120 through 2149152 through 49252 ALEOS TCP 8082 through 8083 MSCI44900 M3DA Type Protocol Port Range Source All Traffic All All 0.0.0.0/0
Note: For customers who block or limit access via Port 80 to the webUI and are utilizing ALEOS gateways (RV, MP etc), note that the aforementioned gateways currently utilize Port 80 for Sierra Wireless updates from the AM/AMM.
- Click Review and Launch and then click Launch.
- Click the Services -> EC2 menu.
- Select Instances in the navigation panel and check the new instance information including public DNS to access web UI.
Adding a New Volume
Steps 1 and 2 below can also be performed via the Launch AMI wizard.
- In the EC2 management console, click the Services > EC2 menu, then select Volumes in the navigation panel, and click Create Volume.
- Select Provisioned IOPS SSD, set the designed size, select the availability zone to be the same as the AMM VM, and click Create.
- Select the newly created volume, right click, and select Attach Volume.
- Click Instance input rectangle, select the AMM VM, and click Attach.
- Log in to the AMM VM by SSH (see Accessing Instances by SSH for more information).
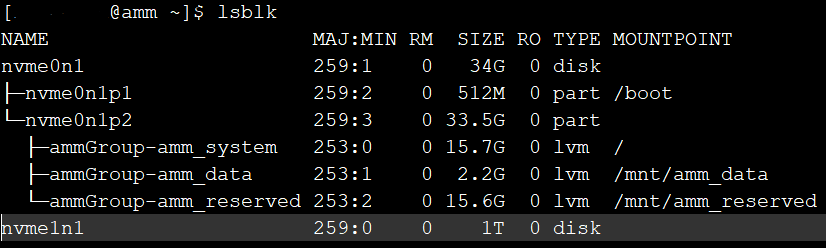
- Execute lsblk as root (su -). The additional attached volume to be allocated for data, will be listed as a disk without any partitions or mountpoints associated. For example, the following figure shows the attached volume nvme1n1:
- Run the following script to add and modify the volume. Prior to running the script, confirm that the correct volume is being used:
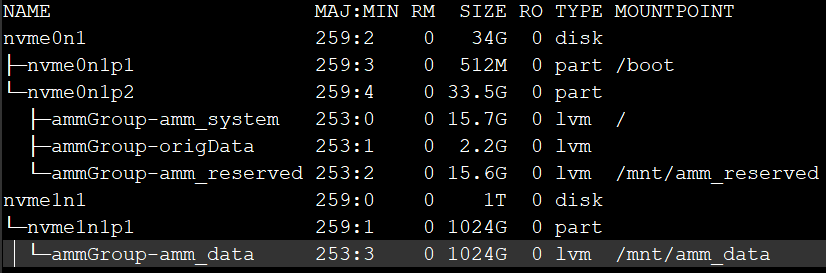
[root@amm ~]# /opt/tomcat/webapps/inmotion/WEB-INF/support/setupNewSdbAsDataDrive.sh nvme1n1 - Once the script is successfully run, execute lsblk again. The mountpoint should be moved to the extended disk’s partition:
- Allocate and associate the obtained Elastic IP with the ec2 instance.

