Managing Security Certificates
All security certificates used on the router can be centrally managed. The router may require certificates for several functions, including (but not limited to):
- HTTPS server access
- VPN IPsec tunnels
- Wi-Fi Client WPA2-Enterprise connection
- ALMS Hybrid Cloud
- Certificate Management System access
Each function will separately validate the certificate that it uses.
The Security > Certificates section consists of the following tables:
- IMPORTED CERTIFICATES – Upload certificates and view status of uploaded certificates
- GENERATED CERTIFICATES – Generate certificate signing requests (CSRs), and view status of CMS-generated certificates (see Generated Certificates below)
- EST CREDENTIALS – Enter EST (Enrollment through Secure Transport) protocol credentials to establish a secure connection to your CMS (see Generated Certificates below)
Certificate Management Features within ALMS
ALMS has a series of features that provide insight into certificates on AirLink routers that support both Imported and Generated certificates. For more details, see the ALMS documentation.
 Initializing Table Of Contents...
Viewing Imported Security Certificates
To view your imported security certificates, go to System > Security > Certificates > IMPORTED CERTIFICATES.

| SETTING | DESCRIPTION | VALUES |
|---|---|---|
| NAME | User-defined name identifying the certificate | N/A |
| SUBJECT/DISTINGUISHED NAME | The set of values that were entered during the enrollment and creation of the certificate | N/A |
| TYPE | The type of certificate | User, CA |
| EXPIRATION DATE | The certificate’s expiration date | User, CA |
| STATUS | Status of the certificate | Untrusted, Valid, Expired, Not yet valid, Wrong private key, Files missing or malformed, Invalid CA |
Uploading a Security Certificate
To upload a security certificate:
- Go to System > Security > Certificates.
- Under the IMPORTED CERTIFICATES table, click UPLOAD CERTIFICATE.
The Create PEM Certificates window appears.

Configure the following settings to create a security certificate.
| SETTING | DESCRIPTION |
|---|---|
| TYPE | Select from Certificate or Root Certificate |
| NAME | Required name identifying the certificate |
| CERTIFICATE | Required for TYPE Certificate. Click to upload the certificate file |
| PRIVATE KEY | Required for TYPE Certificate. Click to upload the private key file |
| CERTIFICATE BUNDLE/CHAIN | Only shown for TYPE Certificate. This is currently not used by any functions on the router |
| ROOT CERTIFICATE | Required for TYPE Root Certificate. Optional for TYPE Certificate. Click to upload the root certificate file |
The maximum upload file size is 64 KB per file.
The following table describes which fields are required based on certificate usage.
| OPERATION | CERTIFICATE | PRIVATE KEY | CERTIFICATE BUNDLE/CHAIN | ROOT CERTIFICATE |
|---|---|---|---|---|
| HTTPS | Required | Required | n/a | Ignored |
| VPN IPSEC | Required | Required | n/a | Required |
| Wi-Fi CLIENT WPA2-ENTERPRISE | Required | Required | n/a | Optional |
You can add imported or generated certificates while configuring:
- a Wi-Fi Client SSID to use WPA2-Enterprise mode, depending on the selected EAP method (TLS or PEAP) and the requirements of your remote RADIUS server.
- an IPsec or OpenVPN tunnel using the “Certificate” Authentication Type.
Deleting Certificates
AirLink OS prevents you from deleting certificates if they are used in the router’s configuration. For example, if a certificate is used for IPsec VPN authentication, it cannot be deleted from the Imported Certificates or Generated Certificates tables. In that case, you would need to select another certificate or a different authentication method in the VPN configuration before you could delete the certificate.

Generated Certificates
AirLink OS includes features that enable you to generate and manage certificates through your certificate management system (CMS). This process uses the EST (Enrollment through Secure Transport) protocol via TLS to communicate with a pre-configured CMS.
At this time, the AirLink OS automated certificate management feature only supports EST via TLS; therefore the CMS you use needs to support those protocols. AirLink routers also require IP connectivity to the CMS in their default configuration, which is possible using either public CMS IP addresses, or a cellular APN.
Prerequisites
Before using any of the generated certificate features in AirLink OS, you must:
- Correctly configure your certificate management system
- Routers must have a WAN connection. Generating certificates using a CMS does not work when the router has an LPWA connection only.
- Upload a CMS root certificate to AirLink OS as described in Uploading a Security Certificate.
- Configure your EST authentication credentials (user name and password) in AirLink OS (see Create EST Credentials below).
Create EST Credentials
To add EST authentication credentials that will allow the router to access your CMS:
- Go to System > Security > Certificates > EST CREDENTIALS.
Click CREATE EST CREDENTIALS.

The Create EST Credentials menu appears.
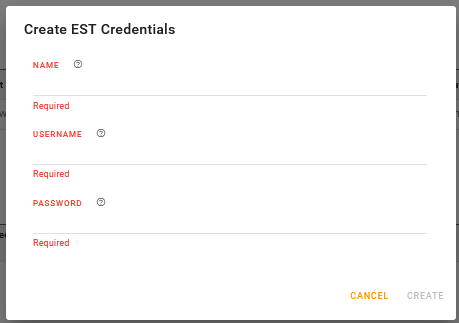
Enter the following required information:
a. NAME–A reference name for the credentials; the name of your CMS, for example.
b. USERNAME–The user name for your EST authentication credentials
c. PASSWORD–The password for your EST authentication credentials
Click CREATE.


The name of your credentials appears in the EST CREDENTIALS table.
Generate a Certificate
To generate a certificate by sending a certificate signing request to your CMS:
- Go to System > Security > Certificates > GENERATED CERTIFICATES.
Click GENERATE CERTIFICATE.

The Create Certificate Signing Request menu appears.
Configure the settings as described below, and then click CREATE.

| SETTING | DESCRIPTION | VALUES |
|---|---|---|
| NAME | User-defined name identifying the certificate | n/a |
| KEY ALGORITHM |
Select an option that is compatible with your CMS. Options are:
|
RSA (default), ECDSA |
| KEY SIZE | Select the key size that is compatible with your KEY ALGORITHM and CMS. |
For RSA–1024, 2048 (default), 4096 For ECDSA–256, 384, 521 |
| USE DEVICE SERIAL NUMBER FOR COMMON NAME | Enable this setting to use the router’s serial number as the certificate’s common name. This is an efficient way of deploying unique certificates to a fleet of routers using an AirLink OS device template. | Yes (default), No |
| COMMON NAME |
If USE DEVICE SERIAL NUMBER FOR COMMON NAME is disabled, enter the common name for the certificate.
|
n/a |
| Enter an email address linked to the certificate request, if required by your CMS. | n/a | |
| COUNTRY | Enter a two-letter ISO-3166 country code, if required. | n/a |
| STATE | Enter the name of your state or province, if required. | n/a |
| LOCALITY | Enter your city name, if required. | n/a |
| ORGANIZATION | Enter the name of your company or organization, if required. | n/a |
| ORGANIZATION UNIT | Enter the name of your department in your company or organization. | n/a |
| SUBJECT ALTERNATIVE NAME |
If required, enter a comma-separated list of subject alternative name extensions to be added to X.509 certificates. For example, “DNS:example.com,DNS:www.example.com” |
n/a |
| CMS URL |
Enter the URL of your EST server, including port number if applicable, and excluding EST operation suffixes and CA labels. For example, “https |
n/a |
| CA LABEL |
If required, enter the certificate authority label. An EST server may provide service for multiple CAs. The CA Label is an optional path segment. For example, “https |
n/a |
| RE-ENROLL LABEL |
If required, enter the re-enroll label, if the EST server uses a different label for re-enroll operations. For example, “https |
n/a |
| CMS ROOT CA CERTIFICATE | Click to select the root CA certificate for CMS access. | Any uploaded root certificate |
| CMS ROOT CA CREDENTIALS | Click to select the pre-configured EST credentials Name used for HTTP authentication with the EST server. | Any configured EST credentials |

Regenerating and Re-enrolling Certificates
After generating certificates, you can perform the following actions in the GENERATED CERTIFICATES table.

RE-GENERATE–Click to re-generate the certificate from scratch using the EST Authentication Credentials
Changing any Certificate Signing Request setting will trigger an attempt to re-generate the certificate.
RE-ENROLL–For an existing certificate, click to manually re-enroll (renew) the certificate. The router will use the existing certificate and private key as an authentication method instead of the EST credentials, and will use the EST simplereenroll API endpoint.
The AirLink router automatically attempts to renew a generated certificate using the RE-ENROLL process when the certificate is within 90 days of expiry. The certificate renewal attempts repeat daily until successful.
Note that using either RE-GENERATE or RE-ENROLL results in a new key pair.