Configuring a Standard AirLink MG90 Setup
 Initializing Table Of Contents...
Introduction
The AirLink® MG90 is a high-performance LTE-Advanced Pro vehicle multi-networking platform, purpose built to provide secure, always-on connectivity for mission critical applications in public safety, transit and field services.
This sophisticated piece of hardware can require significant expertise to configure when used to its full capabilities. As a result, Sierra Wireless has traditionally required a Professional Service engagement to work with the customer to complete the initial configuration of the device. For many customers, this level of complexity is not required for their deployment.
For customers who require a “standard” configuration (as defined below), this procedure provides instructions to get an AirLink MG90 with a basic hardware configuration connected to the network and communicating with AirLink Mobility Manager (AMM).
A “standard” MG90 hardware configuration consists of:
- A single active cellular modem
- A single Wi-Fi radio configured as an access point or Hotspot
- GPS forwarding to CAD/AVL (optional)
- Connection to a hosted AMM via an AirLink Support contract
For customers who require a more advanced configuration, this guide may still be sufficient to get your AirLink MG90 on air and communicating with the AMM. However, for deployments more complex than the standard configuration, you will require assistance and an AirLink Professional Services engagement. Please contact your Sierra Wireless Partner or Sierra Wireless Regional Sales Manager for the details on the required Professional Services engagement(s) if this page does not provide the information you require.
System Requirements
Prior to configuring the AirLink MG90, please confirm that you have all the following available and/or set up as required:
- AirLink MG90
- Access to the AirLink MG90 Hardware User Guide , Airlink MG90 Software Configuration Guide and AMM Operations and Configuration Guide .
- Power source
- You can wire the MG90 directly into vehicle power or a 12-to-24 volt power supply connected to harness. See Step 5—Connect the Power in the Airlink MG90 Hardware User Guide.
- Proprietary power supply (available for purchase from Sierra Wireless: SKU 6001023: AC Adaptor, 12 VDC MG90)
Active SIM card for your cellular network provider.
- Contact your carrier for activation
- Cellular APN details: have your cellular carrier provide you with the details of the cellular APN, if different from one of the standard commercial APNs
Antennas
- Please work with your Sierra Wireless Partner to obtain the appropriate antennas for your requirements. The standard deployment should include 2 × cellular, 3 × Wi-Fi and 1 × GNSS antennas.
- Sierra Wireless can provide an appropriate antenna that has been tested with the AirLink MG90. For vehicle deployments we would recommend one of the following antennas:
- 6-in-1 SharkFin – SKU: 6001117
- 6-in-1 Dome – SKU: 6001121
- More details on antennas are available here .
Valid AirLink Support contract
- Your AirLink Support contract also provides access to the Sierra Wireless hosted AMM that you will use for managing your devices and doing reporting.
- As part of the purchase process, you should have received an AirLink Support Welcome Kit. This will provide you with the login details of your AMM account, as well as the details of your Customer Support Portal account.
- If you have not received this, you cannot start this process. Please contact your Sierra Wireless Partner or Sierra Wireless Regional Sales Manager to ensure your account is properly set up.
A list of AirLink MG90 serial numbers to submit to the Sierra Wireless Customer Support team. Open a support ticket at https://customercommunity.sierrawireless.com/ . This will ensure your devices are directed to the correct hosted AMM.
PC with Wi-Fi capability or Ethernet cable
Procedure
1. Insert the SIM card
Insert the SIM card into slot A1 and re-install the SIM door

2. Connect antennas
Connect antennas to the AirLink MG90. Use the following illustration and table to assist in connecting the antenna cables.

| REFERENCE | CONNECTOR | DESCRIPTION | TYPE | REQUIRED |
|---|---|---|---|---|
| 1 | GNSS | GNSS | SMA | Y |
| 2 | CELLULAR A | First radio, Rx/Tx. Assumes SIM card inserted into SIM slot A1. | SMA | Y |
| 3 | DIVERSITY A | First radio, Rx Diversity | SMA | Y |
| 4 | WI-FI A 1 |
|
RP-SMA | Y |
| 5 | WI-FI A 2 |
|
RP-SMA | Y |
| 6 | WI-FI A 3 |
|
RP-SMA | Y |
| 7 | Bluetooth | Bluetooth | RP-SMA | |
| 8 | CELLULAR B | Second radio, Rx/Tx | SMA | |
| 9 | DIVERSITY B | Second radio, Rx Diversity | SMA | |
| 10 | WI-FI B 1 |
|
RP-SMA | |
| 11 | WI-FI B 2 |
|
RP-SMA | |
| 12 | WI-FI B 3 |
|
RP-SMA |
3. Power up the MG90
Connect power to the AirLink MG90. It will take approximately 2 to 3 minutes for the device to boot and connect. The LEDs should appear as follows:

| REFERENCE | LED | DESCRIPTION |
|---|---|---|
| 1 | GNSS | Not important for connectivity |
| 2 | Wi-Fi | Off |
| 3 | Network | Flashing green |
| 4 | Signal | Flashing green or amber for the initial setup. If the LED is red, check the antenna connection. |
| 5 | Activity | Flashing green or off |
| 6 | Power | Flashing green |
A full description of LED behavior can be found under LED Behavior in Chapter 2 of the Airlink MG90 Hardware User Guide .
4. Log in to the LCI and configure the device
- Connect a laptop to the AirLink MG90.
- If using Ethernet, connect a cable to port 1, 2, 3, or 4.
- If Using Wi-Fi, look for the SSID bearing the ESN (serial number of the AirLink MG90, on the label on the bottom of the device)
- Connect to the LCI (local interface to the AirLink MG90). Open a browser and navigate to http://welcome.to.sierrawireless/MG-LCI/
- Use default credentials to log in:
- User name: admin
- Password: admin
Sierra Wireless recommends changing the default password immediately. See Update firmware and secure the device below.
5. Set up your cellular connection
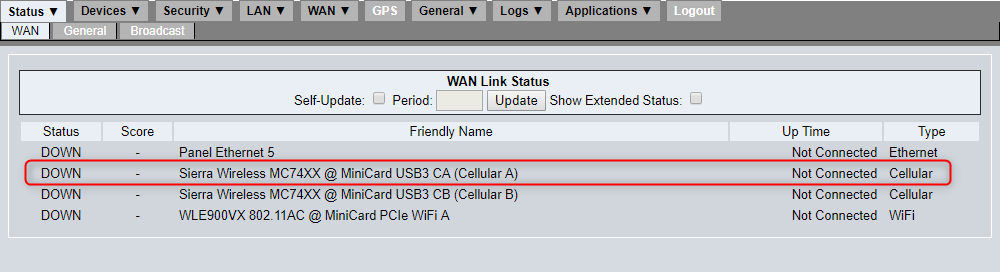
Check the connection status. If not connected, set up an APN.
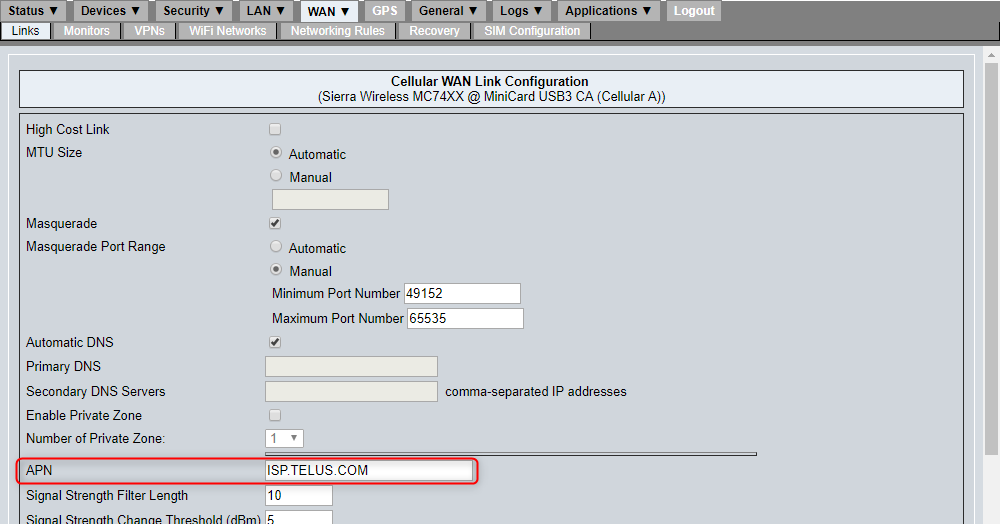
Set up a Cellular APN (skip to the next step if APN setup is not required):
a. Navigate to the WAN > Links page and click the Configure link in line with the “Cellular A” cellular option.
b. Locate the APN setting, enter the carrier-provided APN, and then click Save. Your carrier provides the APN information if your service is on a private APN. You do not need this if you are using a commercial APN from a major carrier.
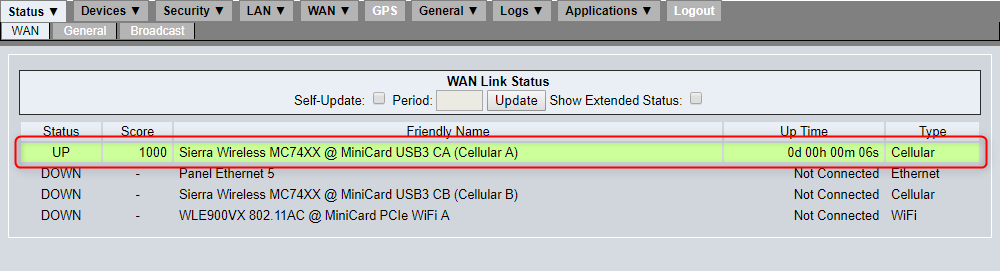
On the Status > WAN page, verify that the cellular connection is up, and confirm connectivity. This is the default page shown after you log in to the LCI when the AirLink MG90 is powered on.
On the Devices menu, change the device name to something that matches your carrier. This helps identify the device for reporting.

On the Devices menu, if you are using only one cellular link, but have an MG90 with two radios, then change the status on link 2 to IDLE. This reduces power consumption, heat generation and CPU load.

Set up at least two monitors for each WAN link, and delete the Default monitor. Best practices state that these monitors should be set with IP addresses, or alternatively one with IP and one with FQDNS. For more information, see WAN > Monitors in the Airlink MG90 Software Configuration Guide
The router can send a ping to a specific target to ensure that traffic is being passed through the network. Use two different ping monitors per link for redundancy.
Best practice is to set one server target by IP address and the second by DNS name. Use servers that are pingable and accessible based on the cellular network configuration.
The MGOS-AMM system also uses the ping responses to calculate network uptime, even if a particular carrier is not the active link at any given time.


6. Update firmware and secure the device
- On the Status > General page, identify the current version of the core firmware.
- Log onto the AMM. You can find credentials for new accounts in the AirLink Support Welcome Package.
- Locate the AirLink MG90 and upgrade the device firmware via the AMM software upgrade feature if an upgrade is available. For information about the upgrade procedure, see the Distribution section of the Airlink AMM Operation and Configuration Guide .
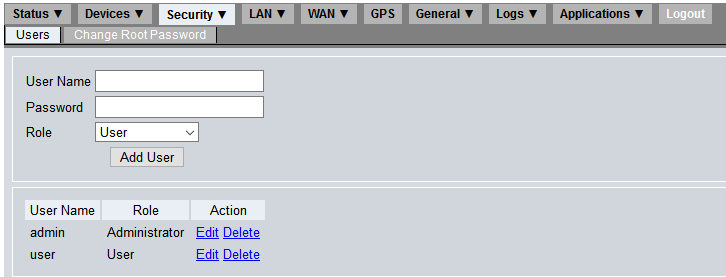
To secure the device, go to the Security > Users page.
a. Change the admin password to something that is unique and strong
b. Edit existing accounts or create new ones as required

7. Configure Wi-Fi
You can skip this step if your AirLink MG90 deployment does not require Wi-Fi.
- On the LCI, go to the LAN > Access Points page.

- Configure Wi-Fi LAN as required for your application.

Change the friendly name to match the topology used (Wi-Fi 2.4, for example).
For detailed Wi-Fi LAN settings, please refer to Access Point Configuration in Chapter 16 of the Airlink MG90 Software Configuration Guide .
8. Configure GPS
On the LCI, go to the GPS page and configure local and remote GPS as required for your application.

For detailed GPS settings, refer to the GPS Tab chapter in the Airlink MG90 Software Configuration Guide .
9. Enable WAN recovery
On the LCI, navigate to the WAN > Recovery page, and then enable WAN recovery as required for your application. See WAN Link Recovery in the Setting Up the WAN chapter of the Airlink MG90 Software Configuration Guide .
10. Configure WAN Link policies
If multiple WAN links are to be used (such as Cellular + Wi-Fi), then Sierra Wireless recommends configuring their priority score, rather than relying on a dynamic priority policy. When using WAN Wi-Fi in mobile applications, setting either a signal strength or velocity policy will help minimize downtime when switching between WAN links.
Sierra Wireless recommends that you create as few policies as required to achieve your desired system performance.
Prioritize Wi-Fi if available: The MG90 does not automatically switch over to Wi-Fi when it becomes available, unless configured to do so.
Use the Dynamic Priority Policy to give Wi-Fi a higher score when it is available. Consider using a link down penalty with a recovery period to slow down the connection time to Wi-Fi to ensure a reliable link.
Wi-Fi smart switching: By default, the MG90 does not immediately switch over to cellular when it loses Wi-Fi signal. It will wait for 15 seconds after the Wi-Fi beacon disappears before switching.
To eliminate downtime due to switching, use the Signal Strength Policy or the Velocity Policy to switch from Wi-Fi to cellular.
For more information, see Setting up WAN Link Policies (Velocity Policy Overview and Signal Strength Policy Overview) in the Airlink MG90 Software Configuration Guide .
11. Prepare the device for deployment
Disconnect power – the MG90 is ready for installation in the vehicle. This device can also be used as your configuration “master”. You can use the AMM configuration management features to push this configuration to other AirLink MG90s. Please refer to the Airlink AMM Operation and Configuration Guide for more information on the AMM’s configuration management features.
Contact Sierra Wireless customer support if you have any issues. The first step should be to open a ticket on the Customer Support Portal or to contact the Support team at 1-877-687-7795.