Simulate a system with MQTTLens
 Searching...


Introduction
MQTTLens is a chrome application which supports MQTT communications. You can use it to simulate a single system communicating with AirVantage via MQTT.
Prerequisites
MQTTLens must be installed on your computer.
Understand the basics of MQTT. Refer to page for an introduction.
Step 1: Register your device
The first step is to declare a system in AirVantage, providing an identifier. We call this the Serial Number.
What is a system? A system is the AirVantage representation of any connected device, it includes:
- Gateway/modules providing the connectivity
- SIM cards providing access to the wireless network (optional)
- Some applications running on the connected device (embedded firmware & software)
An application must be associated within this system in order to define how it will communicate with AirVantage: protocol used, credentials, data sent and/or commands available.
The application we use in this tutorial defines MQTT communications sending 3 data types: temperature, luminosity and humidity. For your convenience, this application has already been published in AirVantage, so that you can use it.
To know more about applications and how to release your own application, refer to tutorial .
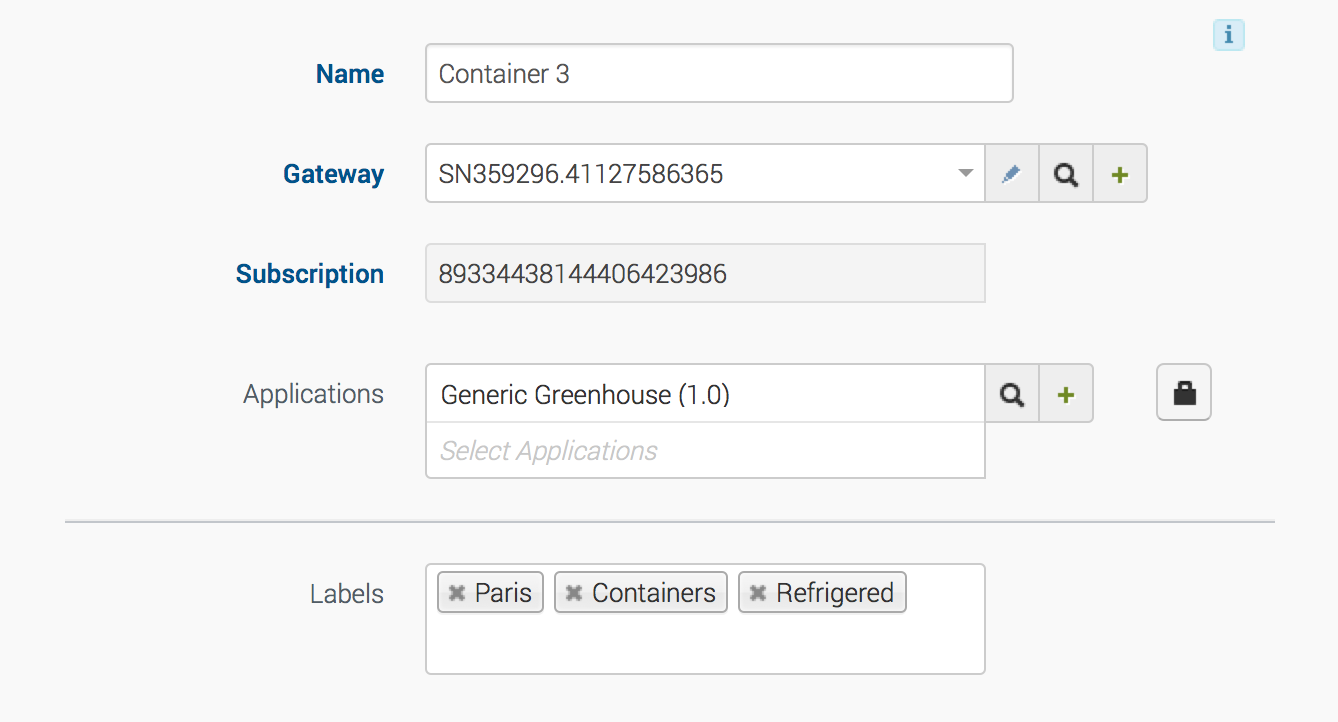
Add required information to your system
- Go to Monitor > Systems and select your system by checking the check box on the left
- Edit your system by clicking on Edit in the table’s menu More
- Add a gateway by clicking on the + button in the
Gatewaysection
- Specify the Serial Number. Remember it, you will use it in the next step
- Click on Create
- Associate your application, by clicking on the glass icon in the
Applicationssection - Search
Generic Greenhousein the filter Name - Click on the application
- Set a password by clicking on the padlock on the right, fill it and click on
Continue. Note it safely, as you will use it in the next step - Save your modifications
Step 2: Configure MQTT Lens
In the previous step, you specified a system and how it will communicate with AirVantage. Now let’s configure MQTTLens to connect and send data.
MQTTLens can send MQTT messages to AirVantage exactly like a real system.
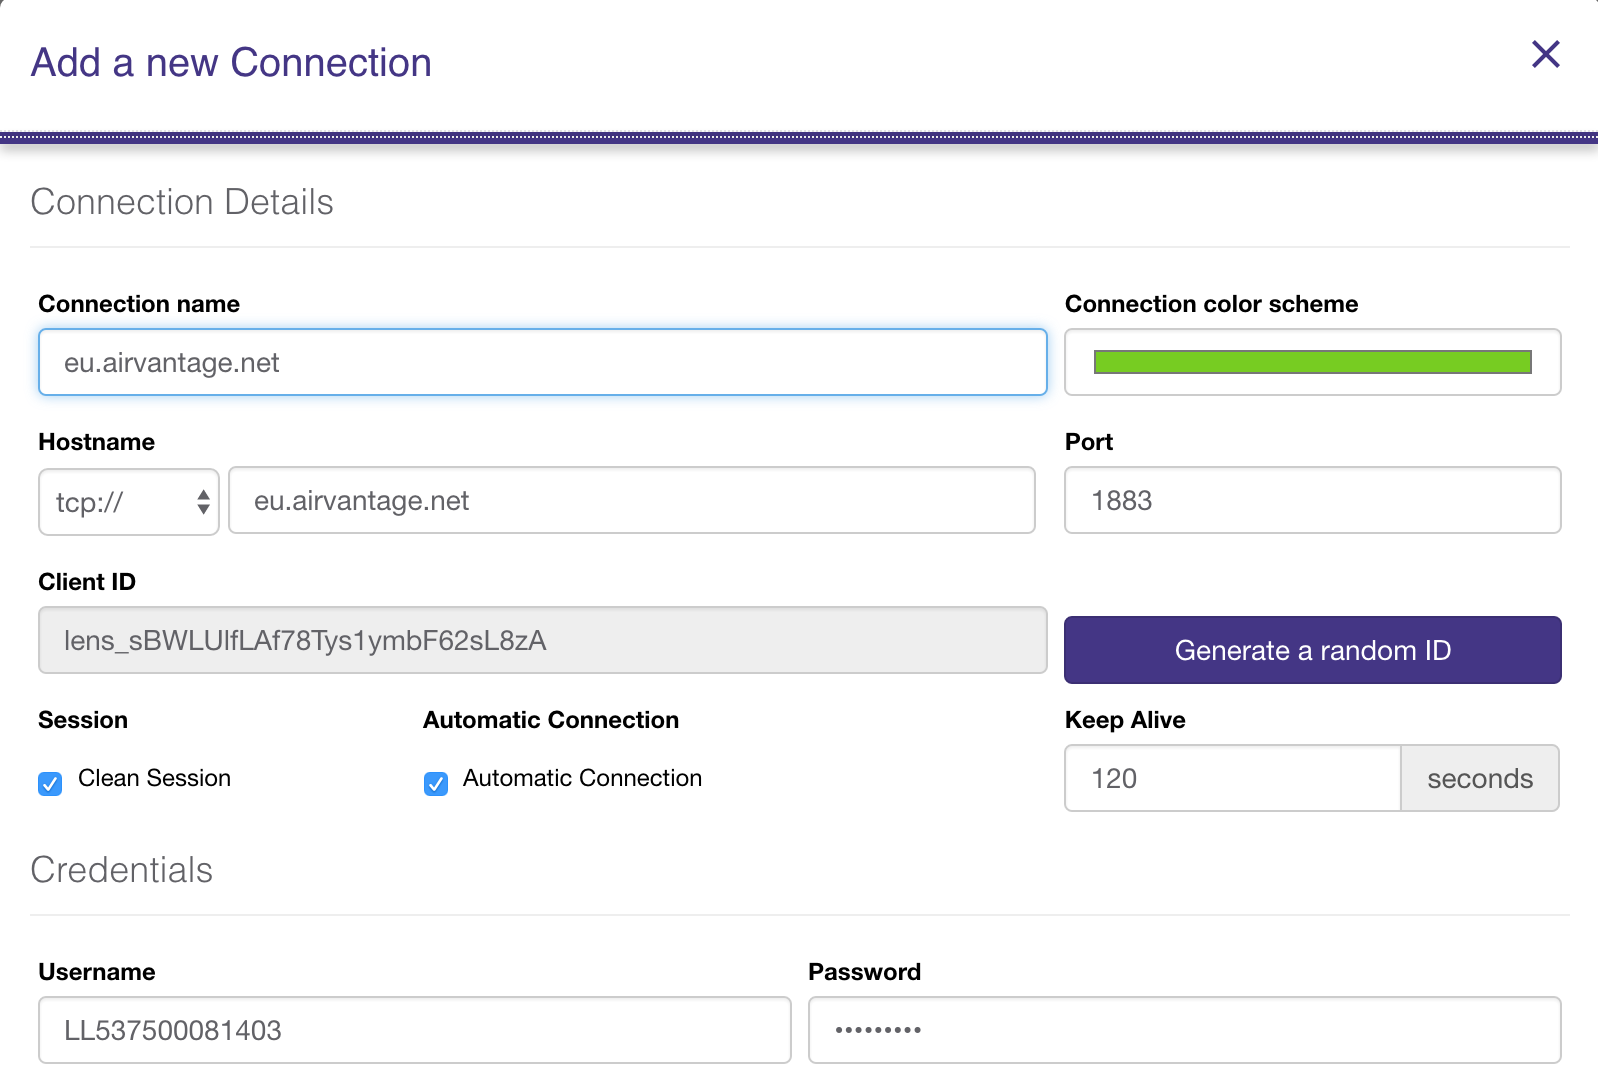
AirVantage address configuration
- Click on the + button to create a new connection
- Give it a name AirVantage
- Specify the hostname:
eu.airvantage.net(default port is correct) - Supply your credentials: fill
Usernamewith the Serial Number, and thePasswordwith the password your supplied in the previous step. - Click on
Save Changes
Your connection status must be green:

Subscribe to topics
Let’s subscribe to a topic in order to receive notification of commands from AirVantage.
The first line in MQTT Lens allows you to susbcribe to a topic. For command, you need to subscribe to {Serial Number}/tasks/json
Thus fill in the Subscribe field accordingly and click on the Subscribe button on the right:

A new line is added at the bottom of the MQTTLens screen:

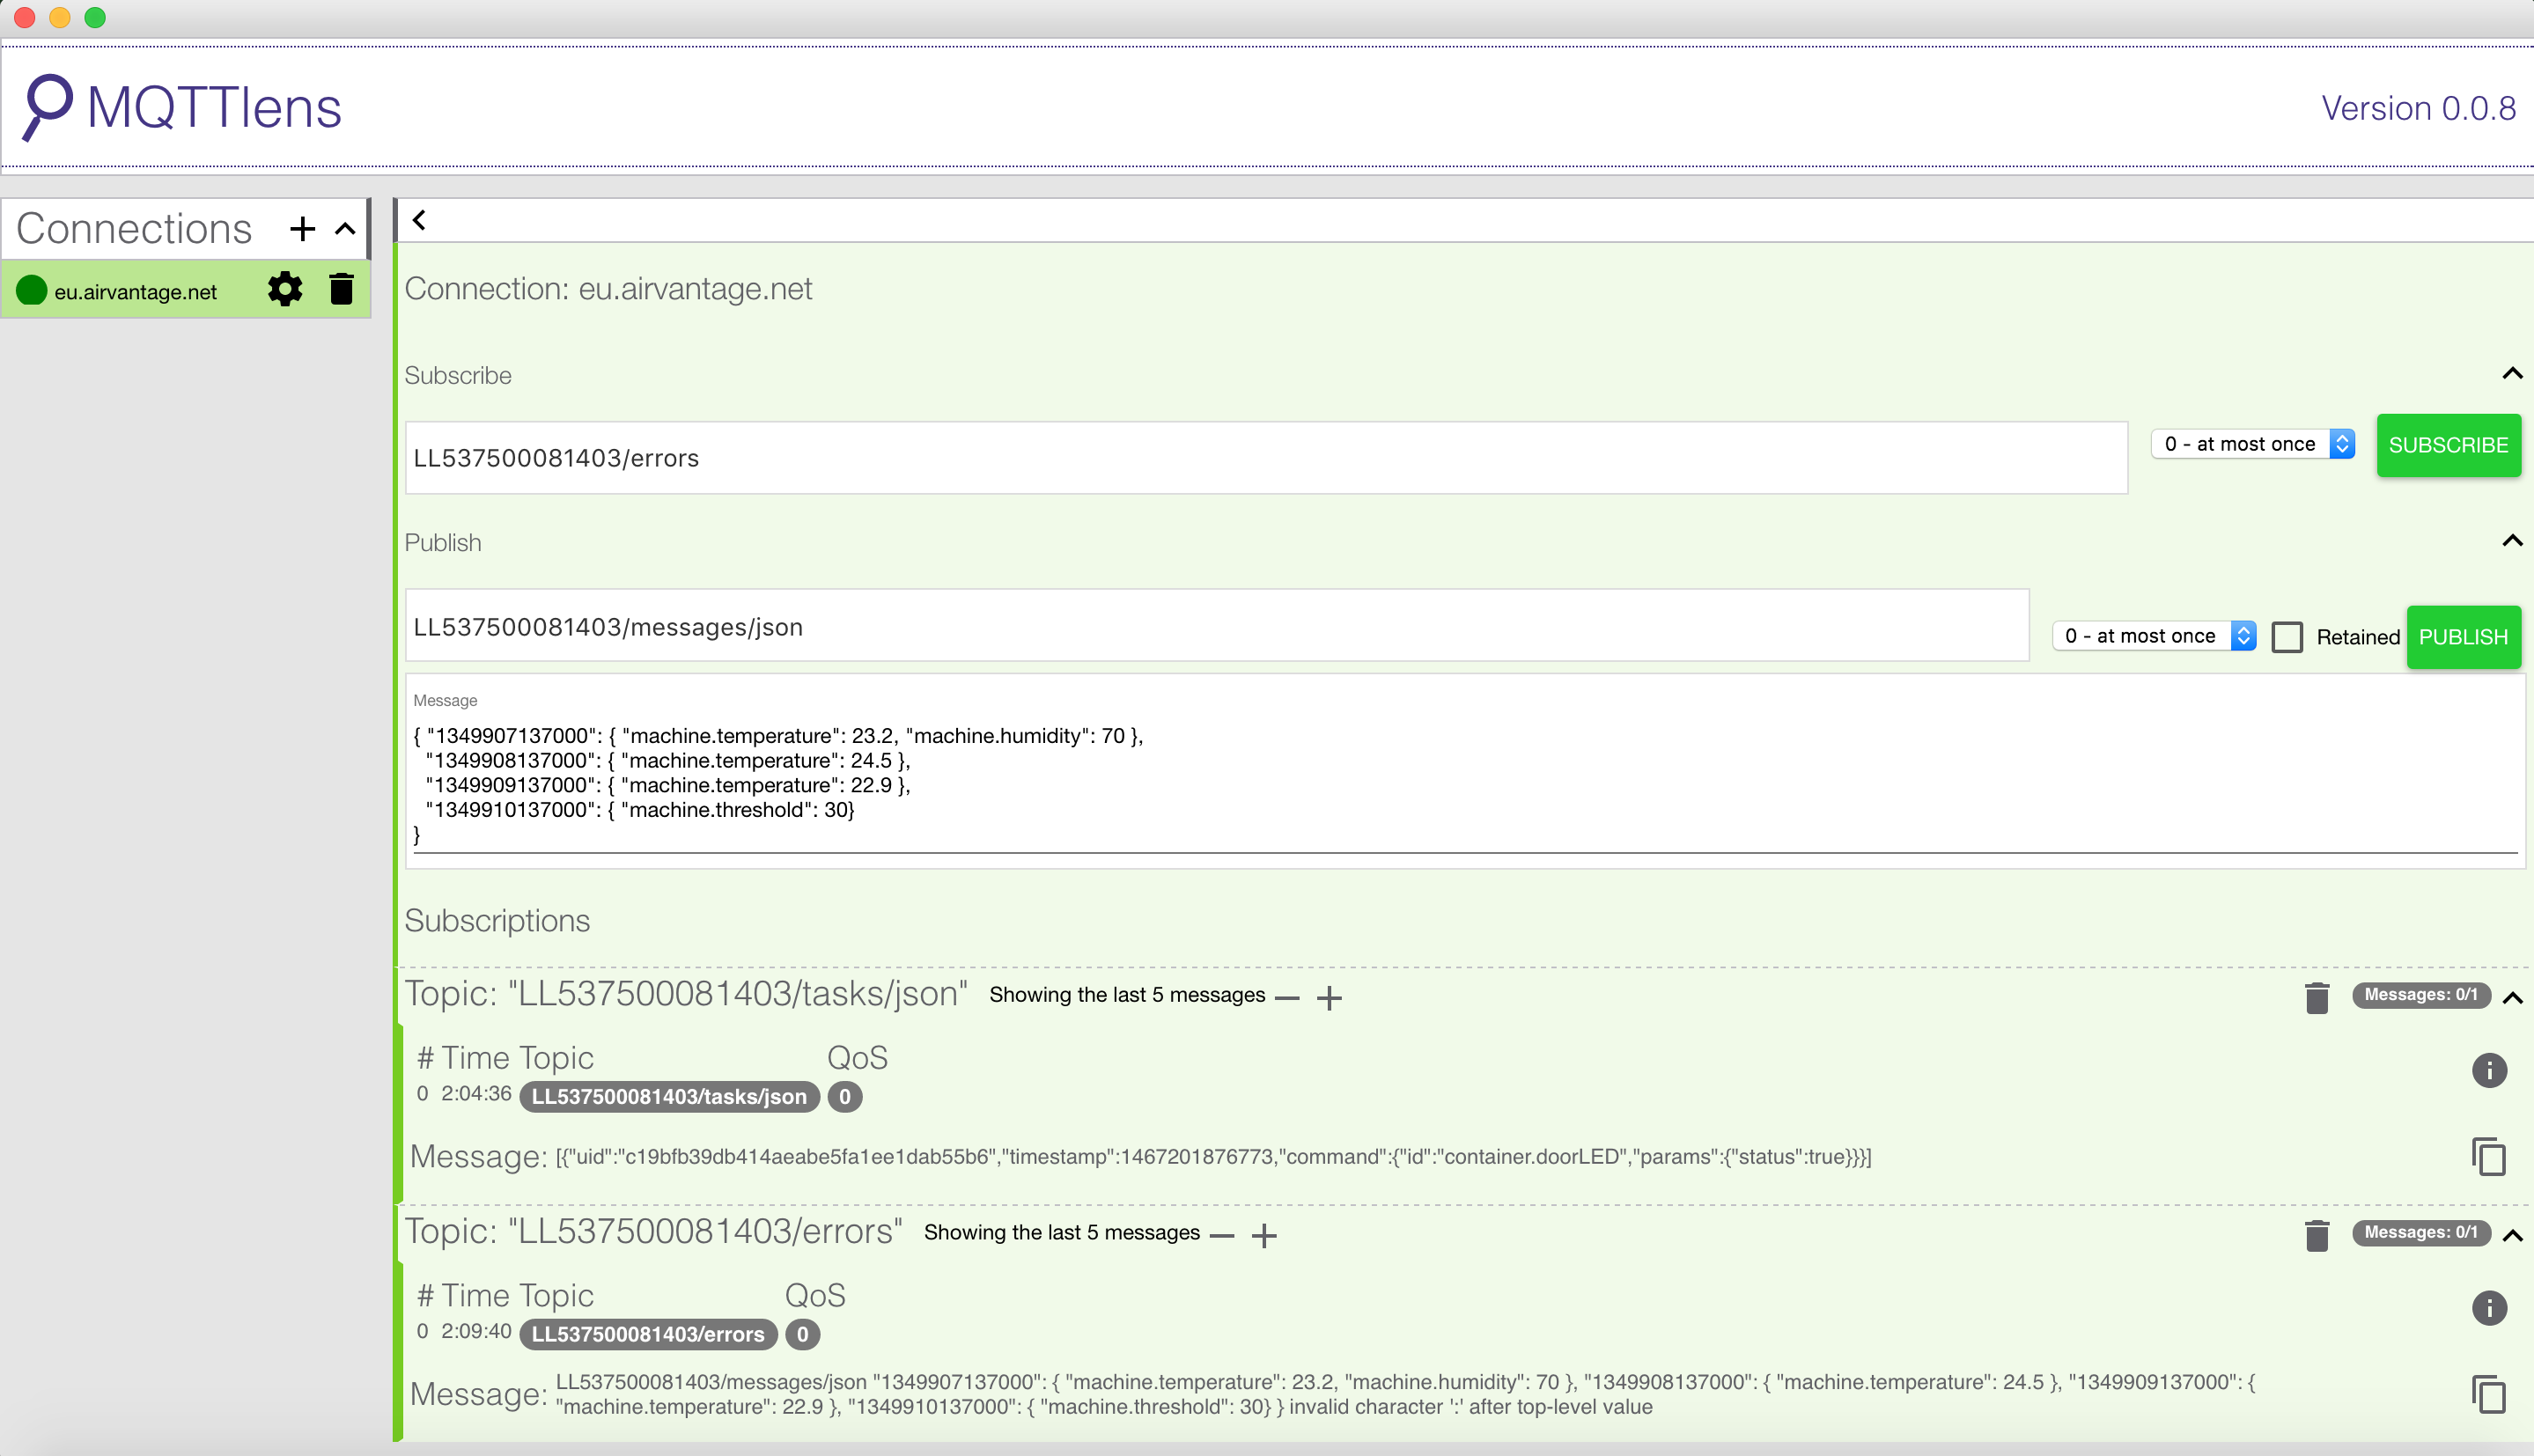
You can subscribe to the errors topic:
{Serial Number}/errorsto be notified when a payload will occur, later in this tutorial.
Step 3: Send data and receive commands
MQTT Lens is now connected to AirVantage. Let’s start by sending data and then receive a command.
Send data to AirVantage
Sending data to AirVantage consists in sending to a topic called {Serial Number}/messages/json
the following json content:
{ "1349907137000": { "machine.temperature": 23.2, "machine.humidity": 70 },
  "1349908137000": { "machine.temperature": 24.5 },
  "1349909137000": { "machine.temperature": 22.9 },
  "1349910137000": { "machine.threshold": 30}
}
As in this screenshot:

You can check the data has been sent by looking at the system in AirVantage:
- Go to Monitor > Systems and select your system with the check box on the left
- Click on the Timeline button to see the timeline of communications for the device: MQTT connections and data sent.
- or Click on the Green house application in your system to access the history of values sent for each data type defined for this application.
To learn more about the AirVantage json format, refer to page
Troubleshoot payload errors
To receive notifications when AirVantage cannot understand the payload sent, AirVantage provides a topic you can subscribe to. As an example showing what happens when you send a bad paylod, you can try to publish the following payload with a missing } char at the beginning of the message :
 "1349907137000": { "machine.temperature": 23.2, "machine.humidity": 70 },
  "1349908137000": { "machine.temperature": 24.5 },
  "1349909137000": { "machine.temperature": 22.9 },
  "1349910137000": { "machine.threshold": 30}
}
You will receive this notification:

Receive and acknowledge commands
On AirVantage, in the system details, click on the menu More on the top.
- Select your application (Generic Greenhouse)
- Select your command and parameter
- Click on Send Command button
You can check the status of this operation in AirVantage.

Send back the operation uid provided in the command to acknowledge it and update the status Failed or Success in AirVantage. In the publish section:
- Fill the topic name with
{Serial Number}/acks/json - The payload with one of the following content:
Note you have to use the
uidfrom the task’s message (see above for an example) not from the command’s operation in the ui.
To receive success acknowledgements (change the uid accordingly), status must be OK:
[
    {"uid": "8006cc58ba2141f69161a78f1bfdea1d", "status" : "OK"}
]
or for failed acknowledgement (change the uid accordingly), set status to any other value except OK (ERROR, KO):
[
    {"uid": "3c12547b613740adb686271bdc8f097c", "status" : "ERROR", "message" : "Crashed in flames! Error code: 12345"}
]

You now know how to simulate a single system in order to understand how your system can communicate to AirVantage or to generate specific business contente in order to test accurately your APIs without any real system.
Next Steps
If you wish to simulate a fleet of systems, refer to tutorial .
To learn more about MQTT, use the resources from this page . On this page, you can access the time series format, which allows your device to send a compressed data history to AirVantage.
To know more about errors topic, refer to page .
To learn more about communicating with AirVantage via MQTT, refer to page
And please also take a look at our tutorials , which explain how to develop embedded applications!