AMM provides functionality to display the GPS Vehicle ID on the AMM dashboard, enabling easy identification and tracking of vehicles.
In order to display the GPS Vehicle ID on the AMM dashboard, there are three steps that need to be taken:
Set the GPS Vehicle ID on the MGOS device : this can be done directly on the MGOS device, using AMM templates, or by uploading a CSV file.
Create/modify post-sysinit script on the MGOS device : on boot up of the MGOS device, the script will read the GPS Vehicle ID from the configuration and send it as an event to the AMM
Configure dashboard of the AMM to display GPS Vehicle ID
Initializing Table Of Contents...
GPS Vehicle ID on MGOS device
The GPS Vehicle ID can be customized and configured when utilizing TAIP (Trimble ASCII Interface Protocol) messaging. Refer to the MG90 Software Configuration Guide for more details on how to configure the GPS Vehicle ID on the MGOS device.
Configure GPS Vehicle ID using AMM Template
Use the following procedure to configure the GPS Vehicle ID using an AMM Template.
From the AMM dashboard, select Configuration > Templates
Select Add to create a new template
Specify the Platform to be MG90 and the Target Version to be the current version that the MG90 is running, so that it will not upgrade. Select Next.
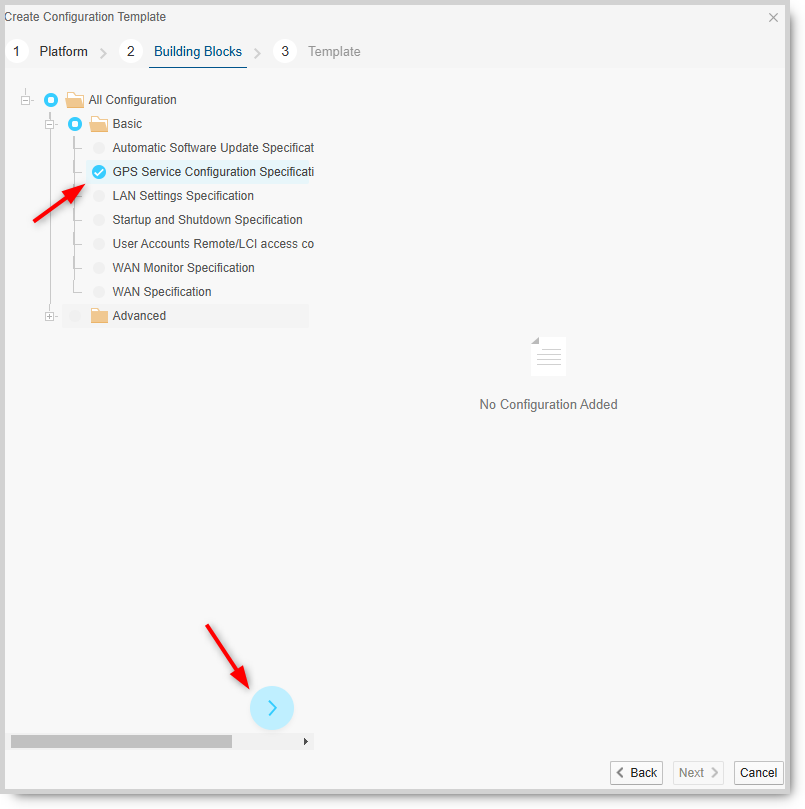
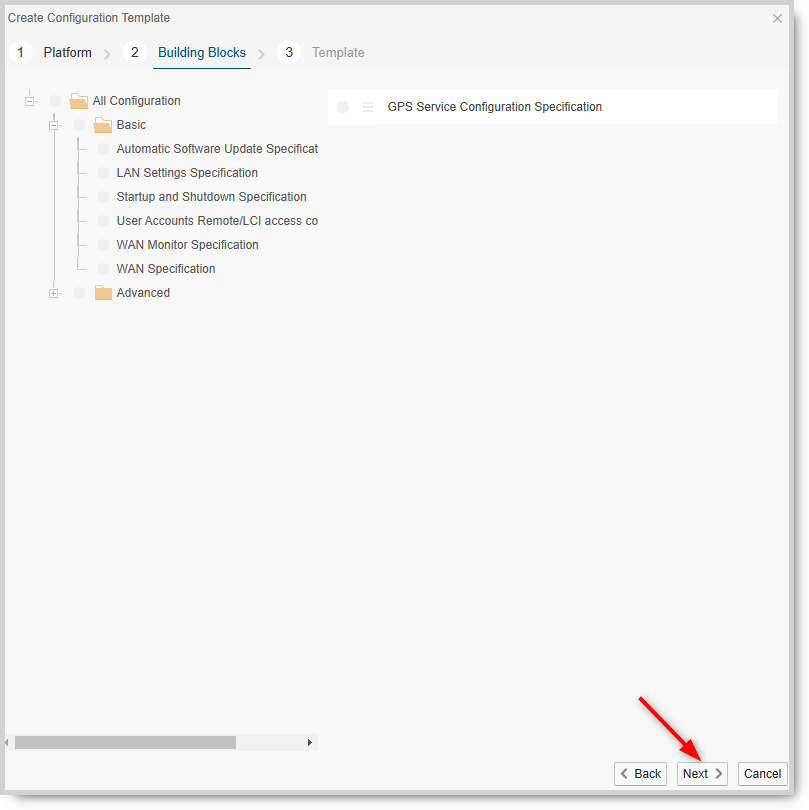
Select GPS Service Configuration Specification and then
to move it to the right column. Select Next.
Enter a Template Name
Select the Owner Group for which the template will be available for
Under the TAIP section, set Enable to yes
Specify the Fastest Report Interval.
Select the Response
Specify the Top of Hour
Enter the Vehicle ID. This consists of four 7-bit ASCII alphanumeric characters. E.g. A123
Select Submit to save the template
In the list of Configuration Templates, select the template you just created and it will open the template so that you can edit it. Then select Publish. The template will be published as revision 1. Select Publish to publish it.
In the left hand tree, select the MG90 router(s) that you will be applying this template to.
In the right hand panel, select the template.
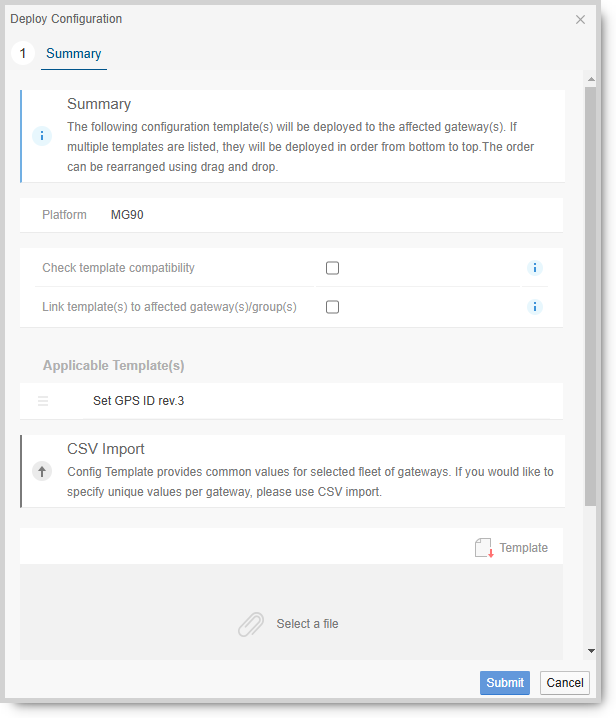
Select Deploy
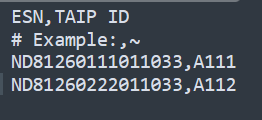
If you are configuring the GPS Vehicle ID on more than one gateway, select
and it will download a template of the file that allows you to configure multiple GPS Vehicle IDs. The format of the CSV template file looks like this:
Once you have configured the CSV template file with the GPS Vehicle IDs, select
to upload the file.
Scroll down, and verify that the Affected Gateway(s) column identifies the correct number and name of the MGOS device that the template is being applied to
Select Submit
Go to the Admin > System > Operations to see the status of the template deployment or select the shortcut displayed to verify that the operation was succesful.
Check for post-sysinit file on AMM
To show the GPS Vehicle ID on the AMM dashboard, a script with the necessary commands must be installed on the MGOS devices. To confirm if a script already exists, use the following procedure.
On the AMM dashboard, go to Configuration > Deployment > Configuration Control
For a MGOS device, under the Files column, select Click to display files…
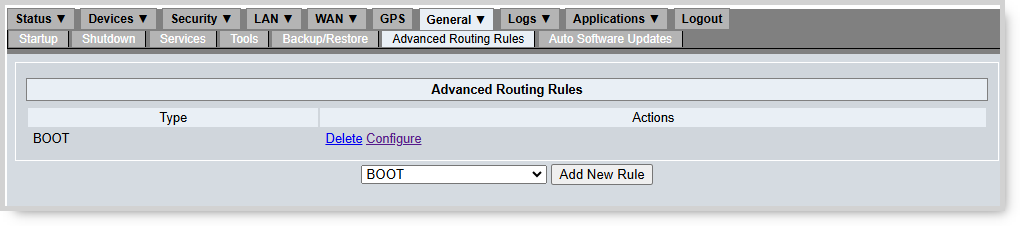
Go to General > Advanced Routing Rules > BOOT > Add New File
Paste the following code snippet into the file.
#!/bin/bash
VEHICKLE=$(awk '/vehicleId:/ { print $2 }' /opt/inmotiontechnology/config/gps.yaml)
if [ "$VEHICKLE" == "~" ]; then
   /usr/bin/logger -t VehicleIdCheck "the vehicle id is tilde"
   exit 1
elif [ "$VEHICKLE" == "" ]; then
   /usr/bin/logger -t VehicleIdCheck "the vehicle id is blank"
   exit 2
else
   /usr/bin/logger -t VehicleIdCheck "the vehicle id is "$VEHICKLE""
   delsinject 1 0 0 0 "<Vehicle ID>=<$VEHICKLE>"
   exit 0
fi
Save the file and reboot.
Confirm that the post-sysinit file is showing on the AMM, after the MGOS device is fully booted up again. Refer to Check for post-sysinit file on AMM
Alternatively, you can also create the post-sysinit file on your local computer using a text editor, such as vim and upload the file to the MGOS device.
If you want to create the post-sysinit file on a Windows PC by utilizing a text editor like Notepad++, then make sure that you enable the EOL Conversion to Unix (LF) format instead of the default Windows (CR LF) format. Without this conversion, the “CR LF” end-of-line characters may lead to unexpected behavior on the AMM side.
Create a text file named post-sysinit
Paste the following code snippet into the file
#!/bin/bash
VEHICKLE=$(awk '/vehicleId:/ { print $2 }' /opt/inmotiontechnology/config/gps.yaml)
if [ "$VEHICKLE" == "~" ]; then
   /usr/bin/logger -t VehicleIdCheck "the vehicle id is tilde"
   exit 1
elif [ "$VEHICKLE" == "" ]; then
   /usr/bin/logger -t VehicleIdCheck "the vehicle id is blank"
   exit 2
else
   /usr/bin/logger -t VehicleIdCheck "the vehicle id is "$VEHICKLE""
   delsinject 1 0 0 0 "<Vehicle ID>=<$VEHICKLE>"
   exit 0
fi
Save and exit the file.
On the AMM dashboard, select the MGOS device which the file will upload to
Select Configuration > Deployment > Configuration Control and confirm that the MGOS device has a State of In Sync. If not, then select the MGOS device and select Revert to retrieve the current configuration from the device. If there are no issues, the State should change to In Sync
On the AMM dashboard, select Configuration > Deployment > Upload
Select Choose File, and specify the newly created post-sysinit file
Select Upload
Select Configuration > Deployment > Configuration Control
Select the MGOS device that you have uploaded the file to. The State should be Pending(sync to device). If the State is In Sync, confirm that the # of files has increased by 1. Refer to Check for post-sysinit file on AMM
If the State is Pending(sync to device), then select Sync Now to apply the file to the MGOS device
Go to General > Advanced Routing Rules > BOOT > Configure
Copy the code snippet below
VEHICKLE=$(awk '/vehicleId:/ { print $2 }' /opt/inmotiontechnology/config/gps.yaml)
if [ "$VEHICKLE" == "~" ]; then
   /usr/bin/logger -t VehicleIdCheck "the vehicle id is tilde"
elif [ "$VEHICKLE" == "" ]; then
   /usr/bin/logger -t VehicleIdCheck "the vehicle id is blank"
else
   /usr/bin/logger -t VehicleIdCheck "the vehicle id is "$VEHICKLE""
   delsinject 1 0 0 0 "=<$VEHICKLE>"
fi
Paste it at the top of the post-sysinit script after the #!/bin/bash line
Save the file and reboot.
Alternatively, you can also add the code snippet to the existing post-sysinit script using the AMM.
On the AMM, select the MGOS device that you want to modify
Select Configuration > Deployment > Configuration Control
Select Click to display files
Click on the post-sysinit and the AMM will open a new window with the contents of the post-sysinit displayed.
Paste the following code snippet into the file after the #!/bin/bash line
VEHICKLE=$(awk ‘/vehicleId:/ { print $2 }’ /opt/inmotiontechnology/config/gps.yaml)
if [ “$VEHICKLE” == “~” ]; then
   /usr/bin/logger -t VehicleIdCheck “the vehicle id is tilde”
elif [ “$VEHICKLE” == “” ]; then
   /usr/bin/logger -t VehicleIdCheck “the vehicle id is blank”
else
   /usr/bin/logger -t VehicleIdCheck “the vehicle id is “$VEHICKLE””
   delsinject 1 0 0 0 “=<$VEHICKLE>”
fi
Select Save
The State will change to Pending(sync to device).
Select Sync and the state should change to In Sync
Once the post-sysinit has been configured on the MGOS device, reboot it. Verify the stat is sent to the AMM. Use the Stats tab or the Events tab to search for Vehicle to verify that the correct value is set.
Configure Vehicle ID on dashboard
Once the MGOS device has been configured, the AMM needs to configure the StatVehicle ID to be added to the dashboard.
On the AMM, select Admin > Devices > Threshold > Add
Enter the Label and, Group or gateway.
Select the Stat Vehicle ID
Adjust any other values as needed
Select Save
Note: If the Vehicle ID is a numeric, the AMM dashboard will display it enclosed in quotes. However, if the Vehicle ID is alphanumeric, it will be displayed without quotes.

 Initializing Table Of Contents...
 to move it to the right column. Select Next.


 and it will download a template of the file that allows you to configure multiple GPS Vehicle IDs. The format of the CSV template file looks like this:
 to upload the file.
 to move it to the right column. Select Next.


 and it will download a template of the file that allows you to configure multiple GPS Vehicle IDs. The format of the CSV template file looks like this:

 to upload the file.