Transitioning AirLink Gateways from ALMS to the AMM
This section describes how to transition AirLink gateways which are currently managed through the AirLink Management System (ALMS), to report to an AMM instead.
Overview
The figure below shows an example AirLink device in ALMS
called Warren’s GX450, that is to be transitioned to an AMM:
An AirLink Device Managed on ALMS that is to be transitioned to an AMM.
Note: If the gateway(s) cannot access ALMS, the changes listed below can be performed locally using ACEmanager on each device. This is useful for example, when an on-premise AM/AMM is in use because your company’s policy forbids gateways from connecting to the public Internet, and therefore ALMS access is unavailable.
Performing the Transition
To perform a transition, first log in to ALMS.
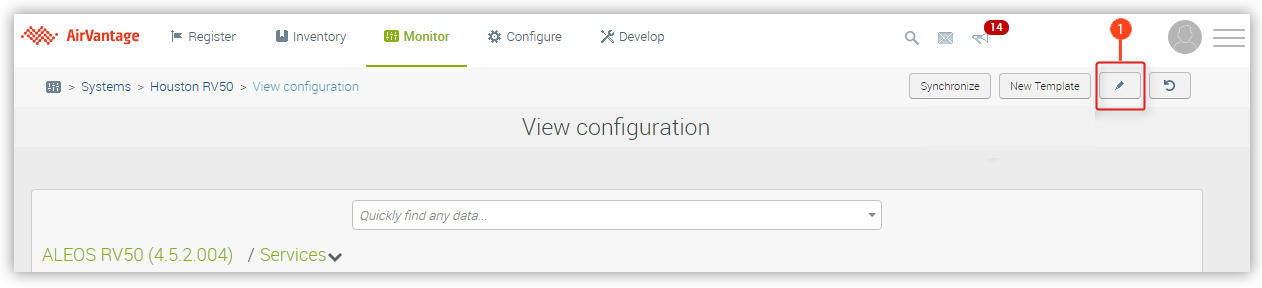
Once logged in, access the Monitor > Systems page and select a device that you want to redirect to an AMM from the main grid. Access the device Configuration screen by clicking Configuration
at the top of the Device screen as shown in the figure below:
Accessing the Configuration Screen.
Click on the Edit button
to display the settings screen where configuration settings can be changed, as shown in the figure below:
Accessing the Configuration Settings Screen.
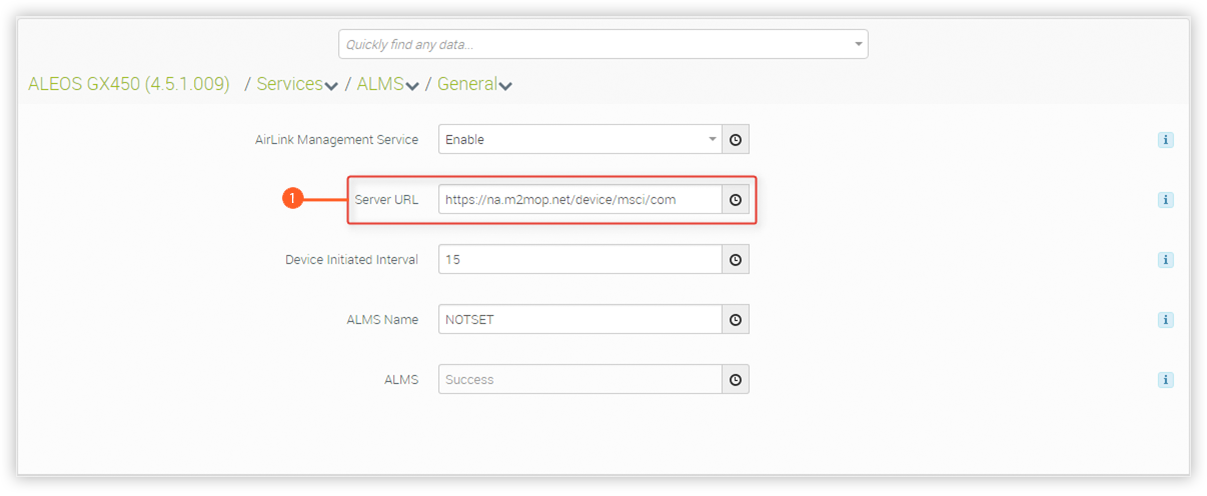
The gateway is currently configured to report to ALMS as shown in
in the figure below:
Current Server URL of the Device to Transition from ALMS.
update the Server URL field
to point to the IP address or URL of the AMM and set TLS Vertify Peer Certificate
to Disable as shown in the figure below:
Setting the Server URL for a Device with Firmware 4.6.x and later.
Note: If HTTP Server And ACEview Services is enabled and used on port 8082, communication with the AMM is performed in clear text and device password management is not supported.
In addition to setting the Server URL for devices with Firmware 4.6.x and later, the protocol must also be set. To set the protocol, navigate to the AirLink Management Service settings and select MSCI for the ALMS Protocol field
as shown in the figure below:
Setting the ALMS Protocol for Devices with Firmware 4.6.x and later.
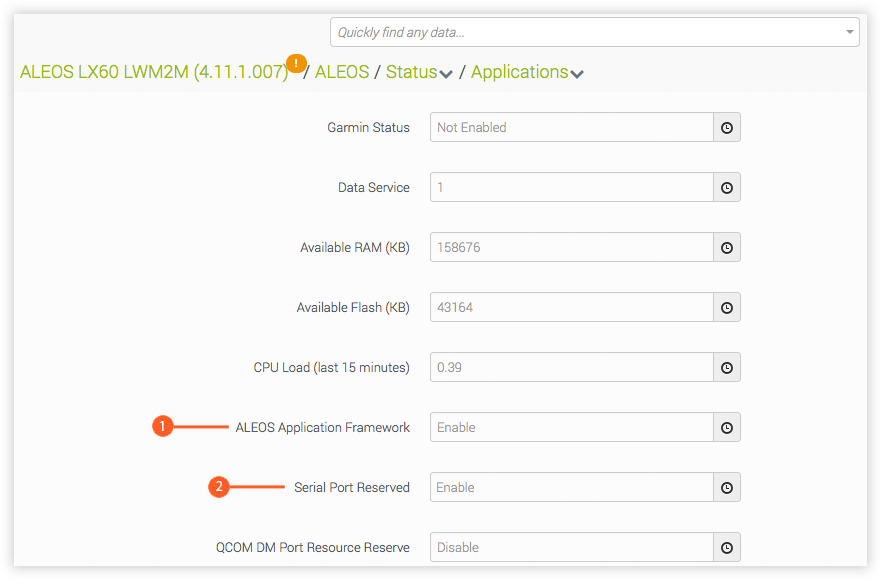
(Optional) In order to make use of applications such as automatic log uploading and telemetry/streamed GPS, set ALEOS Application Framework
to Enable. To use vehicle telemetry, also set Serial Port Reserved
to Enable:
Using a Template to Configure a Fleet of Gateways
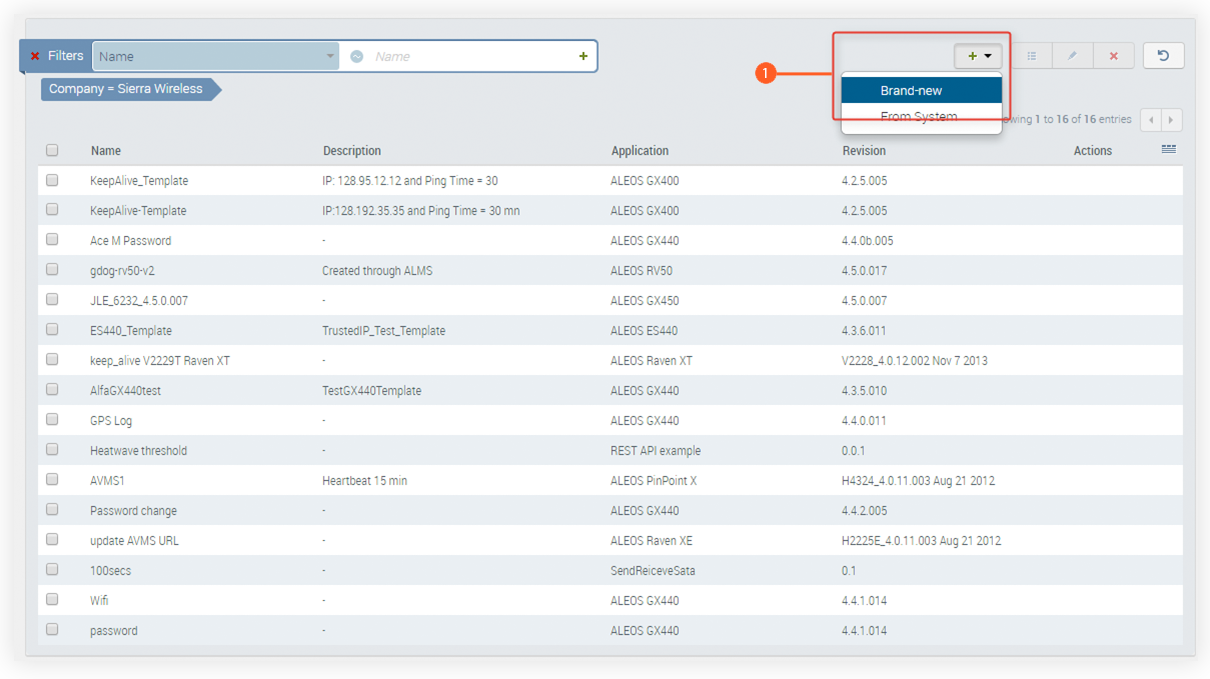
To perform the process described above for a fleet of gateways, use the following steps to create a template:
Log in to ALMS.
Navigate to Configure>Templates.
Click the green “+” dropdown and select Brand-new:
Creating a new Template.
Select the appropriate firmware for the type of gateway being transitioned. In the example above, a GX450 (ALEOS GX450 (4.5.1.009)) is being transitioned. For multiple gateways of different types, a separate template will need
to be created for each gateway type.
Tip: the amount of work required to transition gateways can be significantly reduced by first updating all of gateways to a consistent (and ideally latest) version of the firmware for each gateway type. Use the Update status widget on the main dashboard to see the current state of the fleet, and upgrade those gateways that are not current.
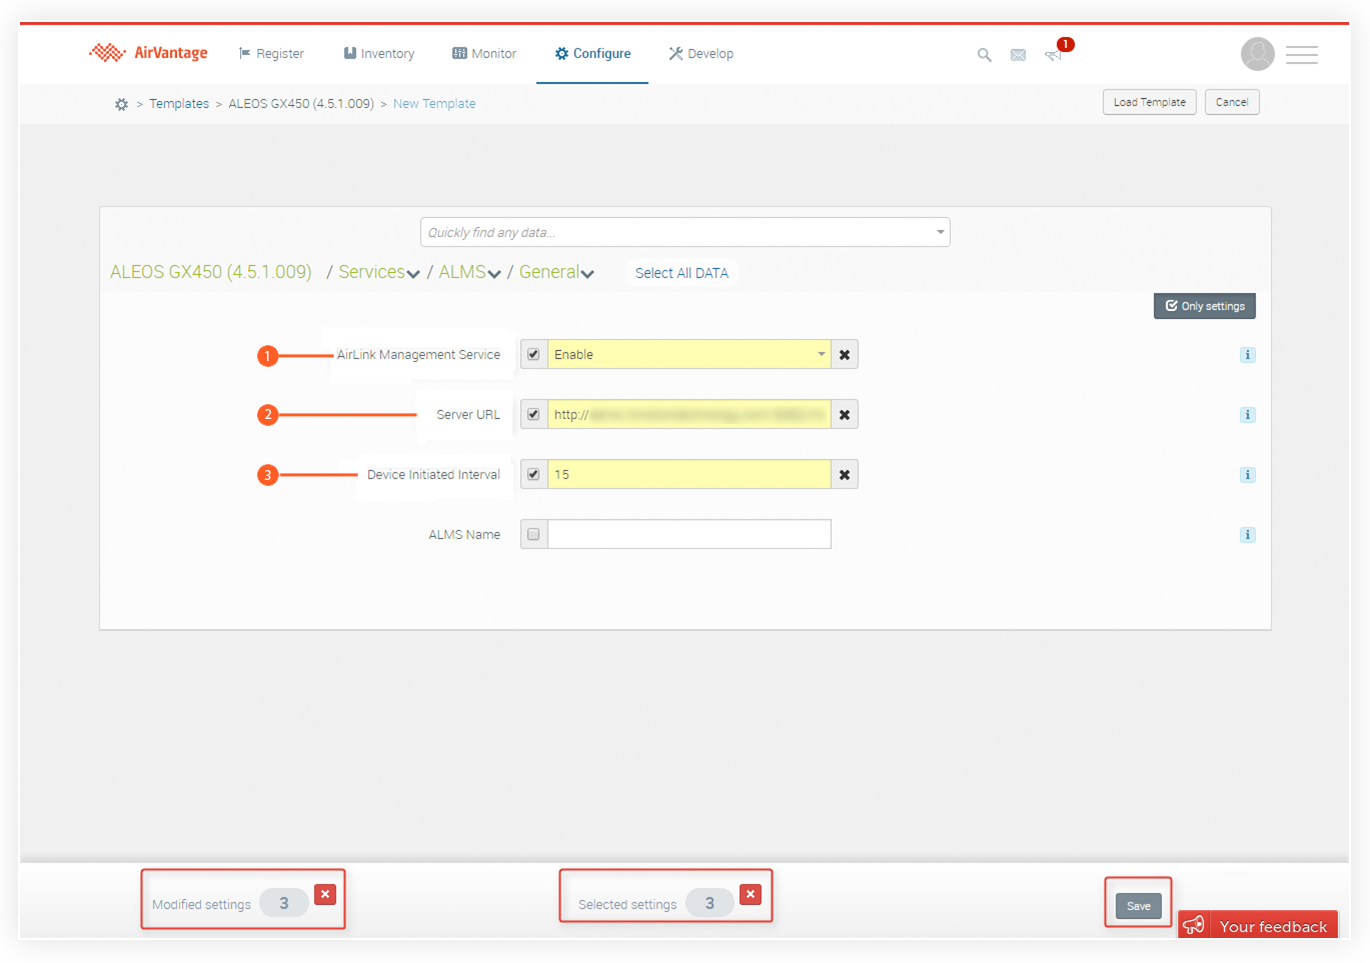
For devices with Firmware 4.5.x and lower: ensure the following fields have been configured in the Services/ALMS/General section:
AirLink Management Service: set to enabled.
Server URL: set to either of the following: http://ip_address:8082/msci or https://ip_address:8083/msci
Notes:
“msci” is case-sensitive and must be entered using lower-case letters.
the IP address can be replaced with a fully qualified domain name.
Device Initiated Interval: set to the preferred communication frequency. For an on-premise AMM, the frequency can be set to a low as one minute.
Setting the Configuration Fields for Devices with Firmware 4.5.x and lower.
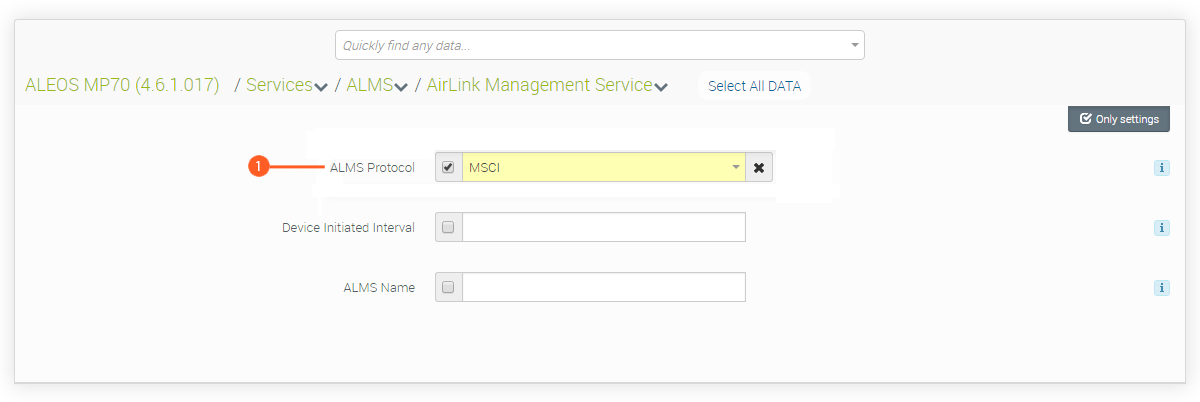
For devices with Firmware 4.6.x and above: ensure the following field has been configured in the Services/ALMS/AirLink Management Service section:
ALMS Protocol: set to MSCI.
Setting the ALMS Protocol for Devices with Firmware 4.6.x and above.
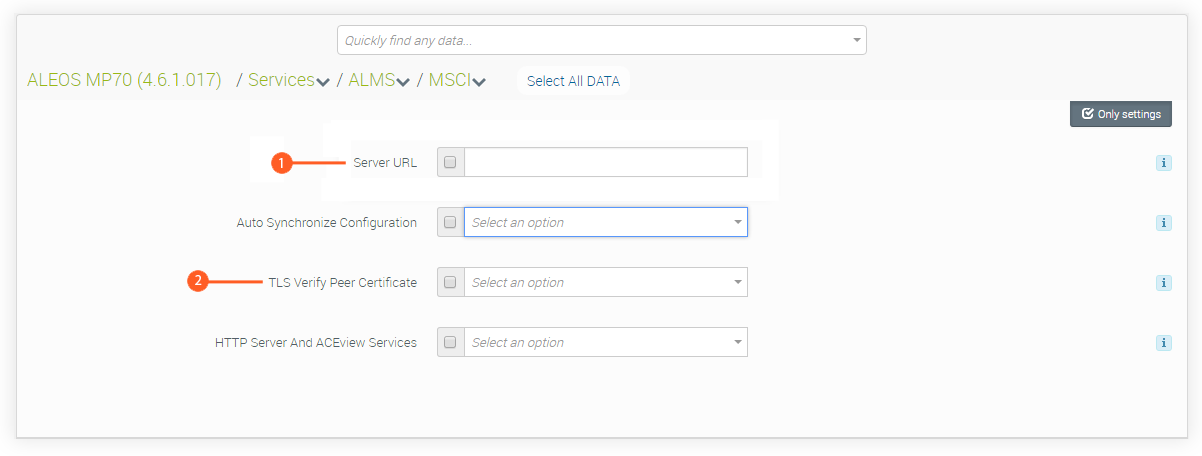
Also ensure the following fields have been configured in the Services/ALMS/AirLink Management Service section:
Server URL: set to either of the following: http://ip_address:8082/msci or https://ip_address:8083/msciTLS Verify Peer Certificate: set to Disable. Note that this option can be enabled for additional security if a suitable TLS-capable certificate has been installed on the server during the installation process.
Setting the Server URL for Devices with Firmware 4.6.x and above.
Note: If HTTP Server And ACEview Services is enabled and used on port 8082, communication with the AMM is performed in clear text and device password management is not supported.
(Optional) In order to make use of applications such as automatic log uploading and telemetry/streamed GPS, set ALEOS Application Framework
to Enable. To use vehicle telemetry, also set Serial Port Reserved
to Enable:
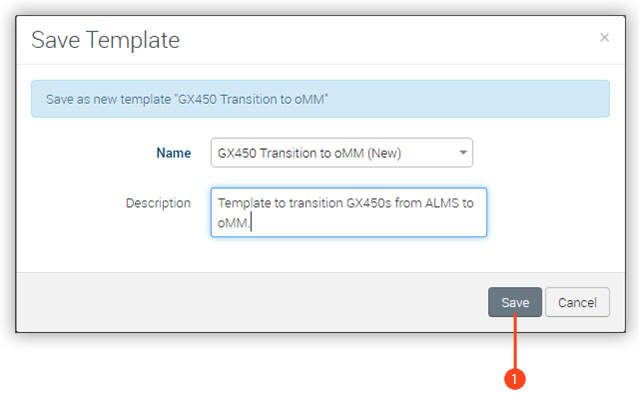
Click Save at the bottom of the screen.
Name the template, provide a description, and click Save on the Save Template dialog:
Naming the Template.
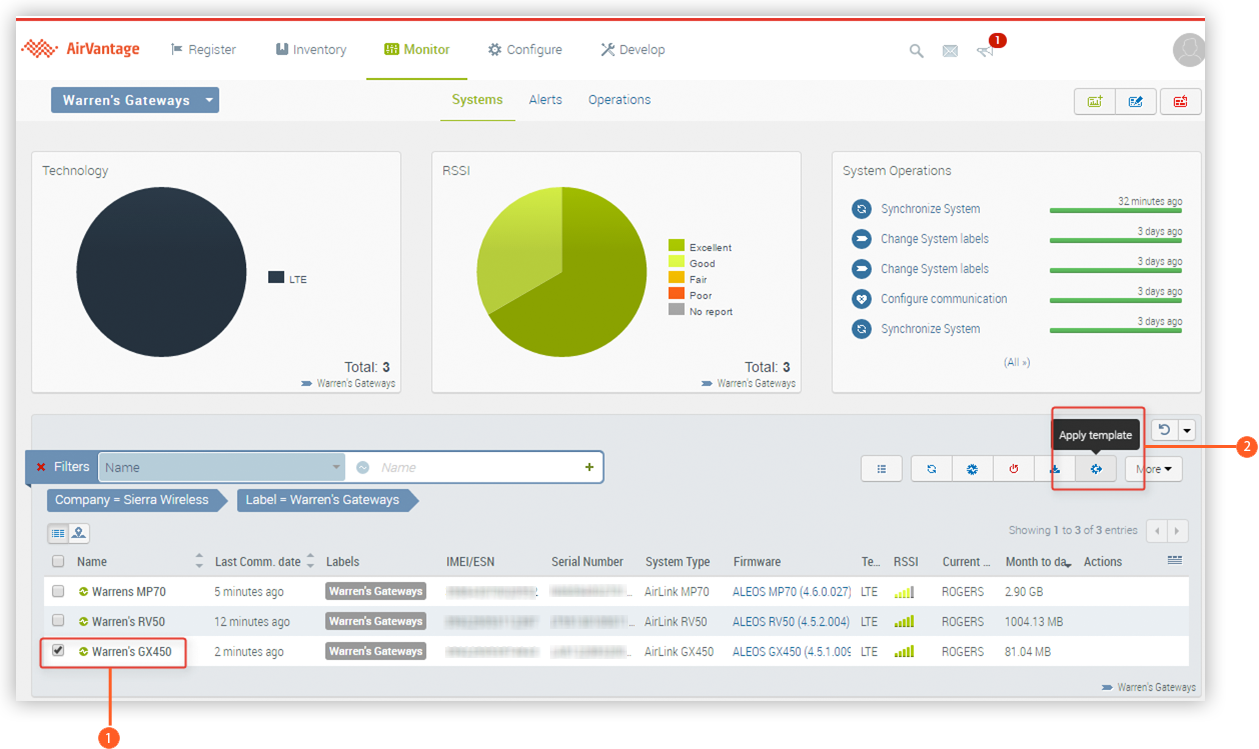
Navigate to the Monitor > System page in ALMS.
Select the appropriate device (e.g. Warren’s GX450
) in ALMS and click Apply template
:
Selecting a Device.
Select the newly created template and click Apply template. Choose to reboot the device and optionally schedule the reboot in Advanced Settings. An Apply Settings operation is launched. The next time the gateway checks in, it will apply the template, reboot the gateway, and have it redirected to the AMM.
Log out of ALMS,
Log in to the AMM.
Navigate to Admin > Gateways.
Click Add at the bottom of the screen.
Pre-populate the follow required details of the gateway, as they should appear in the AMM and click Save
:
Pre-Populating Gateway Details.
ID: Use the serial number of the gateway.
Name: Enter a friendly name.
Group: Preselect the group to place the gateway into. Use the Admin > Groups feature to create groups, if they do not exist.
For additional information about adding a gateway see: Gateways
.
Note::
The other fields are optional.
As an alternative to adding individual gateways to the AMM one by one as described in steps 13 to 15 above, oMM 2.15.1.1 and above supports adding multiple gateways using a template. This can also be used to organize gateways into desired groups. See Adding Multiple Gateways to an AMM for more information.
Once the gateway receives its updated device management reporting location and checks in to the AMM, the device will show up either in the main directory listing, or in the folder that was pre-populated when the gateway was registered.
 Searching...
 called Warren’s GX450, that is to be transitioned to an AMM:
 at the top of the Device screen as shown in the figure below:

 to Disable as shown in the figure below:
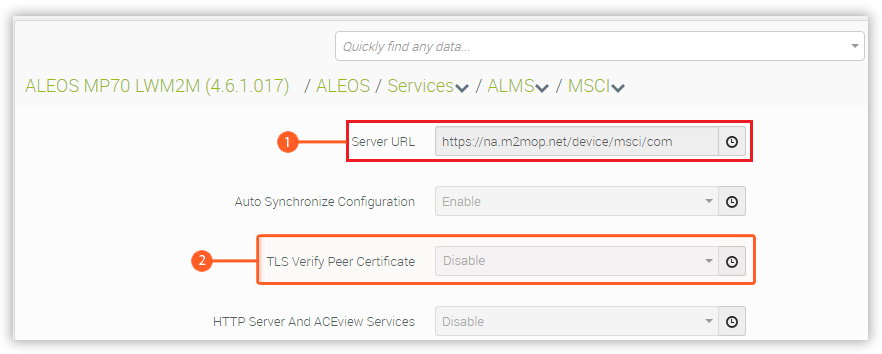


 Device Initiated Interval: set to the preferred communication frequency. For an on-premise AMM, the frequency can be set to a low as one minute.
 :
:


 :
:
 Name: Enter a friendly name.
 Group: Preselect the group to place the gateway into. Use the Admin > Groups feature to create groups, if they do not exist.