 Searching...
Zones
The Zones panel can be used to identify, add, and delete zones (e.g. virtual boundaries or geofences). Zones allow administrators to monitor vehicles in different ways. For example, if a vehicle is expected to only travel within a certain area, a threshold can be set up that triggers an alert when the vehicle leaves a zone.
Note: From AMM 2.17.2 onwards, zones created by parent groups are automatically visible to sub-group users.
Note: for ALEOS routers, the communication frequency with the AMM determines the accuracy of threshold triggers with respect to zone boundaries.
Zones Panel

The map area provides the following controls:
Map Area Controls

 Adds a new zone.
 Removes the selected the point.
 Clears the zone from the map (note that once cleared, there is no way to retrieve the zone).
 Locates a location on the map.
 Displays other zones on the map.
 Imports an existing zone into the new zone. Using an existing zone provides a starting point and can facilitate quicker zone creation.
 Enters advanced mode where zones can be defined by entering raw latitude/longitude position pairs below the map. Clicking Update below the map in this mode saves the coordinates and returns to standard zone editing mode.
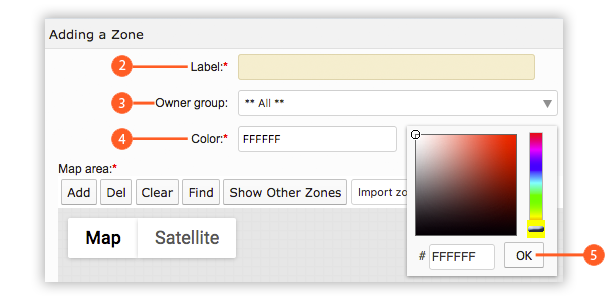
Adding a new zone
- Click on the Add button (located at the bottom of the zone list screen) to open the Adding a Zone panel and edit the following:
 Label*: enter the name for the new label.
Note: Only use letters, numbers, spaces and dashes. Other characters are not supported and could cause unintended behaviour.
 Owner group: use the drop-down menu to select the preferred group.
 Color*: click to open the color picker or enter the 5-digit code (if known). Select a color and then click the OK button
  .
.
Zone Configuration Screen
- The default map is a view of the world. Zoom in on the map to the area in which to create the new zone.
- On the Map controls, click on Add to add a four-point rectangle on the map (the color will be the one chosen above):

Map Bounding Box

* denotes a required field
Editing an existing zone
- From the main Zones panel, click on an existing zone name in the list of zones, to open the editing panel.
- From this panel, the zone’s properties can be changed including the name, color, and owner group. Points can also be moved, added, and deleted to redefine the boundary.
- Click on Save to save the changes.
Deleting a Zone
To delete a zone, select it from the main Zones panel and click on Delete. Alternatively, click on Delete from the editing panel.
Adding a Zone Alert
A zone alert can be used to detect when one or more gateways leave a zone. To create a zone alert, define a threshold as described in Thresholds , set the Group or gateway to the devices which are to be monitored for the zone, and set the Stat field to GPS Location Zone.