 Searching...
How to configure SSO for my account?
Single sign-on (SSO) refers to the ability for AirVantage users to log in with their enterprise credentials to get access to AirVantage seamlessly as they do for most applications they are using in their day-to-day work.
SSO is available only for accounts where all devices are on the AirLink Complete or AirLink Premium services. It is not supported for devices on AirLink Basic. These devices will need to be upgraded prior to SSO being enabled.
SSO solves key problems for the business by providing:
- Greater security and compliance as users only have to remember a single set of credentials. With SSO, users won’t have to enter a different password for each application, which often results in password reuse or easily guessed passwords. This also allows enforcing the company password rules (length, rotation).
- Improved usability and employee satisfaction with seamless login
- Reduced IT costs related to users provisioning and deprovisioning upon departure, ensuring that former employees or partners can’t access sensitive data.
With SSO enabled, every time users authenticate to AirVantage with their email matching your company’s domain, they will automatically be redirected to your OpenID Connect (OIDC) SSO provider. If they already have a session open with their company’s identity provider, they will automatically be logged in to AirVantage without any additional actions.
To enable single sign-on in your account, please open a support ticket.
Prerequisites
- You must be the account administrator for the ALMS account
- All devices must be on the AirLink Complete or AirLink Premium offers
- Your identity provider shall support OpenID Connect (OIDC) as authentication protocol.
- Verify that all UI users emails are real emails (avoid aliases for example that are not working for some identity providers)
OpenID Connect (OIDC) is an identity layer built on top of the OAuth 2.0 protocol and supported by some products, such as Azure AD, Okta, OneLogin, and others.
Configuration
The OpenID Connect configuration may differ based on your identity provider, but here are some information you will want to consider to create the configuration:
1. Configure AirVantage as an application in your identity provider
Here is an example of how-to add AirVantage in a Microsoft Azure Identity platform: https://docs.microsoft.com/en-us/azure/active-directory/develop/quickstart-register-app
Regardless of the identity provider you have, please follow their instructions. In any case, you’ll be prompted to provide the service provider’s redirect URIs, where you’ll have to enter:
2. Enable Single Sign-On for your account
Open a support ticket to request SSO be enabled.
3. Configure your SSO in AirVantage
From My Account > Administration > Security, click on (+) to add a configuration for a new domain:
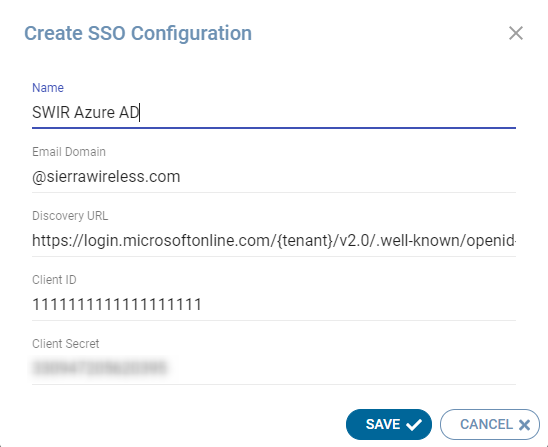
On the different fields please provide following information from your identity provider
Email domain: Defines the domain that will be covered by the SSO configuration. Any user with an email matching exactly the domain entered will be redirected to the Identity Provider defined in the configuration.
Discovery URL: OpenID Connect defines a discovery mechanism, called OpenID Connect Discovery, where an OpenID server publishes its metadata at a well-known URL. This URL returns in a single response a JSON listing of the OpenID/OAuth endpoints, supported scopes and claims, public keys used to sign the tokens, and other details. By using this discovery mechanism, the SSO configuration is made very simple. You can test whether your OpenID identity provider supports discovery URL by appending /.well-known/openid-configuration to the SSO endpoint and therefore viewing the discovery response. In the example above, we’re showing an example with Microsoft Azure AD where you would need to replace {tenant} by your company tenant information
Client ID: It is the Application Identifier or Client ID that you can find in your provider’s settings.
Client Secret: Refers to the Secret that you have created in your provider’s settings.
Once, you’ve entered all the information, click on Save. The configuration will appear in the list of configurations as inactive.

At this stage the configuration is still not enabled
4. Enable and test your configuration
Identify the SSO configuration you created in the previous step, open it to view or edit the details, then set the toggles and save. The dialog includes:
- Enabled: Activates SSO for users whose email matches the configured domain. Only enable this when you are confident the identity provider settings are correct.
- IDP Enabled: Enables the identity-provider login experience for AirVantage. Ensure your identity provider is configured with the redirect URI https://auth.airvantage.net/login/callback before enabling SSO.
The configuration screen shows a prominent warning and action buttons, for example:
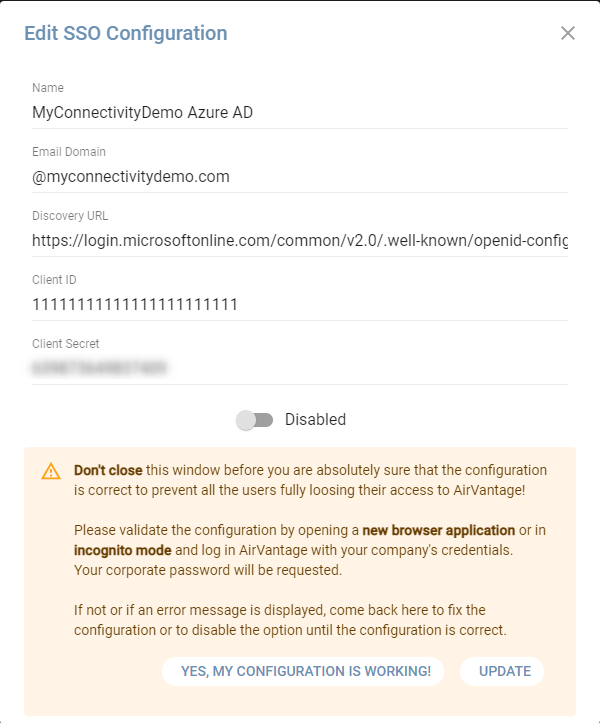
Before you proceed:
- Don’t close this dialog until you have confirmed the configuration is working. Closing it prematurely may lock all users out of AirVantage.
To validate your configuration:
- Open a different browser window or use incognito mode.
- Sign in to AirVantage using your company credentials (your corporate password will be required).
- If sign-in fails or an error appears, return to this dialog to correct the configuration — or disable the option until the issue is resolved.
- If needed, use UPDATE to save any changes to the SSO configuration.
- Once sign-in works as expected, click YES, MY CONFIGURATION IS WORKING!.
SSO Frequently asked questions
Do I need to configure user accounts in AirVantage if SSO is enabled?
Yes, AirVantage delegates the authentication to AirVantage, but not the authorization of the user’s activities. You still need to ensure that each user has a user account. Note that the password field is still available in the user account, but it is no longer used when SSO is enabled.
Do I need to configure profiles in AirVantage if SSO is enabled?
Yes, AirVantage delegates the authentication to AirVantage, but not the authorization of the user’s activities. You still need to configure the AirVantage application-specific permissions you want to give to each user.
For more information on user profiles, please refer to Managing Profiles .
Does SSO impact API users?
No, API users are not redirected to the Identity Provider. If the user is using the Resource Owner Flow, the password associated to the user shall still be used.
I’m using sub-accounts. Do I need to duplicate the configuration on my subaccounts?
No, the configuration done at the main account is valid for all users using Sierra Wireless services (all AirVantage accounts, Source, Octave, Forum) as soon as their email is matching the domain defined in the configuration.
How will users not belonging to the SSO configured domain log in?
SSO will only be applied to the users with emails matching configured domains. For other users from your company or partners, the standard authentication based on email and password will still apply.
Is SSO compatible with multi-factor authentication (MFA)?
You can have both Single sign-on and MFA activated on your account. All users associated to the SSO configuration will use the configured identity provider. This company identity provider may itself use MFA. The MFA option activated in AirVantage will only apply to users for which the authentication is not delegated.
Do I need to open additional ports in the company firewall?
No, we are using the same ports as the ones used for AirVantage