 Searching...
Using ALMS to configure and redirect AirLink OS routers
This section describes how to bulk configure AirLink OS router(s) using ALMS, and then redirect them to AMM.
Overview
AirLink OS routers reporting to AM or AMM use a secure unique key and certificate connection mechanism to attach to the AirLink Manager server. This means that every router has its own unique Bootstrap Identity and Bootstrap Secret to support the initial connection. Without the ability to use a bulk configuration tool, every device must be configured individually.
Some customers’ security policies permit new devices to connect once to Semtech’s AirLink Management Service (ALMS) via an encrypted connection before being put into service. For these customers, Semtech is pleased to offer a no-charge ALMS account to perform this initial configuration. This can be done as a bench configuration performed either by the customer or by their AirLink reseller, using a wired Ethernet connection before any other device configuration or cellular connection is enabled. Once the device receives its configuration settings redirecting it to the on-premises AM or AMM server, it will no longer communicate with ALMS.
If the routers do not have SIM cards installed until after the configuration has been saved, then the ALMS account will not have any device configuration or cellular details stored in it. By default, ALMS will purge data at 90 days.
Note: Registering XR80 or XR90 routers in ALMS enables the LPWA/OOBM radio. However, switching the Device Manager to AMM mode automatically disables the LPWA radio. In this case, it is very highly recommended that you do NOT delete the XR80 or XR90 routers from the ALMS account. Doing so will permanently disable the LPWA radio, because the embedded SIM will be retired.
Equipment and Environmental Requirements
It is highly recommended that you first work through this procedure with one router or a small batch of routers, testing the final state with a SIM card and cellular connection, to validate the process in your specific environment.
The end state should be that the routers come online using the Cellular WAN connection and successfully report in to your AM/AMM server.
To perform the bench configuration, you must have the following in place:
- An uplink available with the required open outbound ports to support AirLink OS to ALMS communication
- Short list of outbound ports: UDP 5684, UDP 5686, TCP 443; all traffic is encrypted and outbound, and can be locked down to specific subdomains if desired. Full firewall requirements are available here
- A multi-port switch with enough ports to support the number of devices being configured in a batch
- Sufficient desktop power supplies and Ethernet cables to provide one of each per router in a batch
- An ALMS account in which to register devices for configuration
- Account creation and one-time use is available a no additional cost for on-premises AM and AMM users
- If you do not already have an ALMS account to use, create one in the appropriate region here
- An installed AM/AMM server which can support AirLink OS routers:
- Suitable certificate (currently requires public CA signed certificate)
- DNS available for the server, and DNS record for the server address available to all router WAN subnets (such as private cellular and Wi-Fi WAN)
- Software version 2.18 or higher
- Firewall rules allowing required access from routers to server (these include some different ports for MGOS or ALEOS devices) available here
- A list of router serial numbers and corresponding (ALMS) Registration Codes to be added to the installed AMM server
- To register AOS routers in ALMS, you will need the Serial Number and Registration Code. These are available on the bottom label of the router, but are usually available electronically from your AirLink Reseller.
- If you do not have serial numbers provided electronically, contact your reseller.
- If you have serial numbers but no registration codes, open a Semtech support case and provide the list of device serial numbers.
Procedure
Please ensure that you have purchased the required AirLink OS client access licenses, software maintenance and router support SKUs for the routers being added to the AMM server. The device serial numbers being added must be registered with Semtech to support licensed server access. Contact your AirLink reseller if you have any questions
- Log in to the production AMM server and navigate to Admin > Devices > Gateways to add the list of routers by Serial Number. See Adding Multiple AirLink OS routers to the AMM)
.
- Adding the routers will automatically trigger the download of a CSV file containing all the individual bootstrap IDs and secrets required for the router configuration. This file must be available to the team configuring the routers.
- Register at least one router in the ALMS account to be used. (You can register all of them if desired. You may want to include a Label, such as “New” or Unconfigured”, for filtering purposes.) For details on registering routers on ALMS, see How to register a list of systems?)
.
- To register AirLink OS routers in ALMS, you will need the Serial Number and registration code. These are available on the bottom label of the router, but are usually available electronically from your AirLink Reseller. If they are not available, please open a Support ticket to request them.
- The router must be running AirLink OS version 6.1 or higher in order to create the template required below. If it is not running a suitable version, upgrade to 6.1 or higher before proceeding to the next step..
- Using that router, create a template that includes, at a minimum, the AMM server configuration elements.
- Device Manager setting (AMM)
- Bootstrap URI (common to all routers; must be entered at time of template creation in order to save the template)
- Bootstrap Identity (unique per router but enter the value for the first router in order to save the template; other routers’ IDs will be added to a CSV upload file)
- Bootstrap Secret (unique per router but enter the value for the first router in order to save the template; other routers’ IDs will be added to a CSV upload file)
- You may also want to update the Heartbeat to a number shorter than the default. Enter the desired heartbeat in Minutes, and it will be converted to the most appropriate unit for the value.
Note: If desired, you can use ALMS to perform complete router configuration prior to sending it to the on-premises AM or AMM server. The tools in ALMS are currently in a richer and more complete state than the configuration tools currently available in AM/AMM for AirLink OS routers. If your network connection requires a private APN or other settings in order to connect, you should include, at minimum, the SIM template in your initial router template. You may need to insert the SIM card in the router being used to create the template to ensure the accuracy and effectiveness of the SIM template.
- Export the template to the ALMS account.
- Register the remaining routers in the ALMS account, and be sure to allow them to be Activated when registering.
- Working in small batches:
- Select the desired group of routers in the Monitor Systems list.
- Click on the Change Configuration button.
- Leave the “Apply settings" block highlighted.
- Select the template you created and exported to the ALMS account.
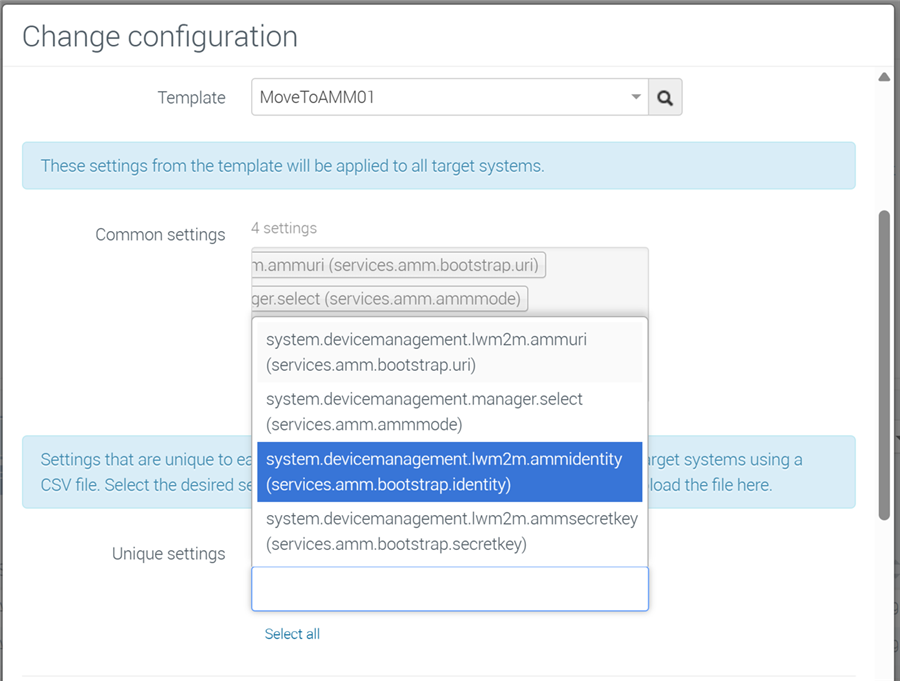
- Scroll down to the unique settings area and click to open the list of settings.
- Select the two settings ending in “ammidentity” and “ammsecretkey”
- Click the Generate button to create the CSV download file to be filled in with individual ID and secret per router by serial number.
- Open the CSV file in a suitable editor, such as Excel.
Note: If you create a blank spreadsheet and use the Import Data function, you will have to remove the row with Column 1… headings prior to uploading back to ALMS. You can do this by cutting and pasting to a new Excel file before saving, or by saving as a CSV and then manually deleting the first line using Notepad or similar.
- Export the completed file as a CSV.
- In the ALMS Change Configuration dialog, use the Select a CSV button to select the saved file.

- Click Submit Configuration.
- The routers will take the configuration and reboot to apply the changes, whether or not you have selected the Reboot checkbox.
- Once the Apply Settings operation in ALMS shows completion, you can power down the routers and install them in vehicles.
Note: The routers will only actually check in to the AM/AMM server if their uplink provides a path to that network location.
- Now that routers are offline and will not check back in to ALMS, you can install SIM cards in preparation for them coming online via cell connection next time they power up.
- You may want to to apply a Label in ALMS to indicate the completed state of the devices, strictly for filtering purposes.
- Once completed, proceed with the next batch.
Note : For instructions on creating and exporting an AirLink OS template in ALMS, see How to create and apply a template? .
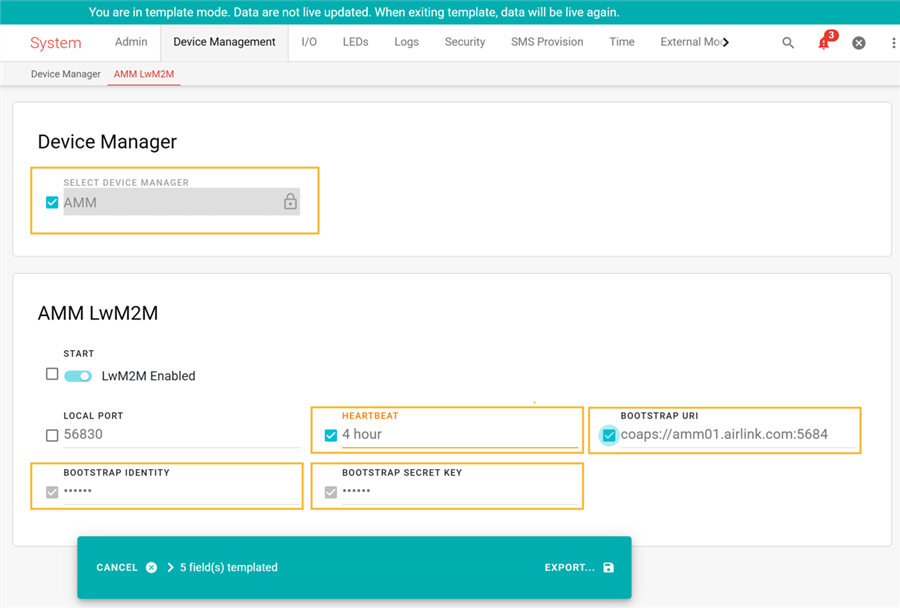
ALMS Device Manager Settings