How to create and apply a template?
Creating a configuration template differs depending whether your device is running ALEOS or AirLink OS.
 Initializing Table Of Contents...
Creating a template for an ALEOS device
There are two ways to create templates: from scratch or based on a given system application.
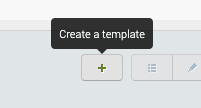
To create a template
- Go to Configure > Templates.
- Click + in the action bar.
- Select an application after checking From an Application (from Scratch) checkbox or a system after checking From a system checkbox.
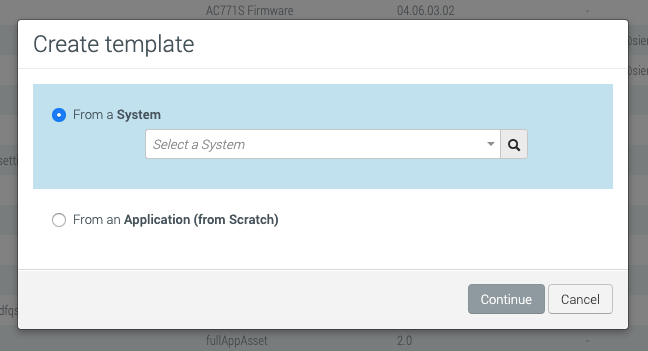
There are two options to create templates:
- From a System: This approach allows you to select an existing system in AirVantage and use it to create a template that you can apply to other devices. This template will inherit the settings from the selected device. Before creating a template from a System ensure that the System is synchronized. To synchronize a System, select the System on the Monitor page and then click
 .
. - From an Application (from Scratch): When starting from an Application, you are creating a new template from scratch. To do so, you need to select the version of Application Firmware you want to start with, then select and configure the values that are required.
- From a System: This approach allows you to select an existing system in AirVantage and use it to create a template that you can apply to other devices. This template will inherit the settings from the selected device. Before creating a template from a System ensure that the System is synchronized. To synchronize a System, select the System on the Monitor page and then click
- Check and set parameters in the application configuration page as necessary.
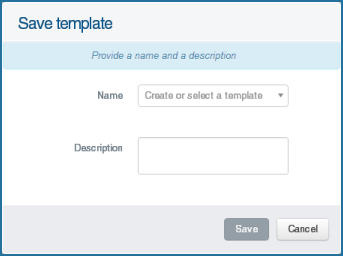
- Click Save and name/or select your template. You can optionally describe your template; this will help you recognize it when loading a template.


 .
.
Creating a template for an AirLink OS device
You can create a template for an AirLink OS device using the From a system option.
You can also perform the following template actions from the Configure > Templates table:
- Export an existing template by clicking Export to File.
- Import a template .json file from your local computer to ALMS.
For more information about AirLink OS templates, see the AirLink OS documentation.
To create a template from a system
- Go to Configure > Templates.
- Click + in the action bar.
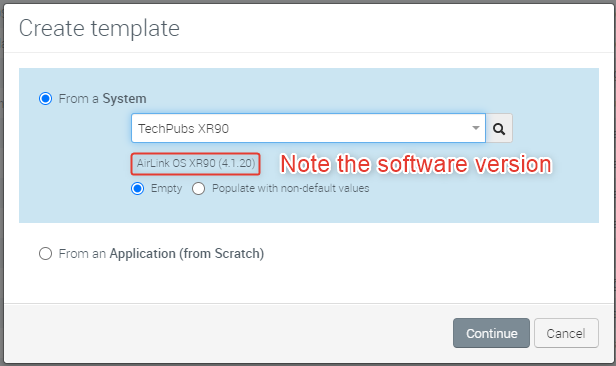
Select From a System. You can select an existing System in AirVantage and use it to create a template that you can apply to other devices. Before creating a template from a System, ensure that the System is synchronized. To synchronize a System, select the System on the Monitor page and then click
.
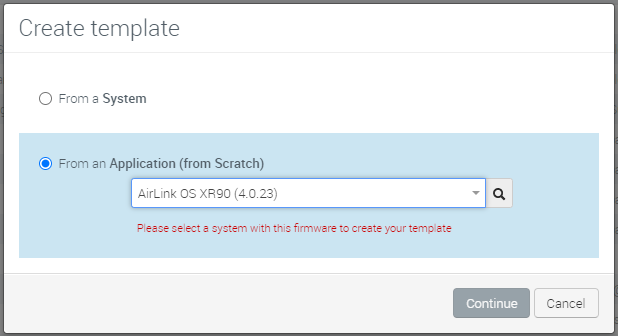
If you click From an Application (from Scratch) and select an AirLink OS firmware, an error message appears, as shown below.
Select whether you want to create the template starting from scratch (Empty) or with the device’s current configuration (Populate with non-default values—use this method to create a “System Snapshot” template to replace a router’s entire configuration).
Ensure that you select the correct device type and software version for your template.
AirLink OS templates can be applied only to routers of the same model type and major and minor AirLink OS version. For example, a template created on an AirLink XR90 running AirLink OS 4.1.20 can be applied to other XR90 routers running 4.1.20 or 4.1.24. (The first digit, 4 in this example, represents the major version; the second digit represents the minor version.) If you tried to apply an XR90 4.1.20 template to an XR90 running 4.0.24 or 5.0.15, or to an RX55 running 4.1.20, the operation will fail.
Click Continue. The AirLink OS interface opens in Template Mode.
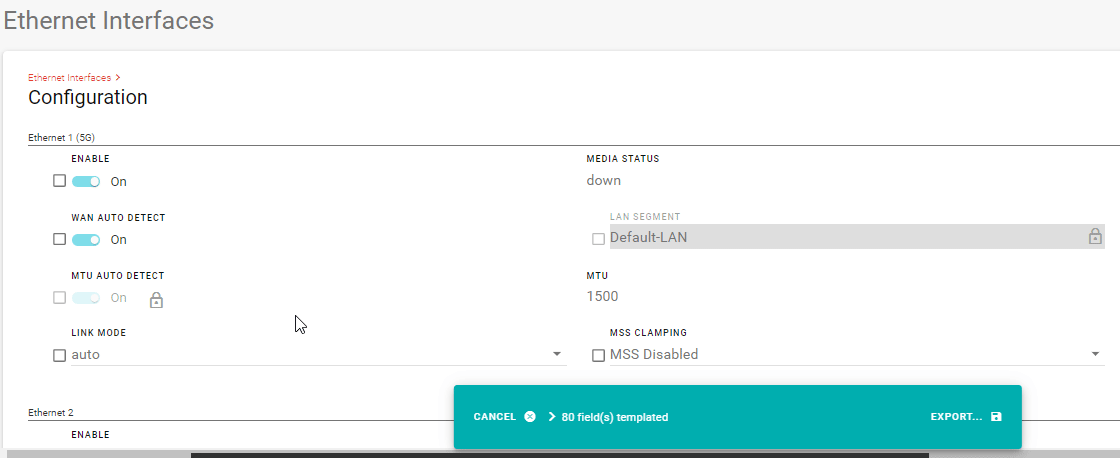
To add a setting to the template, select the checkbox for the setting. The setting and its current value will be added to the template.
To delete a setting from the template, clear the checkbox for the setting.
You can also add complete configurations from tables to a template. Settings such as Static Routes, Wi-Fi interfaces and VPN tunnels can be added to a template by selecting a table row, as shown in the Static Routes example below.
After selecting a table row, you can refine the selected settings by clicking edit
 on the table row and editing, re-selecting or de-selecting certain settings. For example, you may need to edit and then add a password or pre-shared key to a template (by default, these settings are not included in templates).
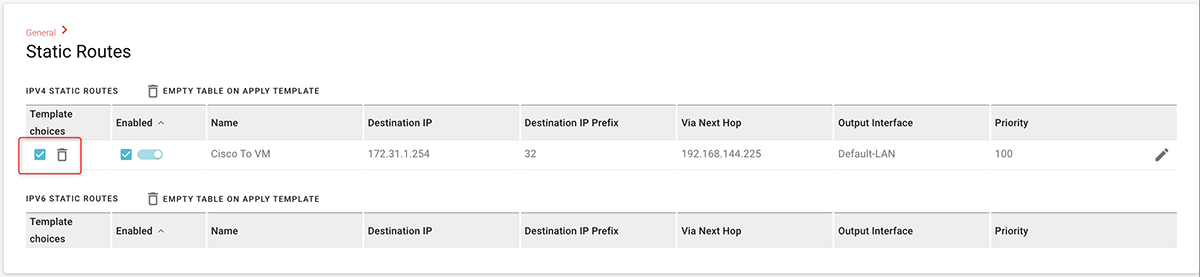
To save the template, click EXPORT…, and then select EXPORT TO FILE (to save the template .json file to your computer) or EXPORT TO MY ALMS ACCOUNT (to save the template to Configure > Templates page in ALMS).


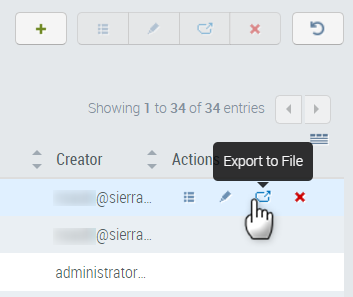
To export a template
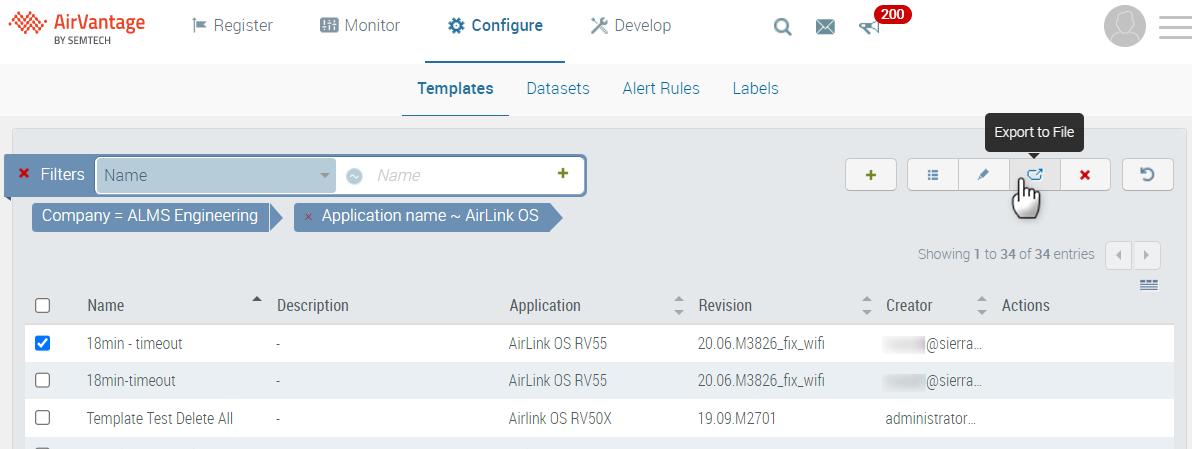
You can export an existing template directly from the Configure > Templates table.
You can also export a router’s current template using the EXPORT TO FILE button in the AirLink OS user interface. To access the AirLink OS user interface, click the Configuration button from the System View page.
- Go to Configure > Templates.
In the Templates table, click the Export to File button:
- after selecting the desired template
or
- in the Actions column for the desired template.
- after selecting the desired template


After clicking Export to File, the .json template file is downloaded to your computer.
To import a template
If you have a saved AirLink OS configuration template .json file on your local computer, you can upload it to ALMS using the Import Template feature on the Configure > Templates page.
- Go to Configure > Templates.
Above the Templates table, click the Import button.

In the Import Template window, click + Select a JSON.

Locate your .json file and click Open.
Click Start to import the template.
After the import is complete, the new template will appear in the Templates list.


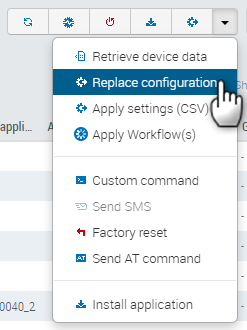
Applying a template (Replace Configuration)
You can use the “Replace Configuration” option to perform a full configuration replacement on the target router(s).
This option can use two separate configuration files:
- a System Snapshot template to apply settings common to the target routers
- a CSV file to apply settings that are unique to each router, such as passwords.
ALMS performs the Replace Configuration process (applying both a template and a CSV file) in a single operation.
The Replace Configuration option is available only for AirLink routers running AirLink OS 6.0 or later.
Using Replace Configuration will cause all settings that are not in the template to return to their factory default configuration on the target router. Because of this, ensure that the template contains all settings to configure and maintain device connectivity, including passwords and SIM Templates. For more information about templates in AirLink OS, see Working with Device Templates.
To use Replace Configuration:
- Create a template as described in Creating a template for an AirLink OS device.
In Create template, select “Populate with non-default values”. The AirLink OS interface opens in template mode.
If you need to add any passwords to your template, you can add them here. You must modify any passwords before they can be added to a template.
After you’ve added passwords to your template, you can use a CSV file to customize the passwords and then apply them to your routers. See step 9 below.

Export the template to your ALMS account.
Enter a template name and click Save.
In Configure > Templates, the template appears in the list, and the Type is “System Snapshot”.

Go to Monitor > Systems and select the system(s) to configure.
Under “More device and application actions”, select Replace configuration. This option appears only for routers running AirLink OS 6.0 or later.
In Replace configuration, select the template. The Common settings (template) window shows all the settings that will be applied to the router.

In Unique settings (CSV), select the settings (such as passwords) that you want to apply to the router(s) as unique values using a CSV file.
Click Generate to generate the CSV template.
After the CSV file generates, click Download your template.
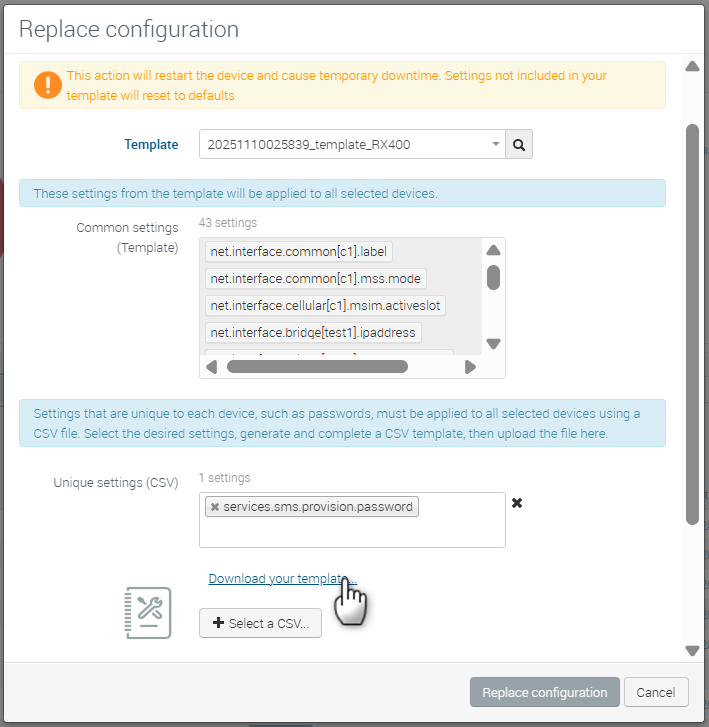
Edit your CSV template as described in How to edit csv files, add custom values and save the file.
In Replace configuration, click Select a CSV…, browse to your .csv file and then click Open.
Select any advanced settings (to schedule the update, for example).
Click Replace configuration.
ALMS launches a Replace configuration operation to validate the template and then apply the configuration.


You can follow the progress from the Operations list. For each system, at the next heartbeat, the settings will be configured, overwriting the previous values.