Configuring Cellular Interfaces
The AirLink RX55 has two SIM card slots that support the cellular interface. By default, the SIM card in the upper slot (slot 1) is the active SIM card.
To configure cellular interfaces, go to Hardware Interfaces > Cellular Interfaces > Configuration.
Table of Contents
 Initializing Table Of Contents...
Cellular Configuration
Not all the settings shown below appear when the router is operating without a SIM card installed.

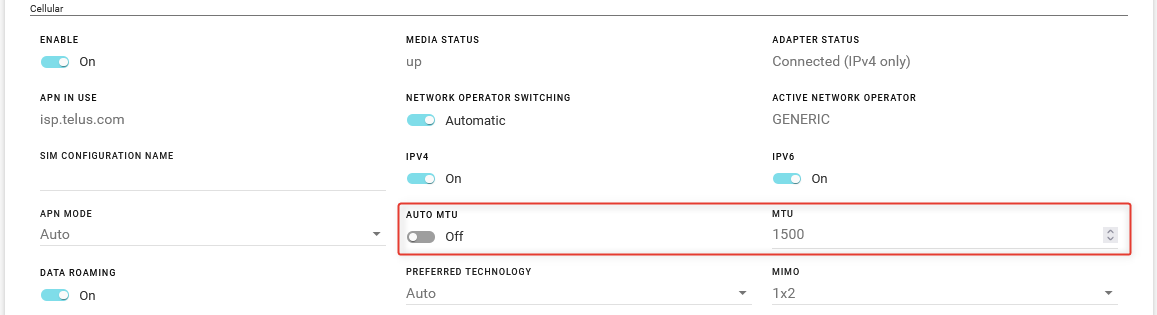
- ENABLE
- MEDIA STATUS: Status of the antenna link connection. This reports whether the antenna is present and a cellular network signal is detected. In some cases, the router may get a cellular network signal even when the antenna is not connected.
- ADAPTER STATUS: AirLink OS communication status with the cellular radio after a media signal is detected.
- Initializing: initiating communication with radio
- Initializing SIM: Handling SIM-related tasks
- Check Radio Carrier: Checking the carrier of the SIM card inserted against the “Network Operator Switching” setting (whether it is automatic or a specific carrier is selected)
- MultiApn: Checking Multi APN configuration
- Configuring: Configuring the radio for connection (APN, for example)
- Connecting
- Connected
- Standby: Indicates the radio adapter has been disabled, or if it is enabled and no cellular network signal has been detected yet
- Wait For Update: Waiting for radio update if requested during Check Radio Carrier, for instance
- Stopped: A problem occurred when AirLink OS tried to initialize the radio (with SIM card inserted) to get on air. To restore operation, reboot the router.
- Monitoring Virtual: The adapter is in Multi-APN mode, with configured virtual APNs
- No Service: The radio is enabled and able to detect a cellular network signal but cannot get any service (2G, 3G, 4G, or 5G). The antenna may be disconnected or faulty, or the SIM card has been deactivated.
- APN IN USE: The APN in use for the current mobile network connection.
- NETWORK OPERATOR SWITCHING: By default, the router automatically selects the network operator. To force the router to use a specific network operator, change NETWORK OPERATOR SWITCHING to Manual, and then select a Network Operator from the list.
- Automatic (default): When the router powers on or reboots, it automatically selects and uses the appropriate radio module firmware for the active SIM card.
- Manual: The router does not automatically select the appropriate radio module firmware when it is powered on or rebooted. You must select the Network Operator.
- ACTIVE NETWORK OPERATOR
- SIM CONFIGURATION NAME: By default, the installed SIM(s) and associated configuration(s) are included in the SIM Database. You can enter a name for the current SIM Configuration in this field. The name appears in the SIM Database.
- IPV4: Turn On to allow the mobile network to assign the router an IPv4 address. Turn Off to disable IPv4.
- IPv6: Turn On to allow the mobile network to assign the router an IPv6 address. The IPv6 address and routing information are passed to the LAN clients so that they can acquire IPv6 addresses and pass IPv6 traffic over the mobile network. Turn Off to disable IPv6.
- APN MODE: Auto, Manual, Multi
If the router does not automatically connect to the network, contact your Mobile Network Operator to confirm the APN and activation status of your router. You may need to set APN MODE to Manual and enter your carrier’s APN and other credentials.
When APN MODE is set to Manual, set the following:
- MANUAL APN
- AUTHENTICATION PROTOCOL: None, PAP, CHAP, AUTO
- AUTHENTICATION USERNAME
- AUTHENTICATION PASSWORD

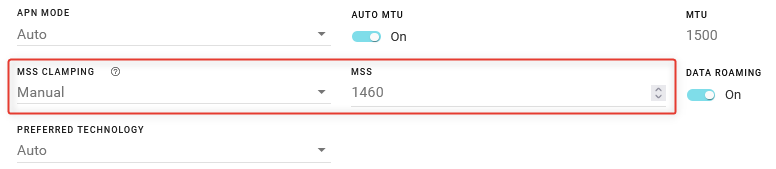
AUTO MTU: By default, AUTO MTU is On. You can turn AUTO MTU off and manually configure MTU (Maximum Transmission Unit in bytes) if you have VPN issues, and as directed by your service provider.
MSS CLAMPING: MSS (Maximum TCP Segment Size) Clamping controls the maximum packet size used for TCP connections between a local (LAN-side) host and a remote host over the cellular WAN interface. MSS Clamping helps avoid possible issues with sending and receiving large TCP packets over the cellular network when other standard MTU mechanisms do not appear to be working with your installation.
By default, MSS Clamping is set to Auto. It can also be set to Disabled, or to Manual. When set to Manual, you can set the Maximum TCP Segment Size (range is 1–2000 bytes, default is 1460).
DATA ROAMING: Enables or disables roaming on the active SIM. When OFF, the active SIM does not use data when roaming.
PREFERRED TECHNOLOGY: Restrict the router to using a specific cellular technology: Auto (default), 3G Only, 4G Only, 5G Only


SIM Slot Management
The AirLink RX55 has two SIM card slots and is capable of supporting a primary and secondary SIM card. By default, the SIM card in the upper slot (slot 1) is the primary SIM card.
When the RX55 powers up or reboots, it detects how many and which SIM cards are inserted. It connects to the cellular network using the primary SIM card, if present. If there is no SIM card in the primary SIM card slot, the RX55 connects to the mobile network using the secondary SIM card.
In the SIM SLOT MANAGEMENT table, you can configure Automatic SIM Switching to respond to changes in the cellular network state, or you can switch SIM cards manually by selecting the Active Slot, as shown below.

Auto SIM Switching
If you have multiple SIM cards installed, you can configure the circumstances in which the router automatically switches the SIM card being used for network connectivity.
To configure Auto SIM Switching, click Edit  in the SIM SLOT MANAGEMENT table and enter the timeout settings you want to trigger a SIM switch.
The configurable cases are:
- Roaming: Switch SIMs if roaming for x minutes
- Service Scan Timeout: After a Service Lost Timeout and an attempted switch to the secondary SIM, the Service Scan Timeout switches the router back to the primary SIM if no connection is made during the timeout. Similarly, if the router does not connect to the primary cellular network after startup or reboot, the Service Scan Timeout triggers the gateway to use the secondary SIM.
- Service Lost Timeout: Switch SIMs if the network’s data connection is lost for x minutes
- If Cellular > Monitor is enabled, the Cellular Monitor ping test determines whether the end-to-end connection is lost. If the ping test fails, the Service Loss Timeout begins.
- Secondary Slot Timeout: If the router has been connected to the secondary SIM for x minutes, switch to the primary SIM. Use this parameter if you prefer the router to use the primary SIM whenever possible.

| SETTING | DESCRIPTION | DEFAULT | RANGE |
|---|---|---|---|
| Roaming |
If the router has been roaming for longer than the time (in minutes) configured in this field, it automatically switches to the inactive SIM card. This option is useful if the router frequently crosses an international border where there are different Mobile Network Operators in each country. You can set up the router with two SIM cards: one for a Mobile Network Operator in each country. The router then automatically switches to the SIM that is not roaming (after a configured delay) whenever the router crosses the border. |
Disabled | 10 - 255 min |
| Service Scan Timeout |
If the router has been trying to connect to a network for more than the configured time (in minutes), the router switches to the other SIM card. Note: If you are using Automatic SIM switching, this field should always be configured. The automatic SIM switch is initiated if the router is unable to establish a data connection or if the SIM card is unable to register on the network. If this is a new SIM card, check that the APN in Use is correct and that it is able to register on the network. |
Disabled | 10 - 255 min |
| Service Lost Timeout |
If the data connection is lost for more than the configured time (in minutes), the router switches to the inactive SIM card. Tip: If you prefer to use the Primary SIM account as much as possible, configure the Non-Primary Network Timeout and the Service Scan Timeout so the router will periodically check, and switch back to the Primary network when it becomes available. |
Disabled | 10 - 255 min |
| Secondary Slot Timeout |
If the router has been connected to a network using a secondary SIM card for the time configured in this field (in minutes), it automatically switches to the primary SIM card. This allows you to configure the router to fall back to the primary network if, for example, the data rate is better on the primary network. Note that the router will switch SIM cards again if the Service Lost Timeout threshold is met again. Example: After switching back to the primary SIM card (with the Service Lost Timeout set to 30), if there is a service loss for 30 minutes, the SIM will switch to the non-primary SIM card and the Non-Primary Network Timeout begins again. |
Disabled | 10 - 255 min |
Multi-APN Configuration
When using a SIM that allows for multiple APNs, you can configure additional APNs.
To configure an additional APN:
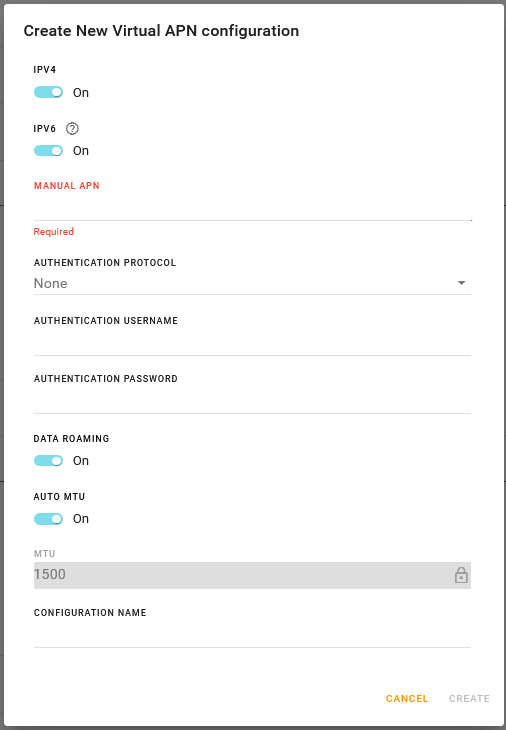
Under APN MODE, select Multi.
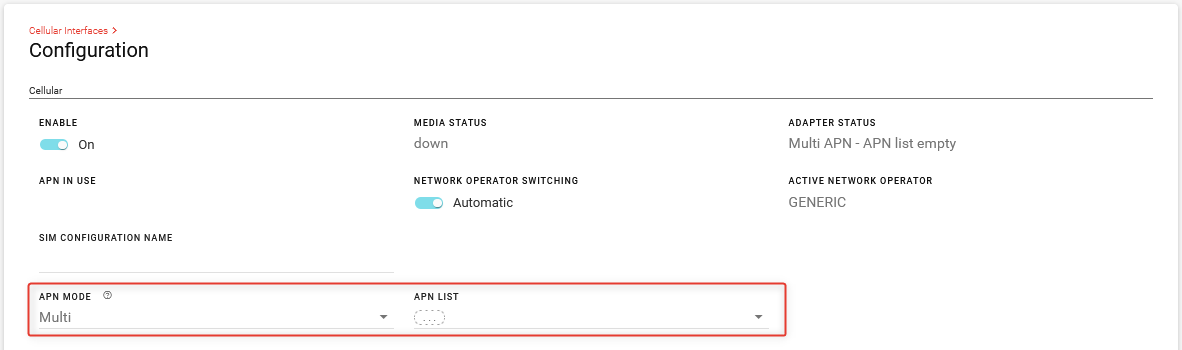
In the APN List, click CREATE. The Create New Virtual APN configuration screen appears.
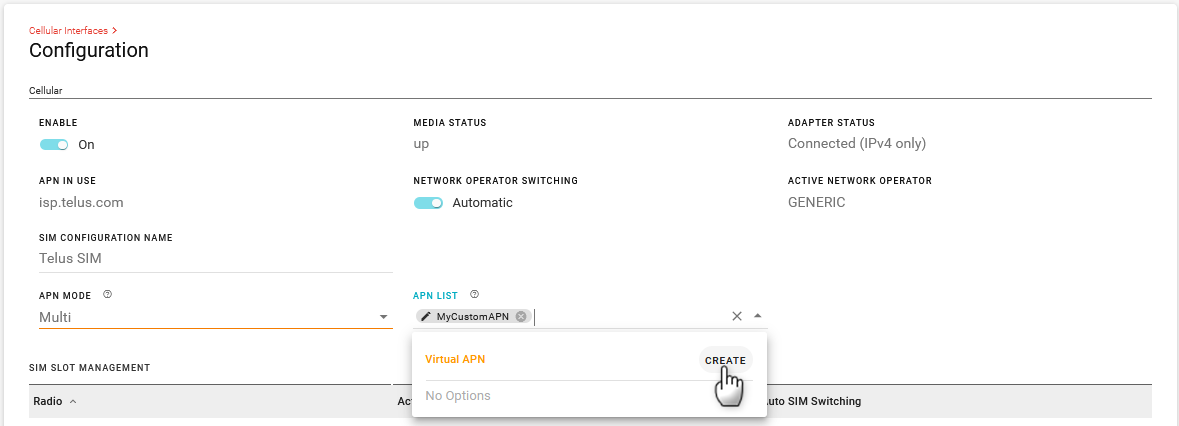
Configure the APN settings and then click CREATE.


You will see the Cellular Interface settings for each new APN that you create below the “parent” Cellular interface. The parent Cellular interface status becomes Monitoring Virtual.
In the example below, the main Cellular interface has the sub-interface Cellular-1. This additional APN, when enabled, is the potentially active interface when the Cellular interface is in Multi APN mode.
