 Searching...
Gateway Tree
The Gateway Tree  located on the left side of the screen, allows you to select vehicle groups, sub-groups and individual gateways:
Gateway Tree

The look and feel is similar to traditional file management systems with folders and files.
Click on a group, sub-group, or individual gateway  to select it. This selection will remain active when toggling between the main tabs (e.g. Dashboard to Map). Additionally, when running reports, the gateway field is automatically populated and can be changed by clicking on another group/sub-group/gateway. Multiple items can be selected by holding down the Control (Ctrl) key while clicking.
The Gateway Tree includes the following additional functionality:
- Filter field
 : allows you to enter the full or partial name of a gateway to search for. For more information see: Filter Box and Searching below.
 - Node Selection
 : selects all nodes currently displayed in the Gateway Tree.
Select All Checkbox
Note: The Select All checkbox differs from All Gateways. All Gateways is the base group which include all gateways present in the AMM. In combination with the filter options (described below), the Gateway Tree can be reduced, which can be useful for selecting a certain group of devices for which you want to invoke an operation (e.g. to run a report on).
- Filter Options
 : displays a popup allowing you to filter the Gateway Tree based on Heartbeat (i.e. devices that the AMM communicated with, within the last X minutes, hours, days, or months), the type of device Platform and by Cellular Capability.
 - Refresh
 : forces the Gateway Tree to refresh the list of nodes.
 - Collapse All Groups
 : collapses all groups in the Gateway Tree including sub groups.
 - Expand All Groups
 : expands all groups in the Gateway Tree including sub groups.

Note: The Gateway Tree view is saved when logging out. So that when you log back in, the Gateway Tree is as before.
Filter Box and Searching
The Filter field found in the Gateway Tree, as well as many other search boxes throughout the AMM, allows users to enter the full or partial name of a gateway or group to search for.
The search is not case sensitive and performs wildcard searches by recognizing the following patterns from the keyword entered in the search box:
- !<keyword>: if the keyword starts with ‘!’ (e.g. “!abc”), gateways/groups with no fields containing the sub-string will be returned.
- 0-10: if the keyword contains two numbers separated by “-”, gateways/groups with numerical fields which fall in the range enclosed by these two numbers inclusively, will be returned.
- Regular Expression: the keyword will be used as regular expression, if the two patterns above don’t match on any fields.
Note: Entering complex search strings such as those containing double quote characters will cause an exception to occur due to the browser’s security measures to avoid cross-site scripting. This can be bypassed by entering a regular expression to search for. For example, entering PUBLISH configuration template “test” (revision 1) will cause the exception to occur due to the double quotes. Using a regular expression, the search string would be rewritten as: PUBLISH configuration template \“test\” (revision 1).
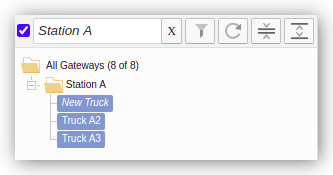
In the figure below, the image on the left shows the list of gateways displayed when nothing is entered in the Filter field (i.e. show all gateways). The image on the right shows only gateways under “Station A”. After entering or changing a value in the filter field, the refresh button to the right of the time dropdown can be clicked to refresh the list. Alternatively the list will refresh on its own after a few seconds.
Filter Box in Gateway Tree

Text in the Filter field can be deleted by clicking on the X icon
.
Main Dashboard Filter Options
For more information on the Main Dashboard Filter Options click here
Groups and Sub-Groups
Groups allow gateways to be categorized and grouped together for organizational purposes. For example, different groups could be created to organize fleets for different departments. Sub-groups can be created under other groups for additional subcategorization.
To manage groups and sub-groups in the Gateway Tree, right-click on a group name and select one of the options listed below:

Delete group: select to delete a particular group.
Note: if a parent group is deleted, then the gateways and sub-groups contained in it will be automatically promoted one level up. A parent group cannot be deleted if there is a user assigned to it.
Warning:
If there are users assigned to sub-groups, but none to the parent group, the parent group can be deleted.
Do not attempt to delete the All Gateways group.
Rename group: select to rename a group.
 Create group: select to create a group of gateways.
 Move group here: select to move a group to a particular group.
 Move gateways here: click on a gateway to select it. Right-click on a group and select this option to move the gateway to the group.
If there are linked configuration templates found on the gateway(s)’s parent group(s), then a popup will show, allowing the user to unlink the configuration template(s).
E.g. if “template A” and “template B” are linked to the gateway, but only “template A” is also linked to the gateway’s parent group, then when the gateway is moved to a new group, only linked “template A” has the option to be removed from gateway. “template B” remains unchanged.

If there are linked configuration templates found on the group and/or parent group where the gateway(s) is moving to, then a popup will appear requesting confirmation to deploy the linked configuration template(s) to the gateway.

A Summary popup will display allowing the confirmation of the deployment of the template(s), with the option to link the template(s) to the gateway(s).

The changes will be logged in the User Activity screen.

 Sync log files (available for MG routers only): displays a popup allowing for log files to be imported from the gateways in the selected group to the AMM.
 Browse log files: displays a list of log files that have been imported/synchronized to the AMM. For ALEOS routers, you must first install the uploadlog tool as described in the Uploadlog Tool appendix.
Note: the menus available will vary depending on whether the node selected represents an MG router, ALEOS router, AirLink OS router, fleet of devices, or a mixed fleet of devices.
Gateway Details
When setting up a fleet of gateways, several fields exist to help identify and group each gateway. To change these details, right-click on a gateway and select an option. The available options vary depending on the device type.
For MG routers, the gateway context menu will show these selections.
Gateway Context Menus for MG routers

For ALEOS routers, the gateway context menu will show these selections.
Gateway Context Menus for ALEOS routers

For AirLink OS routers, the gateway context menu will show these selections.
Gateway Context Menus for AirLink OS routers

Delete: select to delete a particular gateway.
Details: opens the Add or Edit Gateway panel in a new browser. Users can update gateway details. For more information about the options available in this panel see: Gateways
.
Show Hosts (MG routers only): displays a list below the gateway’s node, listing the host devices connected to that gateway.
Access Console: provides SSH (shell) access to the selected gateway. The IP address and port are provided which can be copied and pasted for use when connecting using a 3rd party SSH application.
Access LCI (MG and AirLink OS routers only): remotely connect to the MG’s Local Configuration Interface (LCI) or AirLink OS UI.
Note: Only one instance of the LCI can be opened at a time per instance of AMM in the same browser window. If you wish to login to two LCIs at the same time, you can either
- Login to the AMM using two different browsers. E.g. one in Chrome, one in Firefox, and then open an LCI from each.
- Or login to the AMM in one browser by opening one in regular mode, and one in private mode. Then open an LCI from each.
Access ACEmanager (ALEOS routers only): remotely connects to the gateway’s ACEmanager web user interface. This feature has the following requirements and functionality:
- There must be a management tunnel between the ALEOS router and the AMM. This requires that the device’s software is version 4.11 or higher.
Note: When installing AMMER the management tunnel will automatically be enabled. This behavior may be subsequently changed via AMM, and the setting will be retained upon an AMMER upgrade. Un-installing AMMER and then re-installing it causes this behavior to default back to enabled.
- You must obtain a server certificate signed by Comodo. The server certificate must be a signed “Comodo General Purpose (OV - organization validated)” SSL Server Certificate with the correct Common Name (CN), Key Usage, and Extended Key Usage fields. Alternatively, if AM/AMM is using an airlink.com domain, the Sierra Wireless Support team can sign the server certificate. See Enable TLS Verify Peer Certificate in ACEmanager to allow an ALEOS router to communicate over HTTPS for more information.
Note: this restriction only applies to ALEOS routers running version 4.11 and 4.12. If you do not want to use a management tunnel when using ALEOS routers running 4.11 or higher, you should disable it to avoid unnecessary bandwidth consumption. This can be done by setting MSCIID 10033. See Configuring Device-Specific Parameters for ALEOS Configurations from the AMM for more information.
- The device can have a public IP address that is network address translated on the way to the AMM.
- By default an ALEOS router communicates with the AMM on Port 1190. Each port on the AMM has a capacity for 2047 management tunnels. If you have more than 2047 gateways then you will need to distribute the tunnels over the other ports that the AMM listens to (1191, 1192, and 1193) by modifying MSCIID 10034. See Configuring Device-Specific Parameters for ALEOS Configurations from the AMM for more information.
- This feature can be used to access and save a local copy of the configuration template of a device as a master ALEOS template, after which it can be deployed to a fleet of devices.
Note: Only one instance of the ACEmanager can be opened at a time per instance of AMM in the same browser window. If you wish to login to two ACEmanager windows at the same time, you can either
- Login to the AMM using two different browsers. E.g. one in Chrome, one in Firefox, and then open an ACEmanager from each.
- Or login to the AMM in one browser by opening one in regular mode, and one in private mode. Then open an ACEmanager from each.
Request Reboot: instructs the gateway to reboot.
If you invoke the Request Reboot menu on a gateway, a popup box will appear notifying you of the reboot operation that will be created.

Click Submit to create the reboot operation. A notification banner will appear at the bottom of the screen. There will be a link to take you directly to the Operations page.
Note: the reboot operation will expire at midnight in 10 days from the date of creation of the operation.
For ALEOS routers, the reboot operation will only be sent to the device when the gateway checks in. The reboot operation can be cancelled only if it is in one of the following states : Initialized, Pending, In Progress(Reboot request is queued).
For MG90(5G) devices, they must have MGOS version 4.4.1 or higher for a reboot operation to be created. MG90(4G,5G) must have MGOS version 4.4.2 or higher. If the MGOS version is lower than 4.4.1, it will use remote client access to send the reboot command. The reboot operation can be cancelled when the state is either Initialized, or Pending.

 Copy today’s log files (MG routers only): forces the gateway to upload all log files generated today. Under normal operation, critical logs are uploaded hourly, while the remaining log files are only uploaded once a day.
 Browse log files: shows log files that were previously uploaded to the AMM.
 Copy Configuration: copies the configuration files from one gateway to another. For more information see: Copy a Configuration
.
Copy Configuration: copies the configuration files from one gateway to another. For more information see: Copy a Configuration
.
 Generate Configuration Template: uses the gateway’s configuration as the starting point for creating a new configuration template. For more information see: Creating a Template from a Device
.
Generate Configuration Template: uses the gateway’s configuration as the starting point for creating a new configuration template. For more information see: Creating a Template from a Device
.
Note: the Generate Configuration Template menu is only available to users who have had the Generate Configuration Template privilege added to their user profile by an administrator. This is set as part of the Tabs privilege. For more information about enabling user privileges, see Creating a Template from a Device .
Note: the menus available will vary depending on whether the node selected represents an MG router, ALEOS router, fleet of devices, or a mixed fleet of devices.