The AMM’s Configuration Template screen, introduced in AMM 2.17, allows you to easily create and deploy MG and/or ALEOS router configurations directly from the AMM. This topic provides an overview of these capabilities and provides direction on how to use the new features.
Workflow
The general workflow is as follows:
Create a configuration template using one of the following methods:
Create a template from scratch. This method is used when you want to modify one or more settings, add a profile (e.g. VPN), remove a profile, rename a profile/device, distribute server certificates, or do other small changes. This method will merge settings with the configuration of the target gateway, remove/rename profiles and rename devices.
Create a template from an existing device. This method is used when you want to create a golden copy from a device, that will be used to deploy to multiple gateways/fleets. When deployed, it will override the target gateway with the whole configuration from the source gateway. It also allows additional files to optionally be added to the configuration.
Note: There are a number of known discrepancies and issues that exist between the AMM’s template configuration functionality and the corresponding functionality in the LCI of MG routers, and ACEmanager on ALEOS. For more information see:
Note: The Configuration Template screen is a new approach for configuring ALEOS and MG routers, which replaces the legacy configuration management functionality introduced prior to 2.17, namely the Upload, Copy, and Configuration Control (formerly Deploy) screens. This brings more granular control to configurations by enabling you to configure the individual fields for settings and to share those settings amongst devices, as opposed to copying raw configuration files using the legacy approach.
Using the Configuration Template approach allows the user to configure settings and then link the template to a group of gateways, or to a selected gateway. The link between the group/gateway is persisted unless the user explicitly unlinks it using the UI.
When the template is published with a new revision, the AMM will automatically push the configuration changes to the linked gateways. For AMM 2.17 and 2.17.1, the template compatibility check is ignored in this workflow.
When publishing a template with linked gateways, caution should be used to make sure that all the template changes have been tested first. Otherwise it could result in misconfigured gateways in the field.
When a new gateway is added to a group that is linked to a template, the AMM will give the user the option to deploy the linked template to the new gateway.
The Configuration Template screen is the main user interface from which templates are managed:
Platforms: filters the list to show only templates that apply to the selected platform.
Filter edit box: filters the list in part or all of a template name. For more information about searches see: Filter Box and Searching
.
Range dropdown: selects the date/time range to filter, based on the last date/time that templates were modified. Selecting an option from the dropdown will display a field where the range can be input.
Search: filters the list by the platforms, filter, and range selected.
Name: the name of the template
Revision: lists the template’s current and historical published revisions.
Platform: the router model that the template can be applied to/is compatible with.
Target Version: the minimum platform software version that the template can be applied to/is compatible with.
In ALMS, the Application version is determined by the router model(platform), operating mode (MSCI or LWM2M) and the ALEOS firmware version.
However in AMM, the Target Version for a particular device is determined solely by the ALEOS firmware version. AMM always uses the MCSI operating mode.
Status: the current validation status of the template since it was last saved. Will be set to one of the following:
Not validated: the template was saved without validation.
Validated with errors: the template was saved and validated, but the AMM detected that the template configuration is incomplete and/or some of the required fields have missing values.
Validated: the template was saved and validated, the template configuration is complete, and all required fields have valid values.
Created by: the name of the user who created the template.
Last Modified: the date/time when the template was last updated.
Owner group: the gateway group whose users have access to this template.
Linked to: lists the gateway(s) and gateway group(s) that the template has been deployed to. The gateway(s) will inherit the configuration values when a template change is published.
Generated from: the name of the device that the template was generated from. This column will be empty if the template was created from scratch.
Description: a description of the template.
Add: displays the Create Configuration Template wizard, allowing you to create a new template from scratch.
Delete: deletes one or more of the selected templates.
Deploy: deploys the selected template(s) to the selected device(s).
Import: imports one or more templates that were saved to an XML file using the Export button.
Export: exports the selected templates to an XML file.
Export to CSV: exports the information shown in the list to a .CSV file.
The following are key terms used throughout this template documentation:
Term
Definition
Building Block
A group of configuration elements to support one category of functionality on a managed device (e.g. VPN settings). Building blocks can have a hierarchy of parent/child building blocks and dependencies between fields and other building blocks.
Configuration Template
A revisioned data structure that stores template information to support mass configuration. A template is created for a specific device platform (e.g. AirLink MP70, RV50, MG90 etc.) and target software version.
Template Deployment
Applies configuration elements in the template to one or more managed device(s). The AMM will generate configuration changes based on template and device data. The AMM will also check the current device state, to deploy the configuration immediately, or hold on to the configuration in staging and wait for certain criteria to be fulfilled, such as the completion of a software update, or for the device to check in.
Linked Template(s)
Template(s) that have been deployed to a device or group.
The configuration template functionality is supported for the following platforms and software versions:
MG90: version 4.3+
AirLink GX400/440, ES440 and LS gateways 4.4.5+
AirLink GX/ES450, RV, MP and LX gateways and routers 4.9.0+
Required User Permissions
The following user permissions are required in order to perform operations on templates:
Creating a new Template: A user must have AMM read/write privileges assigned in their profile on the AMM to add a new template. When a new template is added, the user’s group becomes the template’s owner.
Deleting or Modifying a Template: A user must have write permission in the owner group of a template in order to delete or modify the template.
Deploying a Template: A user must have read permission on the owner group of the template as well as write permission on the customer group of the target device(s), to deploy a template. The user must also have been assigned access to all gateways, the template owner group, or the ascendant group of the template owner group.
Reading a Template: A user must have read permission on the owner group of the template to read it. The user must also have been assigned access to all gateways, the template owner group, the ascendant group, or the descendant group.
Provisioning ALEOS routers Using Configuration Templates
This functionality allows you to provision new ALEOS routers. It is not possible to automatically provision new ALEOS routers to include AAF applications, because they have to check in to the AMM at least once. Until this occurs, functionality such as the ability to request app installation via the AMM, is blocked. Using the Configuration Template screen, you can pre-provision the gateways via the AMM such that the gateway is fully configured with settings (via templates) and app installation will then occur upon initial check-in after installation.
Notes:
Only one app can currently be requested for installation at a time.
There is no provision for pre-loading app settings, so only default values will be available initially.
Configuration Template Procedures
The sub sections below provide the steps required to create, maintain, and work with configuration templates.
Note that some procedures (e.g., deploying a template) require you to first select one or more existing configuration templates on the Configuration Templates screen on which to perform the procedure. In order for the templates to be selectable on the Configuration Templates screen, you must first select one or more gateways or a non-empty group
of gateways in the Gateway Tree, whose device type(s) correspond to the device type(s) of the configuration templates listed. Once selected in the Gateway tree, you will then be able to select the relevant templates on the Configuration Templates screen
:
Creating a template from scratch involves using the Create Configuration Template wizard to specify the platform, version, and configuration building blocks to include in the template.
Follow the steps below to create a new template:
1. Navigate to Configuration > Templates.
2. Click the Add button at the bottom of the screen. The Create Configuration Template wizard is displayed.
3. Select the device Platform
and embedded software Target Version
, and click Next
:
Note: Creating a new template is not supported for AirLink OS routers.
4. Add the desired building block(s)
that you want to include in the configuration. You can either drag and drop them from the tree onto the configuration area
or click on the blue arrow
that appears when one or more items are selected in the tree:
Note: You can also optionally change the order of the building blocks that you have added, by dragging them and dropping them.
To remove building blocks, click the checkbox
to the left of each building block to remove, and click X
:
5. Click Next after you have added the desired building blocks.
6. Enter a descriptive name into the Template Name field. The name must not contain back quotes, commas, backslashes, or double quotation marks. Note that as of AMM 2.17, angled brackets “<” and “>” are also no longer allowed in the names of gateways, groups, or templates. Enter a description of the function of the template. Enter the Owner group whose users under it can access the template.
7. Configure the fields in the building blocks. The wizard also provides the following functionality to make navigation easier:
Filter
which fields are visible (All, Enabled, Disabled, or Importable). Importable fields are template fields that can be imported from a CSV file (see Configuration Template CSV for a full list) and will only appear when a template contains certain building blocks (e.g., a template with the IPSec VPN building block). Each importable field is indicated with an up arrow icon
. Hovering the mouse over the icon, displays a tooltip
listing the CSV import header for that field.
Click
to enable or disable all the following grouped fields.
Click
to enable or disable individual fields.
Collapse
or expand
the hierarchy of building blocks.
Navigate directly to a building block by clicking the navigable links
.
Click
to hide/show fields with default values.
Note: “measurement” fields such as temperature etc., are displayed either in metric or imperial units based on the Measurement units preference set by the administrator. For more information about preferences see the Options section in: Tabs
.
.
8. (Optional) Enable Validate template completeness at the bottom of the wizard. This will cause the validation process to be performed when the template is submitted.
9. Click Submit. The AMM will save the template, after which it will be available in the template list on the Configuration Template screen. The Revision column will indicate that a draft revision is available.
At this point the template is now ready to be published, after which it can be deployed.
A template can be created from an existing device, which is useful for using that device’s configuration as a starting point. In doing so, the newly created template will be based on that device’s platform and software version, will contain all of the building blocks associated with that platform/version configuration, and will be populated with the values that were configured on that device.
Follow the steps below to create a template from an existing device:
1. Locate the device in the Gateway tree, right click on it, and select Generate Configuration Template
:
Note: the Generate Configuration Template menu is only available to users who have had the Generate Configuration Template privilege added to their user profile by an administrator. This is set as part of the Tabs privilege. For more information about enabling user privileges, see Modifying User Privileges
.
The Create Configuration Template popup appears:
2. Enter a name into Template Name field
on the popup. The name must not contain back quotes, commas, backslashes, or double quotation marks. Note that as of AMM 2.17, angled brackets “<” and “>” are also no longer allowed in the names of gateways, groups, or templates.
3. If the source device has custom scripts or files, these can be optionally included
in the template. All custom scripts and files are automatically selected when this option is enabled. These files are created specifically tailored to your network and should not be changed without explicit instructions from Sierra Wireless. The Files to be included
field allows the user to note which files are being included for reference later.
4. (Optional) Modify any additional fields as required. For additional information about the various on-screen controls, see Creating a New Template from Scratch above.
5. (Optional) Enable Validate template completeness
at the bottom of the wizard. This will cause the validation process to be performed when the template is submitted.
6. Click Submit
.
The AMM will save the template, after which it will be available in the template list on the Configuration Template screen. The Revision column
will indicate that both an initial first revision and draft revision are available, and the Generated from
column will indicate the device from which the template was generated:
At this point the template is now ready to be published after which it can be deployed.
You can revise a template to change values or optionally add new fields:
1. Click on the name of the template on the Configuration Template screen. This will edit the latest revision of the template or the Draft revision of the template.
2. Add and/or modify the fields that need to be revised.
Warning: If the Owner Group is changed, then any currently linked gateways and groups will be unlinked from the template.
3. Click Save when the edits are done. This will create a new Draft version of the template.
You can copy a draft or published revision of a template as the starting point for creating a new template:
1. Click on Draft or the revision number in the Revision column on the Configuration Template screen.
2. Click Save As
when the Edit Template screen appears. When selecting Save As, it will create a new template from scratch. Any links are removed and the original device is removed from the Generated from column.
Note:
If the template being copied is created from a MG90 gateway, the LCI user passwords will not be included. The LCI user passwords will need to be added by revising the new template.
3. Enter a new Template Name
and optionally, a Description
, and click Submit
:
The new template will then appear in the list on the Configuration Template screen with its revision set to Draft.
The Configuration Template screen allows you to export templates to XML and later re-import them (see the import and export buttons described in Overview of the User Interface above). This feature allows you to import and export templates to share them between AMM servers.
Exporting Templates
Follow the steps below to export templates:
1. Click the check box(es)
to the left of the template(s) for which you want to export.
2. Click the Export Template List button
to display the Export template(s) popup:
3. Select the template revision
to export for each template listed.
4. Click Export
. A .zip file containing the configuration information will be downloaded to your local PC.
Importing Templates
Follow the steps below to import templates:
1. Click the Import Template List button
to display the Import template(s) popup:
2. Click Select a file
on the popup, and choose the template .zip file that was previously exported from the AMM:
3. Select an Owner Group
that will own the template:
If the template passes validation checks, the AMM stores a draft revision of the template which is indicated by the Draft link in the Revision column on the Configuration Template screen
:
Before the template can be applied to devices, it must first be published to a numeric revision:
1. Click on Draft to open the template.
2. (Optional) Perform any additional edits to the template.
3. Click Publish
at the bottom of the template configuration screen:
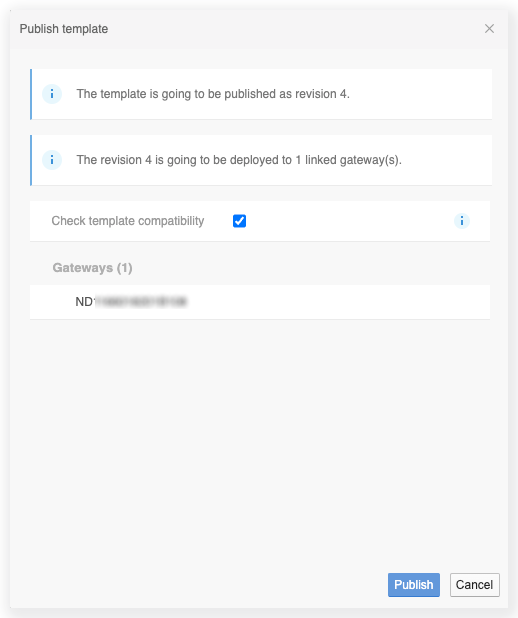
A confirmation popup will appear indicating the revision number that the template will be published as:
4. Click Publish
on the confirmation popup.
After the template has been published, its revision number is indicated in the Revision column
on the Configuration Template screen:
Hover the mouse over the revision number
to see a popup
with information about when the revision was published:
Publishing a new Revision
Follow the steps below to create a new revision of a published template:
1. Click on the template’s name
in the template list on the Configuration Template screen:
2. (Optional) Edit the new template’s fields when the Edit Template screen appears.
3. (Optional) Click Save or Save As to save the template as a Draft revision. Selecting Save As, will create a new template with the same settings as the original template. The newly created template will not have any entries under the Linked to and Generated from columns.
4. Click Publish to create a new revision of the template. A confirmation popup will appear indicating the new revision number that the template will be published as.
Note: If there are any linked gateway(s) to the template, then when you publish a new version of the template, it triggers the AMM to automatically apply the latest configuration changes to those linked gateway(s). A confirmation popup window will list the affected gateway(s). For AMM 2.17, the template compatibility check is ignored in this workflow. For 2.17.1+, there is an option Check template compatibility which is enabled by default. This check will verify that the template is compatible with the software version on the gateway device(s). This should not be disabled, unless it has been thoroughly tested.
Note: Any untested changes should not be published to a template with linked gateways, as this can result in misconfigured gateways
5. Click Publish on the confirmation popup.
After the template has been published, its new revision number is indicated in the Revision column
, along with any previous revision numbers.
Note: If there are any linked gateway(s) to the template, then the AMM UI will navigate to the Configuration Control screen and show the gateway config states as Pending - sync to device. This shows that the AMM is attempting to apply the template to the gateways.
Note: For AMM 2.17 and below, you can only abort this process by quickly reverting the gateway before the operation is completed.
For 2.17.1 and above, you can abort the process by navigating to the Operations page. Then select the created template deployment operation, and click the Cancel button before the deployment has completed.
Cloning a Revision
You can clone a published revision of a template as the starting point for creating a new revision:
1. Click on the revision number in the Revision column on the Configuration Template screen.
2. Click Save As
when the View Template screen appears. When selecting Save As, it will create a new template from scratch. Any links are removed and the original device is removed from the Generated from column.
3. Enter a new Template Name
and optionally, a Description
, and click Submit
when the Save As popup appears:
The new template will then appear in the list on the Configuration Template screen with its revision set to Draft.
Some configuration template fields allow you to add multiple entries for non-device entities using the + button. For example, the image below shows the + button
for adding multiple LCI users:
The AMM may provide one or both of the following options. Note that when both options are available, they are mutually exclusive:
Remove this entry from gateway per friendly name
: removes the entry from the target gateways based on the name entered:
The identifier field (e.g. “User Name”)
remains editable while, non-required fields
become disabled . This allows you to specify or modify the identifier of the entry that is to be removed from the device.
Rename this entry on gateway
: renames the entry:
The identifier field (e.g. “User Name”)
displays a field allowing you to enter a new friendly name, and the non-required fields
become enabled for editing.
After a configuration template has been created and published, it can then be deployed to devices or groups of devices.
Notes:
A template can be deployed at any time regardless of its validation status. After deployment, the template will be automatically linked to selected gateway(s) or gateway group(s).
When a template is linked to a group, and then a new gateway is added to the group, the user will have the option to link the template to the new gateway at that time. If the user selects to link the gateway, then the template will automatically be applied to the gateway.
When a gateway is linked with a template, then it functions as follows
if the gateway configuration is changed and becomes different from the template, then the “out of sync” status will be highlighted. The AMM will not automatically reapply the template to the gateway. The template must be re-deployed to reapply it to the gateway.
if the template is changed and published afterwards, the changes will be automatically applied to the gateway.
Note: Any untested changes should not be published to a template with linked gateways, as this can result in misconfigured gateways.
The AMM will verify that the target gateway(s) are running a version of the software that is compatible with that targeted by the configuration template. If the software version is unknown due to the gateway being offline, the AMM will perform the verification when the gateway checks in.
If the target gateway(s) have a scheduled software upgrade in progress, then the template deployment operation will stay at Pending until the software upgrade completes. From AMM 2.17.1, there is no longer an option to cancel the software upgrade when deploying configuration templates. Instead to cancel the software upgrade, so that the template deployment can proceed, go to Operations.
You can deploy multiple templates to multiple gateway(s) or gateway group(s) at once.
You can deploy templates to devices that have not checked-in. The AMM will defer the deployment(s) until the devices check-in.
Follow the steps below to deploy templates:
1. Open the Configuration Template screen.
2. Click on the gateway or group of gateways
in the Gateway tree that you want to deploy templates to. This displays checkboxes
to the left of each template listed that can be applied to the device(s) or group(s):
3. Click the checkboxes
to select the template(s) to deploy.
4. Click Deploy
. The Deploy Configuration popup appears:
The popup displays the following information, and one or more of the following options depending on the state of the selected device(s) and configuration template(s):
Platform
: displays the platform(s) to which the templates belong.
Options
:
Check template compatibility: displayed if a software version mismatch is found between the selected gateway(s) and the selected templates. If enabled, a new option will be displayed Automatically upgrade gateway(s) to compatible versions. If the new option Automatically upgrade gateway(s) to compatible versions is checked, an additional new option will be displayed asking if you want to schedule the software upgrade or not
. If Yes is selected than a schedule editing panel is inserted into the page for you to select an upgrade schedule. If No is selected, the upgrade will take effect immmediately.
The template will only be deployed and linked to a gateway if their software versions are compatible. This option is selected by default and is recommended because the use of a template that targets the same software version as the gateway, has the best configuration compatibility. If disabled, the template will be deployed and linked to a gateway even if their software versions are different.
Caution: If Check template compatibility is disabled, unexpected errors may occur on the device after deployment. For example, MGOS 4.3 configuration files are not compatible with MGOS 4.2, and the MG90 device may reset itself and lose all custom settings. This option is available for advanced users to deploy simple templates in cases where it can be determined ahead of time that the action will not be harmful.
Automatically upgrade gateway(s) to compatible versions: displayed if the template version is different from the firmware versions on the gateway(s). If enabled, a prompt will display asking if you want to schedule a software upgrade or not.
Deploy to gateway in error configuration state: displayed if it is detected that a gateway is in an error configuration state.
Caution: If a gateway is in an error configuration state, it is recommended to go to the Configuration Control page and determine why and if possible resolve it, so that it is In Sync before deploying new template(s) to it.
Publish draft template(s) before deployment: displayed if one or more of the selected templates has a draft revision. If enabled, the AMM will publish draft revision(s) before deploying them. If disabled, the AMM will deploy the latest published revision(s). It is recommended that this option be disabled to minimize the risk of unexpected results that could occur from deploying a potentially unfinished configuration change.
Link template(s) to affected gateway(s)/groups(s): if checked, template(s) will be linked to the affected gateway(s)/group(s). The linkage between template and gateways will be permanent, unless you explicitly select to unlink them. This setting is set to disabled by default.
Deploy template(s) which contain removing or renaming actions: displayed if templates have been detected that will remove or rename configuration options. If enabled, the affected options will be renamed/removed. If disabled, the affected items will remain unchanged.
Link template(s) to affected gateway(s)/groups(s): if checked, template(s) will be linked to the affected gateway(s)/group(s). The linkage between template and gateways will be permanent, unless you explicitly select to unlink them. This setting is set to disabled by default.
Reboot automatically after changes are applied (ALEOS routers and MGOS devices 4.4.1 and up) : when enabled, the AMM will automatically reboot the affected gateways after deploying the configuration template(s). Note that when enabled, the reboot will take place regardless of whether the template was actually applied. For example, if an attempt is made to apply an incompatible template, the gateway will still reboot even if the template could not be applied.
Applicable Template(s)
: lists the template(s) that will be deployed. The templates will be deployed in the order shown, from bottom to top. You can drag and drop the templates listed in this section to change the order.
CSV Import
: If the AMM detects that the template(s) contain device-specific importable fields (see Configuration Template CSV for a full list), the wizard displays the CSV Import section. Using this section, you can optionally click on Select a file to import specific field values from a template that was previously exported to CSV. Once selected, the file will be listed
and can be removed by clicking “X”
. You can also optionally click on the download template icon
to export the template(s) to a CSV file. See Generating a Skeleton Configuration CSV for more information.
Note: Prior to AMM 2.17, CSV import/export functionality was limited to WLAN, WiFi and VPN security settings, which were accessed via the Config > CSV Import|Export menu. This functionality has been replaced in AMM 2.17 by the use of the CSV Import tab on the wizard.
For more information about the functionality that existed prior to AMM 2.17, see the AMM 2.16.2 Operation and Configuration Guide available on https://source.sierrawireless.com/.
Affected Gateways and Unaffected Gateways
: lists device(s) that the template(s) will be deployed to, and those to which templates cannot be applied to. Click on Show Detail
to get additional information about each device/template deployment.
5. Click Submit
to deploy the template(s). Upon submit, the AMM creates a workflow and operations per gateway. Scheduled software upgrade operations are automatically created for those incompatible gateways.
6. A confirmation window will appear if the deployment is more than 10 gateways. It will show a cautionary message suggesting that the deployment should first be to a smaller number of gateways to ensure the accuracy and stability of the template. If the template(s) has/have been tested and are known to be working, then click Yes to start the deployment.
Notes:
If a field in a building block is disabled, it will be ignored during deployment, and will not be changed on the device.
When disabling a field that has a default value, any custom value that had been entered will be reverted to the default value. This default value will be ignored by the template deployment process.
The AMM will automatically redirect to the Configuration Control screen where you can monitor the status of the deployment(s):
The State column
displays the device’s configuration state
.
The Linked Template(s) column
displays the template(s) that have been deployed to the device. Hover the mouse over the value to display a summary of the deploy status for each linked template. You can click the value to unlink the templates.
Templates can be deleted by selecting one or more templates from the template list
and clicking Delete
:
A popup will appear specifiying any gateways or groups linked to the template and ask you to confirm
the template deletion process:
Note:
Any pending template deployment(s) must be deleted first. If not, the template deployment workflow will still proceed, and still apply the template. Go to the Operations page to cancel the template deployment workflow.
The following items are removed from the system when a template is deleted:
all revisions associated with template.
all links to the device or group associated with the template.
any deferred deployments associated with the template.
Templates can be unlinked from devices when you know that the device’s configuration has changed and no longer matches the template(s) that it was linked with (e.g. when you perform a factory reset of the device).
Follow the steps below to unlink a template:
1. Navigate to Configuration > Deployment > Configuration Control.
2. Locate the row for one of the devices that you want to unlink from the template(s).
3. Click on the value in the Link Template(s) column
for that device:
The Linked config templates popup appears:
4. Click the checkbox of the templates
that you would like to unlink from this device.
5. Click Unlink
to start the unlink process and to close the popup.
Unlinking a Template from a Group or Multiple Devices
Templates can be unlinked from a group or multiple devices in one procedure.
Follow the steps below to unlink a template:
1. Navigate to Configuration > Templates.
2. Locate the row for the template that you want to unlink from the device(s).
3. Click on the value in the Linked to(s) column
for that template:
The Linked gateway(s) and group(s) popup appears:
4. Click the checkbox of the group(s)
that you would like to unlink from this template. Unlinking a group will stop the prompt that pops up when a new device is added to the group. It does not unlink the individual devices in the group. To select All Groups, click on the checkbox
.
5. Click the checkbox of the device(s)
that you would like to unlink from this template. To select All Gateways, click on the checkbox
.
6. Click Unlink
to start the unlink process and to close the popup.
Use the CSV Import tab on the configuration template wizard page to generate a “skeleton CSV”. Click the template download button
to export the current template:
Note: the CSV Import tab won’t be available if there aren’t any fields to be imported among the selected templates.
This mechanism must be used to create a configuration template CSV, because the header row labels of this CSV cannot be manually determined, and headers change from template to template. Also note that if you have a CSV set up already, it may become invalid if you subsequently modify the template. In this scenario, it’s recommended that you download another skeleton CSV and compare the header columns with those of the existing CSV, to ensure that the column labels have not been affected by the modification.
When creating and/or publishing a template, the Configuration Template screen includes the Validate template complete field that toggles the level of validation the AMM performs when submitting the template.
When Validate template complete is disabled, the following field checks are performed when Submit is clicked:
The Template Name field (required) is not empty.
All other required fields are populated.
Date/time fields satisfy the required date/time format.
IP address fields contain valid IP address values.
Enabled fields meet length, character, and/or value range restrictions.
Dependency fields throughout parent/child building block hierarchies have been populated. For example, when the VPN server ID field is enabled with a value, then its corresponding parent VPN friendly name field must be enabled with a valid value, so that the AMM can identify the VPN (by friendly name) that the Server ID applies to.
When Validate template complete is enabled, the following validation checks are performed when Submit is clicked:
All of the basic field checks listed above.
All fields with value dependencies must have their corresponding configurations defined in the same template. For example, if a VPN monitors field is given value “Monitor 1”, then a corresponding complete configuration of “Monitor 1” must be added to the same template.
Notes:
No validation is performed on disabled fields (i.e. fields with the toggle slider turned off).
If a field depends on another required field, but the latter is currently disabled, the required field’s default value will be saved to the template to ensure the configuration generated by the template is valid, in case the value is missing from the device. If the required value is present on the device, it will be ignored.
If the template passes the validation tests after submitting the template, the Status field on the Configuration Template screen will indicate Validated
:
If the template contains validation errors, the errors are summarized at the top of the template
:
Note: If the template is not complete, a popup will be displayed on submit/save if Validate template complete is enabled. This allows you to continue and save the template with validation errors, or cancel to go back and fix the errors. A complete template means:
all required fields that are enabled have valid user inputs.
all required fields that are not enabled have default values.
fields with dependencies to other building blocks satisfy a “complete” configuration.
3. Open the template on the AMM to ensure the configuration from the gateway is completed. If it is incomplete, go back to step 1.
4. On the LCI, reset the gateway to factory defaults by navigating to General > Backup/Restore and then choosing Reset All to Factory Defaults.
5. It is necessary to wait several minutes while the gateway finishes its configuration repository initialization. To check if the gateway has finished initialization, you can navigate on the AMM to Configuration > Deployment > Configuration Control and then click on the Revert button. Wait until the state is In Sync.
6. Deploy the configuration template on the AMM to the MG90.
7. Perform tests to verify that the gateway is restored to the configuration state that it was in, prior to the reset to factory defaults.
Once you have validated that the configuration template operates as expected in the field, you can use the configuration template to deploy to the full fleet.
 Searching...

 Platforms: filters the list to show only templates that apply to the selected platform.
 Filter edit box: filters the list in part or all of a template name. For more information about searches see: Filter Box and Searching
.
Filter edit box: filters the list in part or all of a template name. For more information about searches see: Filter Box and Searching
. Range dropdown: selects the date/time range to filter, based on the last date/time that templates were modified. Selecting an option from the dropdown will display a field where the range can be input.
 Search: filters the list by the platforms, filter, and range selected.
 Name: the name of the template
 Revision: lists the template’s current and historical published revisions.
 Platform: the router model that the template can be applied to/is compatible with.
 Target Version: the minimum platform software version that the template can be applied to/is compatible with.
 Status: the current validation status of the template since it was last saved. Will be set to one of the following:
 Created by: the name of the user who created the template.
 Last Modified: the date/time when the template was last updated.
 Owner group: the gateway group whose users have access to this template.
 Linked to: lists the gateway(s) and gateway group(s) that the template has been deployed to. The gateway(s) will inherit the configuration values when a template change is published.
 Generated from: the name of the device that the template was generated from. This column will be empty if the template was created from scratch.
 Description: a description of the template.
 Add: displays the Create Configuration Template wizard, allowing you to create a new template from scratch.
 Delete: deletes one or more of the selected templates.
 Deploy: deploys the selected template(s) to the selected device(s).
 Import: imports one or more templates that were saved to an XML file using the Export button.
 Export: exports the selected templates to an XML file.
 Export to CSV: exports the information shown in the list to a .CSV file.
 Refresh: forces the screen to refresh.
 Status: the current
  Created by: the name of the user who created the template.
 Last Modified: the date/time when the template was last updated.
 Owner group: the gateway group whose users have access to this template.
 Linked to: lists the gateway(s) and gateway group(s) that the template has been deployed to. The gateway(s) will inherit the configuration values when a template change is published.
 Generated from: the name of the device that the template was generated from. This column will be empty if the template was created from scratch.
 Deploy:
  Import:
  Export:
  Export to CSV: exports the information shown in the list to a .CSV file.
 Refresh: forces the screen to refresh.
 of gateways in the Gateway Tree, whose device type(s) correspond to the device type(s) of the configuration templates listed. Once selected in the Gateway tree, you will then be able to select the relevant templates on the Configuration Templates screen
  :
:
 :
:
 that you want to include in the configuration. You can either drag and drop them from the tree onto the configuration area
  or click on the blue arrow
  that appears when one or more items are selected in the tree:
 to the left of each building block to remove, and click X
  :
:


 to deploy the template(s). Upon submit, the AMM creates a workflow and operations per gateway. Scheduled software upgrade operations are automatically created for those incompatible gateways.

 displays the device’s configuration state
.
displays the device’s configuration state
. displays the template(s) that have been deployed to the device. Hover the mouse over the value to display a summary of the deploy status for each linked template. You can click the value to unlink the templates.


