Configuring Simple Captive Portal
Simple Captive Portal enables you to redirect traffic from Wi-Fi clients to a landing page hosted on the router before granting those clients Web access. Unlike Extended Captive Portal, clients using Simple Captive Portal do not require login credentials or a password to access the Web.
As well, Simple Captive Portal does not require a third-party service like HotSpotSystem. You can also customize the login/splash page and manage the client session length locally without a UAM/RADIUS server. To get you started, Semtech has provided a sample that demonstrates displaying a web page via Simple Captive Portal, which you can download here.
Clients will log in using one of the following options:
- The router’s built-in “demo” splash page (shown here)
- A custom page you have uploaded to the router
- A custom page hosted on your own server
 Initializing Table Of Contents...
Before you begin
- Go to Networking > Zones Settings > LAN Segments and create a LAN Segment for the captive portal traffic. The example below shows “GuestPortal,” with an IP address of 192.168.8.1.

- Configure a Wi-Fi Access Point on the router for use by captive portal clients. AirLink XR90 Wi-Fi configuration is shown below. See Wi-Fi Configuration for your router’s Wi-Fi configuration instructions.
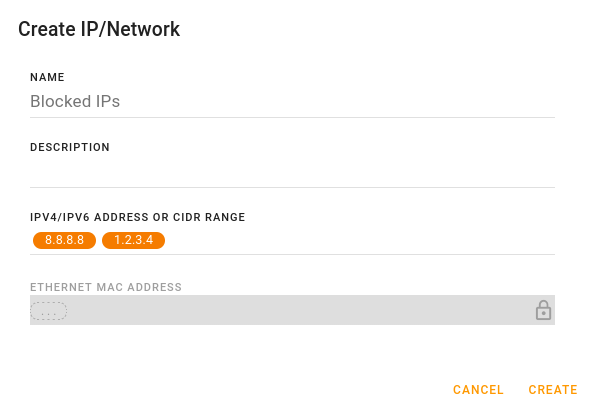
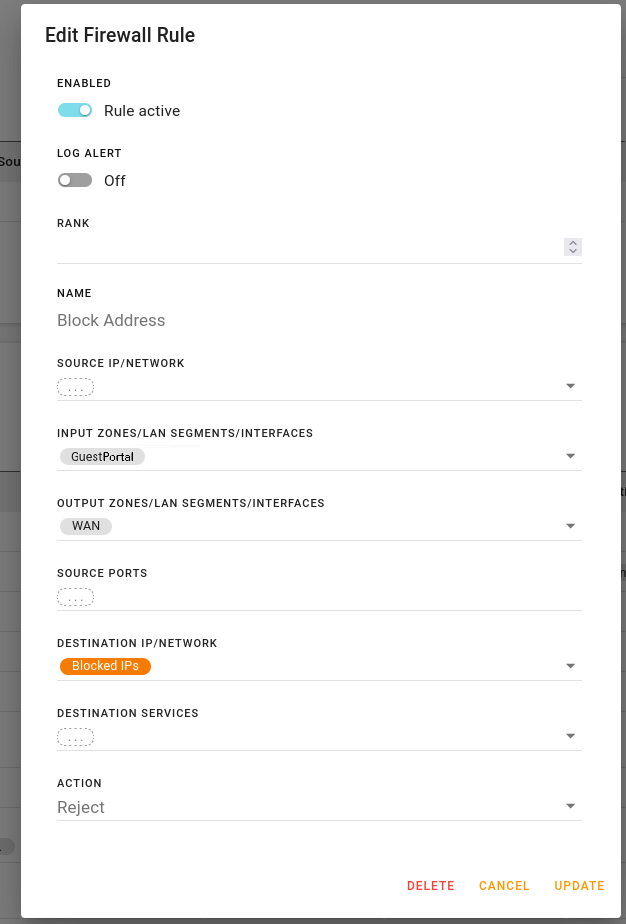
- If you want to block certain IP addresses for clients while they are using the captive portal, then you will need to:
- Create an address zone for the blocked IP addresses. For more information about Device IP/Network zones, see Device IP/Network Configuration.

- Create a firewall rule that blocks traffic to these addresses. For more information about firewalls, see Firewall Configuration on the Captive Portal LAN Segment.

- Create an address zone for the blocked IP addresses. For more information about Device IP/Network zones, see Device IP/Network Configuration.
Once this pre-configuration is done, you can configure the Simple Captive Portal settings at Networking > Simple Captive Portal.
Simple Captive Portal settings
To configure Simple Captive Portal, go to Networking > Simple Captive Portal and enable it. The Simple Captive Portal settings are listed and described below.

| SETTING | DESCRIPTION |
|---|---|
| ENABLE |
Enable or disable the simple captive portal.
|
| STATE |
Status of the simple captive portal. The status depends on the mode you’ve selected (see MODE below for more information).
|
| MODE |
You can select the following modes for displaying the Simple Captive Portal splash page:

|
| LAN SEGMENT |
Enter the LAN Segment you configured earlier. Clients on this LAN Segment will connect to the Wi-Fi Access Point and be directed to the Simple Captive Portal splash page. |
| SESSION TIMEOUT |
Enter the maximum time (in seconds) a session can stay open before automatically ending.
|
| UPLOAD SPLASH PAGE |
This button appears in Local mode. Click to upload your splash page file in tar.gz format. For more information, see Configuring a Custom Splash Page 
|
| SPLASH PAGE SERVER | Appears in Remote mode. Enter the IP address or FQDN of the server hosting your splash page files. |
| SPLASH PAGE FILENAME | Appears in Remote mode. Enter the filename of the tar.gz file containing your splash page files. |
| SERVER INTERVAL | Appears in Remote mode. Enter the interval at which the router downloads the splash page from the remote server (the range is 30 to 10,000,000 minutes). |
| USER | Appears in Remote mode. Enter the user name to access the remote server, if required. |
| PASSWORD | Appears in Remote mode. Enter the password to access the remote server, if required. |
Configuring a Custom Splash Page
As noted above, in Local or Remote mode, you can upload or host your splash page file in tar.gz format (a tool such as 7-Zip can help you create .tar and .tar.gz files). This splash page can be customized with your own graphics, text, and so on.
The .tar.gz file must contain a root folder named webportal that contains the rest of your files (.png or .jpg image files, .css and others). The webportal folder must also contain a login.htm file that allows clients to send a POST to <server>/accept.
Semtech does not recommend referencing external content in the portal, via DNS in particular. All images, icons, xml/css files and other content used by the portal must be stored in the webportal folder.
If the uploaded file cannot be used (as indicated by the Invalid package status), the last valid splash page set will be used. For example, when changing Mode from Demo to Local or Remote and the upload is not successful or the files are incorrect, the portal will still use the Demo page. If a custom set is in use and changing to a new set fails, the previous custom set will be used until a new set successfully uploads.
Monitoring Simple Captive Portal Activity
In the AUTHENTICATED CLIENTS table, you can view information about devices (LAN IP Address, device MAC address and Session Expiry time) that have connected to the WAN using the Simple Captive Portal.


