Configuring the router for the Tracker Widget
This page shows you how to configure an AirLink router so that it will provide location data for display in the Tracker widget. For more information about Tracker itself, see How to Use the Tracker Widget.
Tracker uses GPS data from the AirLink router, so you must:
- connect a compatible GNSS antenna. For information about antennas, see the Semtech Antennas page and the Hardware User Guide for your router. You can find product documentation on The Source.
- Enable Location Services on the router.
 Initializing Table Of Contents...
Enabling Location on the router
In AirLink OS, go to Services > Location > General, and ensure that GNSS ENABLE is On. GNSS is enabled by default and begins working when the router is powered on with a GNSS antenna connected.
Your router’s AirLink OS Location settings may not include all the settings shown in the AirLink XR60 example below.

To configure communication frequency in ALMS, you can either:
Preconfigure your routers at registration and set the Heartbeat to 15 minutes. See How to register systems with an initial configuration.
or
On the Monitor > Systems page:
- Select a system
- Click Configure Communication.

- Set the Heartbeat to 15 minutes.
- Click Configure communication.

Additional Router Configuration
Configuring a Smart Reporting rule in AirLink OS
Configuring a smart reporting rule with an On Change trigger enables the router to record location changes and forward location data to ALMS.
Semtech recommends configuring these settings on a single router, and then creating a configuration template that can be applied to a fleet of routers. These routers must be the same model and running the same AirLink OS router software version as the router on which you created the configuration template.
If you are configuring the router in ALMS, first locate the router and view its configuration.
- Go to Monitor > Systems.
- In the Systems grid, click the name of the desired router.
On the System detail page, click Configuration.

The AirLink OS configuration interface opens.

Create a Smart Reporting Rule
To create a smart reporting rule:
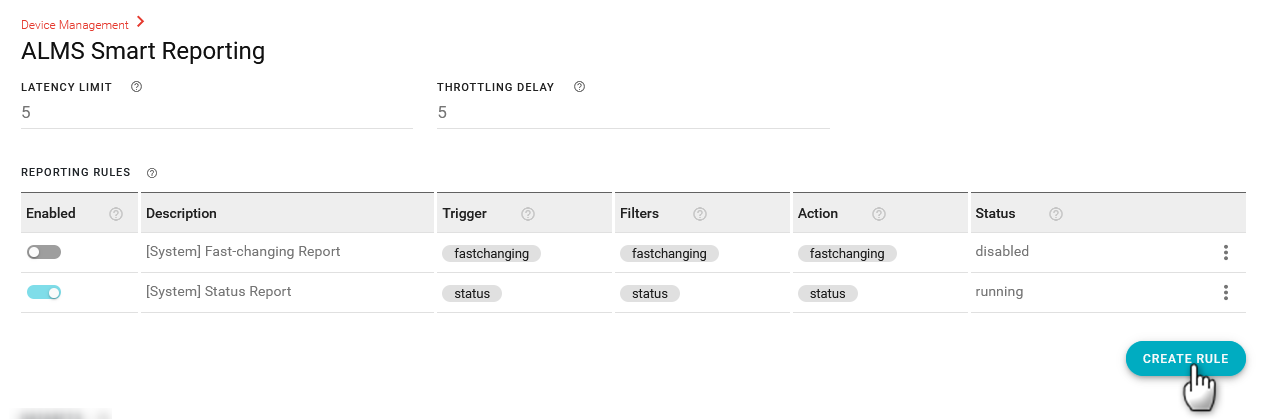
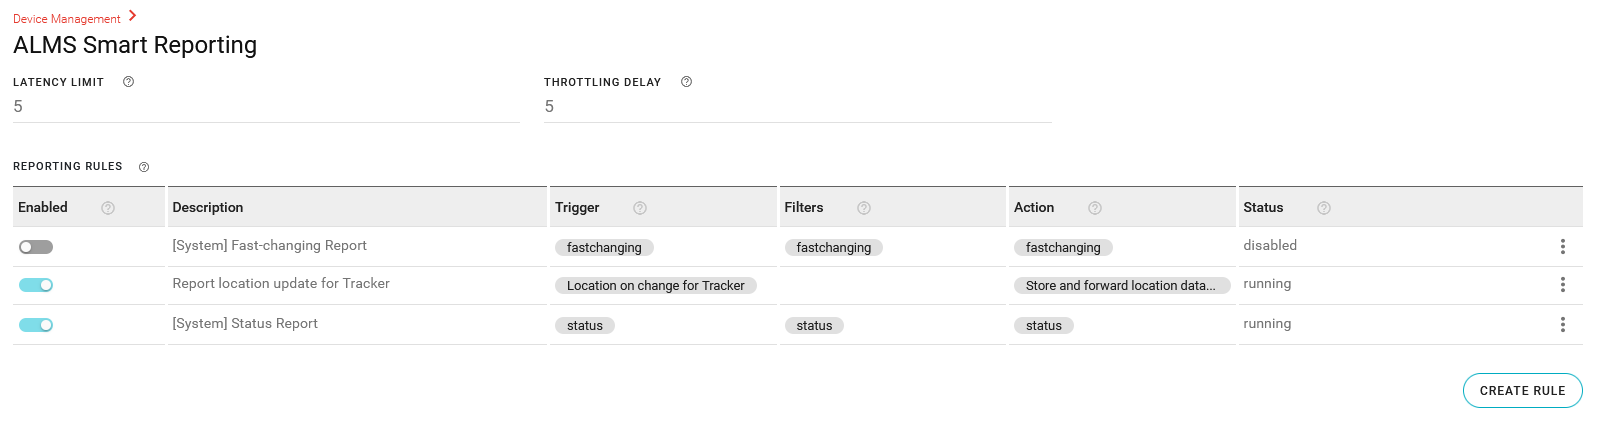
- Go to System > Device Management > ALMS Smart Reporting.
Set the LATENCY LIMIT and THROTTLING DELAY to 5 seconds to optimize Tracker performance. Please be advised that these settings will increase data usage for your fleet. Semtech recommends monitoring your data usage and increasing LATENCY LIMIT and THROTTLING DELAY if necessary.
These settings are available for routers running AirLink OS 5.2 or later. For routers running AirLink OS 5.0.86 or 5.1.78, see Configuring Data Report Latency below.
Under the REPORTING RULES table, click CREATE RULE.
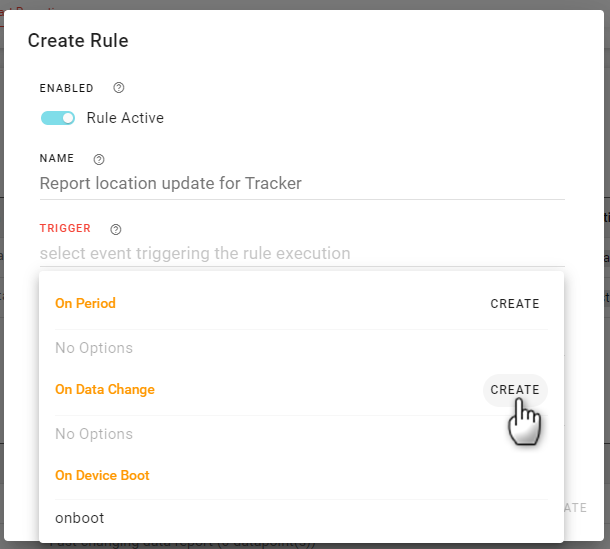
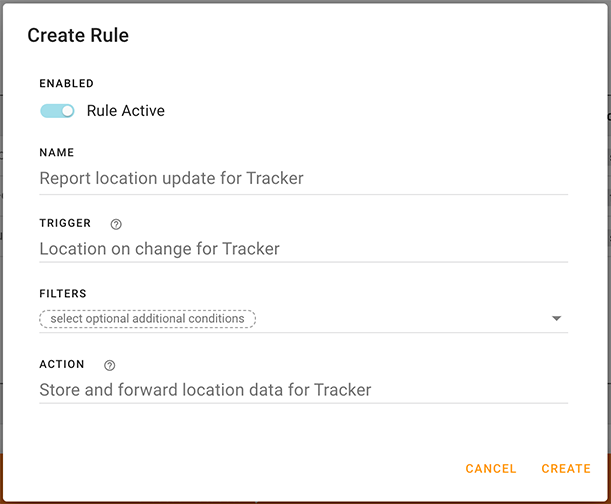
In Create Rule, enter a NAME for the rule, such as “Report location update for Tracker”.
Under TRIGGER, click CREATE to create a new “On Data Change” trigger.
In Create On Change, enter a NAME for the trigger.
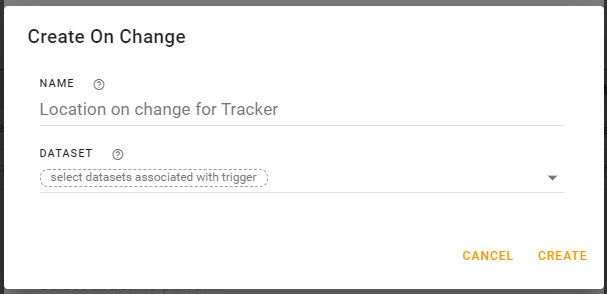
Under DATASET, select the GNSS Report dataset.
Click CREATE.
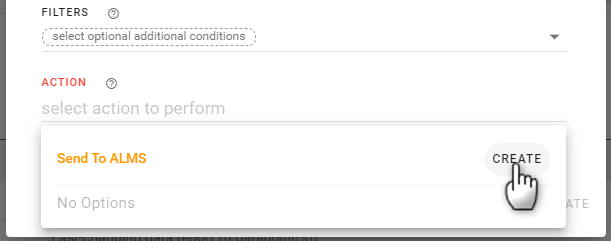
In Create Rule, do not select any FILTERS.
Under ACTION, click CREATE.
In Create Send To ALMS, enter a NAME such as “Store and forward location data for Tracker”.
Under STORAGE POLICY, select Store And Forward.
Under DATASET, select the GNSS Report dataset.
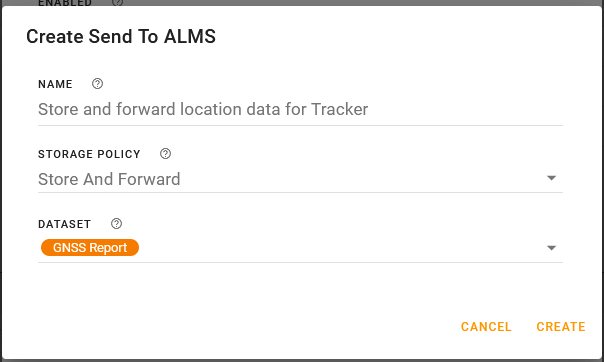
Click CREATE.
In Create Rule, click CREATE to finish creating the Smart Reporting Rule.
Confirm that the new new rule is enabled in the REPORTING RULES table.
Click SAVE to save the configuration change on the router.


Create a Configuration Template
To apply the new reporting rule to multiple routers, you can create an AirLink OS configuration template containing the new Smart Reporting rule.
See How to create a template for an overview of templates in ALMS.
To create the configuration template in ALMS:
- In ALMS, go to Configure > Templates.
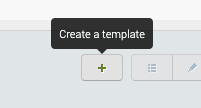
- Click + in the action bar.
- The Create template window appears.
- Select the system from which you created the template. Leave the default option “Empty” selected.
- Click Continue. The AirLink OS UI opens in Template mode.
- Go to System > Device Management > ALMS Smart Reporting.
- Select the LATENCY LIMIT and THROTTLING DELAY.
- Select the Reporting Rule you created earlier (“Report location update for Tracker”, for example).
Click EXPORT.
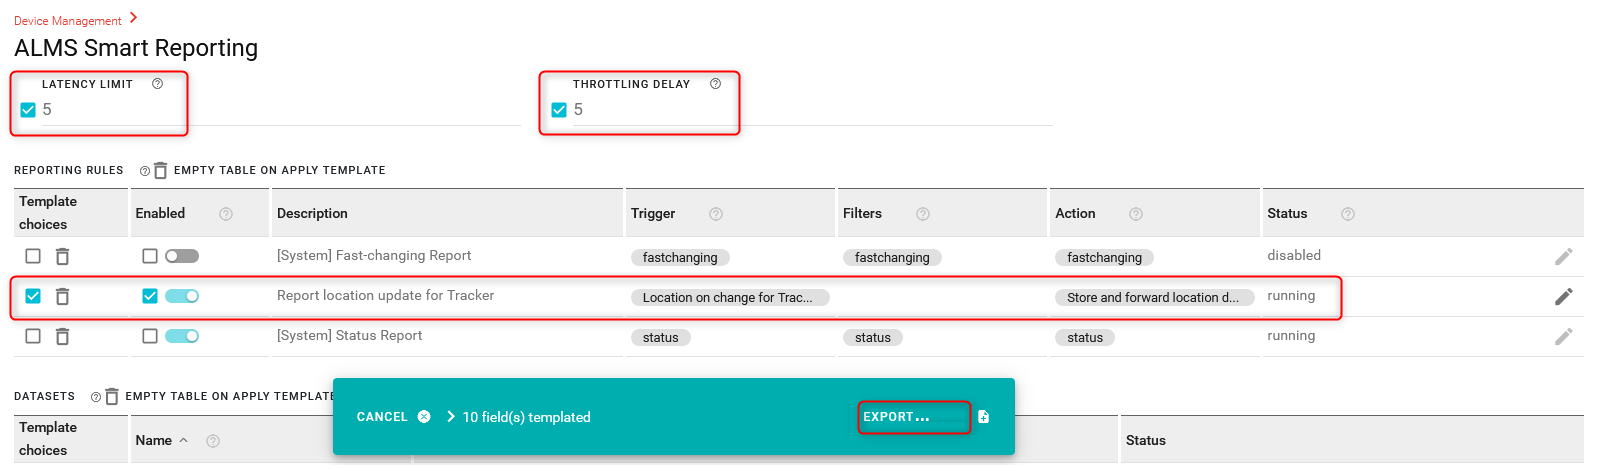
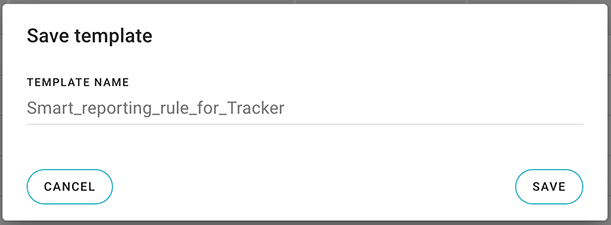
Select “Export to my ALMS account” to save the template, and give it a name such as “Smart_reporting_rule_for_Tracker”.
Click SAVE to finish creating the template.


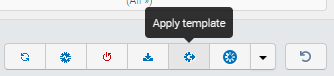
To apply a template, go to Monitor > Systems, select the target routers, and then click Apply template.
A configuration template is associated with a specific router model and its firmware release. Applying a template will fail if the router models and/or the firmware release versions do not match.

Configuring Data Report Latency
AirLink OS has a default data report latency of 10 seconds and a default throttling delay of 120 seconds, which is not optimal for reporting Tracker data. In AirLink OS 5.2 and later, both latency and throttling can be configured to a minimum of 5 seconds.
In AirLink OS 5.0.86 and 5.1.78, latency and throttling delay are not user-configurable. However, for routers running AirLink OS 5.0.86 or 5.1.78, Semtech has provided templates that will configure report latency to a minimum of 2 seconds (throttling delay cannot be configured). The templates are available at Tracker Latency Templates (AirLink OS 5.0 and 5.1).