How to activate a SIM/System with a custom static IP Address?
This How-To is dedicated to customers having a private APN with Custom Static IP address allocation. If this type of allocation is of interest to you, please contact our technical support and/or your usual account contact.
If you have a private APN, and the APN has been configured with Custom Static IP address allocation (as opposed to automatic IP address allocation) AirVantage allows you to choose the Static IP Address on which a SIM will be activated.
Please note that the IP address shall always be configured prior the activation of the Private APN option to the system, otherwise activation or add option operations will fail.
Edit one system to preset its IP address
In Monitor > Systems select the system on which you want to configure the IP Address and click on the Edit button in the more menu ![]() .
Alternatively, you can use the
.
Alternatively, you can use the Edit button from the system details window.
A popup will be displayed in which you can specify among other parameters the Requested IP address to be used when the private APN option will be added to the system.

Edit systems in bulk to preset their IP addresses
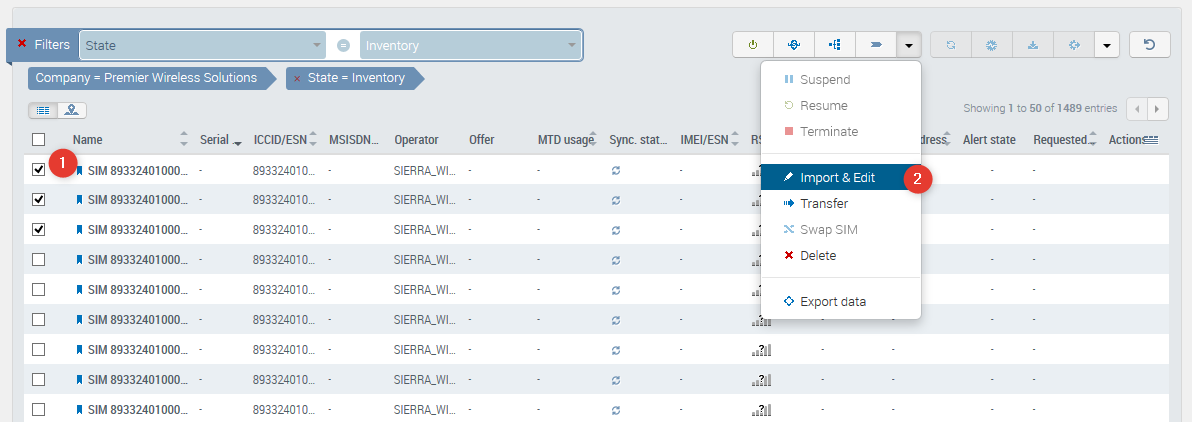
AirVantage also provides the capability to configure IP addresses on a large number of systems at once. From Monitor > Systems, filter the list of systems and check the ones for which you want to set the IP address and click on the More menu and on action Import & Edit :

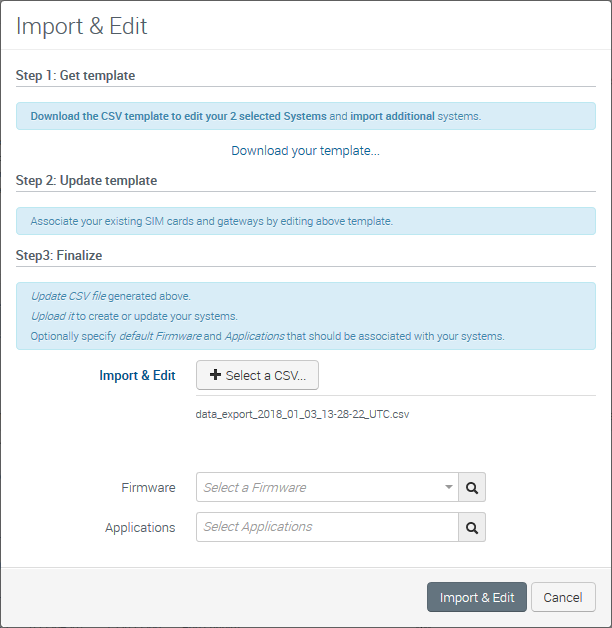
Generate the template in the first section of the popup. In this generated template, fill the column “SUBSCRIPTION[REQUESTED IP]” of the CSV file with the IP address to configure and provide the updated file to complete the bulk edit process. Make sure your editing software does not transform the ICCIDs.

Import the altered template as part of the third section and finalize by clicking on Import and Edit button at the bottom of the popup:

View the previously requested IP address
In Monitor > Systems, on the right top corner on the grid, click on grid configuration icon to add the column ‘Requested IP Address’.

Once you have added the column, you can view all the IP addresses that you have requested for each system even if the IP address has not been attributed yet (if the system is still in Inventory of if private APN option has not been added yet):

For systems on which the private APN option with custom IP allocation has been activated, Requested IP address and IP address fields will be equivalent.
Activate the private APN option
Once you have set the Requested IP address, the next step is to activate the system (if the private APN is activated by default from the activation) or to activate the private APN option with custom IP allocation.
This follows the usual way to activate an option from Monitor > Systems, by clicking on the Change Options button. Add the APN of choice (the one with custom IP allocation). Don’t forget to remove the Dynamic APN (in example screenshot below remove: Data - APN internet.mbqt.net(IPv4))

 Searching...