 Searching...
How to understand and work with the timeline
Overview
AirVantage includes a Timeline screen that displays events for a specific device over a period of time.
This topic provides the following sections on how to access, understand, and work with the Timeline screen:

Accessing the Timeline
Follow the steps below to access the Timeline screen:
- Navigate to Monitor > Systems.
- Locate your device in the list and click on it
Perform one of the following methods:
- Method 1: Click on the Timeline tab at the top of the screen:

- Method 2: Locate the Last Communication pane and click See all communications (Timeline) link near the upper-right corner of the pane:
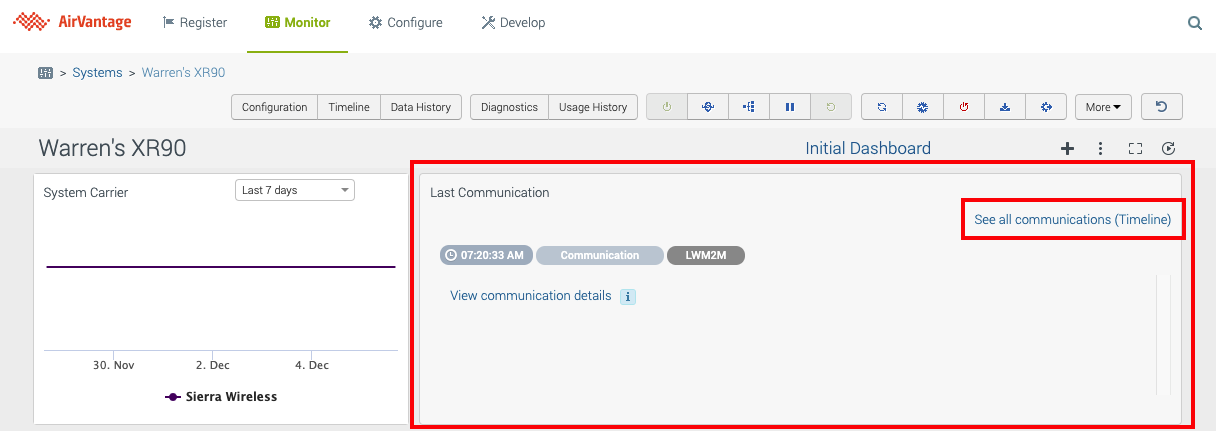
AirVantage then navigates to the Timeline screen.


Working with the Timeline
The following subsections describe how to work with the Timeline:
Viewing the Status
The top of the Timeline screen displays the communication status information for the System, so that you can see its current state:

- Comm status: Current communication status. Hover the mouse over the icon to see the Frequency, Warning after, and Error after times.
- Last seen: The time since the device last communicated with AirVantage.
- Next comm. (ETA): The next expected communication time.
- Sync status: Current synchronization status. Click on the icon to display the device’s synchronization log and filter by sync status types.
Viewing Event Times
By default, the Timeline screen shows all events for the device grouped by day, starting with the most recent events. Each line item consists of bubbles showing the time and the event(s) that occurred at that time. As you scroll down, the Timeline loads and displays additional events from the past.
Hover the mouse over the time bubble to view the time in both local and UTC formats:

Filtering
By default, the screen displays all events up to the current date and time. Click on the List field to select one or more categories of events on which to filter the list. For more information see Event Categories below.

To remove an event category filter, click on the category’s “x” icon:
Click on the which occurred on field to set a different date/time frame. Select the date and/or time before which events are to be shown and click Apply:

Note: AirVantage has a default data retention policy of 90 days.
Drilling Down
You can click on some of the bubbles to display additional information. For example, the following highlighted section appears after clicking on a Communications event:

Clicking on the View Communication Details link opens a screen in a new browser tab displaying detailed communication details for that event:

You can also hover your mouse over certain events to view the start and end for a series of related events. This example shows the start and end events when hovering over one of the Send Command bubbles:

Data Points
Events may display a number to the right indicating that one or more datapoints were collected for the event. Click on the number to get more information:

Event Categories
The following are the categories for the different types of events for which you can filter the timeline:
- All Events: Includes all events.
- Alerts: All alerts triggered by the system during the specified time frame.
- Operations: All actions performed on entities of AirVantage generate operations. Selecting this filter displays only those Operations which affected this system. For more information see this page
- Usages: Information about data sessions for cellular connectivity managed by AirVantage on the system (not third-party SIMs). There are unlikely to be any entries for most AirLink routers and gateways, with the exception of the XR Series devices with OOBM radios.
- Control: Sierra Wireless has implemented usage and control features to ensure the availability of the platform. This includes enforcing limits on communication between devices and the platform, in the event that a device is misconfigured and is sending excess traffic to AirVantage. In the event of rejected communications, this option will easily display any events that were rejected by the platform for exceeding these Usage and Control limits. It is expected that this will happen in only very rare situations.
Communications: Communication events between the system and AirVantage. LWM2M is the primary communication protocol for AirLink routers and gateways. The other protocols may or may not be used, depending on the configuration.
- MQTT:
LWM2M: There are several aspects of LWM2M event behavior on the timeline worth noting:
- Data session started and Data session end events are related to data link establishment between the device and the network.
- Registration update and Registration expired (and also Registration) are messages linked to one of the protocols used by AirVantage and the device to make data management LWM2M
- When a device connects to the server for the first time, it sends a Registration message that includes a lifetime value. This value indicates to the server the registration lifetime.
- The device needs to send a Registration update before the lifetime timer expiry on the server side (you can see a countdown in the Monitor page of a device if this lifetime is “activated). If a Registration update message is not sent before the countdown ends, a Registration expired message is indicated on the device timeline for the server user interface.
- If a device tries to send a Registration update message after the lifetime timer expiry on server side, the server rejects the device and the device sends another Registration message.
- The lifetime term is the LWM2M one. On AirVantage side, it’s linked to the heartbeat which can be configured by Configure communication on AirVantage user interface.
REST: REST API was invoked.
OMA-DM:
AWTDA2:
MSCI (for ALEOS-based devices):
M3DA:
Connection:
Disconnection: