How to manage certificates
Certificate Management in ALMS
The AirLink solution provides powerful features to help customers deploy and manage certificates on their AirLink OS1-powered devices. Certificate management in cellular routers involves the use of digital certificates to authenticate and secure communications between your routers and the networks they need to connect with. These certificates are part of a public key infrastructure (PKI) and are used to establish secure, encrypted connections, ensuring that data transmitted over cellular networks is protected from unauthorized access and tampering.
There are many use cases that certificates can address, but the primary use cases for AirLink customers are to provide more robust security for Wi-Fi and VPN connections. Moving from pre-shared keys (PSK) that are common on all devices to certificates enhances security by providing a robust mechanism for authenticating devices and encrypting data, significantly reducing the risk of unauthorized access and data breaches.
Certificates also provide support for increased scalability and improve operational efficiency. Certificate management systems can easily scale to accommodate a large number of devices, and automating certificate management reduces the administrative burden and minimizes the risk of human error, leading to more efficient network operations.
1The certificate management features in ALMS do not support ALEOS-based routers.
 Initializing Table Of Contents...
Certificate Management Approaches
There are two approaches that are supported in the AirLink solution: Imported Certificates that you manually upload to the AirLink router and Generated Certificates that are managed by an external Certificate Management System (CMS). While certificate management features are a part of all ALMS accounts, users need to be given rights in their User Profile to use the features. See Enabling User Access Rights for Certificate Management.
Imported Certificates
Imported certificates refer to certificates that are managed manually by customers, added to an AirLink router’s configuration and then replicated to the fleet using templates in ALMS. You can use the certificate management features in AirLink OS and ALMS to upload and distribute certificates to your AirLink OS-powered routers, easing the process of adding these certificates to your fleet, and increasing the overall security of your solution.
There are two types of imported certificates:
Root certificate: External systems’ public certificates such as CA (Certificate Authority) root certificates, CA intermediate certificates or server self-signed certificates
Certificate: Externally generated and signed certificates used to identify and authenticate the AirLink OS device. The signed public certificate and its associated private key are required when importing it.
Best Practices in Certificate Definition
Manually managed regular certificates usually last 1 year or less. Root certificates, on the other hand, have a longer validity period, usually going from 4 to 20 years.
The following minimum key sizes are recommended for best security:
- 2048-bit RSA key
- 256-bit EC (Elliptic Curve) key
Generated Certificates Using a Certificate Management System
For customers that want to fully automate the certificate management process, you can directly integrate your AirLink routers and an external CMS. In this scenario, you define a connection to your CMS that is stored as part of the router configuration, and you need to define a corresponding configuration in your CMS. The router then generates and sends a Certificate Signing Request (CSR) to the CMS, and a new certificate is generated, signed, and installed on the router. This process uses the EST (Enrollment through Secure Transport) protocol via TLS to communicate with a pre-configured CMS.
At this time, the AirLink OS automated certificate management feature only supports the TLS protocol; therefore the CMS you use needs to support it. AirLink routers also require IP connectivity to the CMS in their default configuration, which is possible using either public CMS IP addresses, or a cellular APN.
The diagram below shows the process. Steps 1, 2 and 3 are performed by you (either manually on one router, or using a template for a fleet of routers). Steps 4 to 7 are done automatically after the router sends a Certificate Signing Request to the CMS.

For details on Certificate Management configuration within AirLink OS, see the AirLink OS documentation.
Best Practices in Certificate Definition
Certificate lifecycle automation provided by the CMS allows for much shorter validity periods, which enhances overall security. Keep in mind that AirLink OS automatically renews managed certificates 90 days before they are set to expire (this renewal period is non-configurable). If your managed certificate expiration period is set at 90 days or less, the certificate will renew every day.
Like in imported certificates, the following minimum key sizes are recommended for best security:
- 2048-bit RSA key
- 256-bit EC (Elliptic Curve) key
Provisioning Generated Certificates
You can create and distribute generated certificates across your fleet using the workflow described below. You can configure one router first and then use a template to distribute these settings to the rest of your fleet.
Prerequisites:
- Routers must be running AirLink OS 5.1.78 or later
- Routers must have a WAN connection. Generating certificates using a CMS does not work when the router has an LPWA connection only.
- Correctly configure your certificate management system
- Upload a CMS root certificate to the router
Certificates and certificate generation is configured using the AirLink OS user interface. For any of the steps described below, you can get the full details in the AirLink OS documentation.
- Select a router on which to perform the initial configuration.
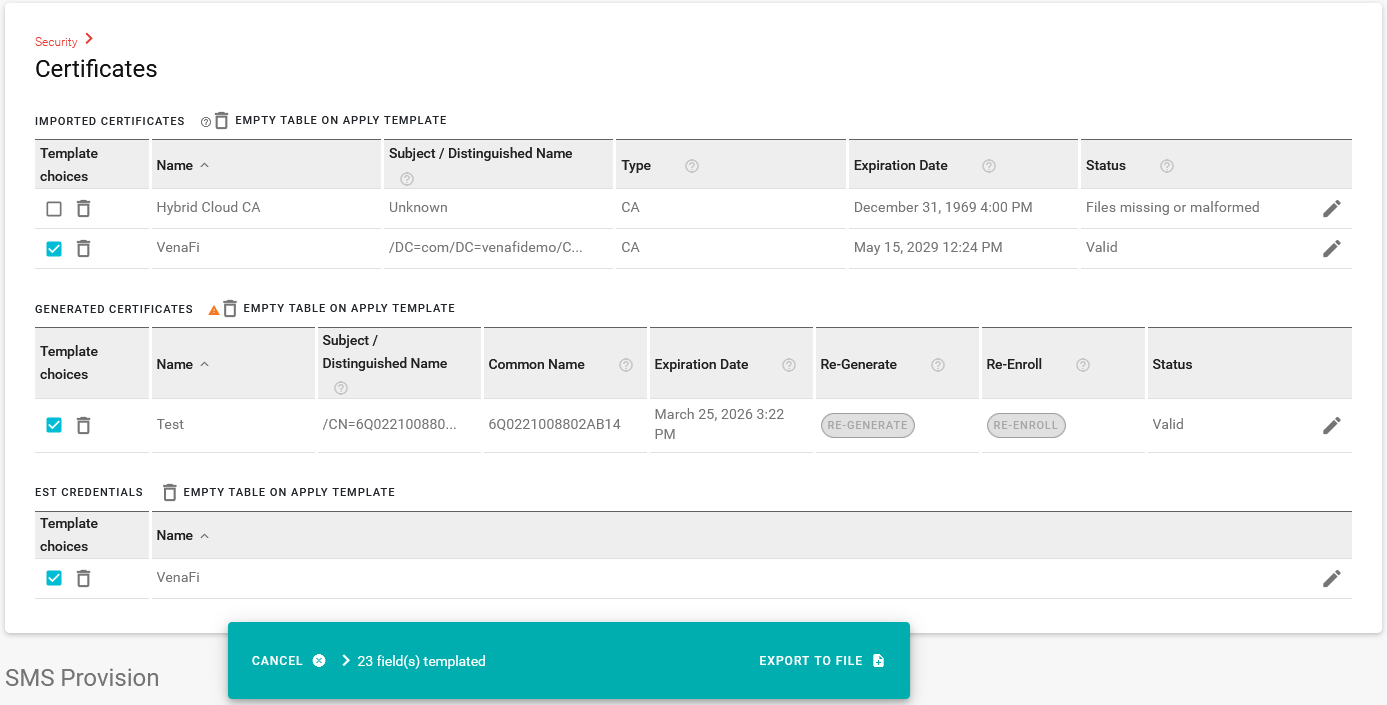
- In the AirLink OS user interface, configure the EST Credentials under Security > Certificates > EST CREDENTIALS > CREATE EST CREDENTIALS. These credentials enable the router to connect to your certificate management system when the router sends a certificate signing request.
- Create a Certificate Signing Request under Security > Certificates > GENERATED CERTIFICATES > GENERATE CERTIFICATE. These settings enable the router to send a certificate signing request and retrieve generated certificates for use on the router. Note that you must enable Use Device Serial Number for Common Name in the Certificate Signing Request if you want to use one template to apply a unique common name to each device.
- Confirm that the router generates the certificate(s).
- Add the generated certificates to the components of the router’s configuration where they are required: Wi-Fi WPA2-Enterprise authentication and/or VPN authentication (IPsec or OpenVPN).
Create a device template containing the certificate parameters.
a. First, go to Security > Certificates and select the CMS root certificate, Generated certificate configuration and EST credentials.
Don’t forget to edit the EST credentials, re-enter the password and select the password for inclusion in the template. Otherwise the password is not added to the template.
b. Go to your VPN and/or Wi-Fi configuration (any component that uses a generated certificate for authentication) and add that configuration to the template.

Export the template.
Apply this template to other routers in your fleet.


Regenerating and Re-enrolling Generated Certificates
After generating certificates, you can regenerate or re-enroll certificates if and when required.
Note that you can regenerate and re-enroll certificates in the AirLink OS user interface. Also note that access to the regenerate and re-enroll buttons in the AirLink OS user interface (shown below) is not restricted to users with Certificate Management Access.

Certificate Management Features within ALMS
ALMS has a series of features that provide insight into certificates on AirLink routers that support both Imported and Generated certificates.
Note: While certificate management features are a part of all ALMS accounts, users need to be given rights in their User Profile to use the features. See Enabling User Access Rights for Certificate Management.
To view and manage device certificates in ALMS, a new section has been created: Configure > Certificates. This page lists systems that have certificates installed and provides other certificate management features such as:
- Regenerating certificates (Generated Certificates)
- Re-enrolling certificates (Generated Certificates)
- Identifying which systems in your account have certificates or lack certificates.
Certificate Management Page
The Certificate Management page shows you routers that have certificates installed, along with information on the certificates themselves (one router may have multiple certificates installed). Both Imported and Generated certificates are displayed.
For routers deployed before Certificate Management was added to ALMS, and for routers that are newly transferred into your company, you must trigger a sync operation in your fleet to update the Certificates page with the routers’ certificate data.

You can click the Show/Hide Columns icon (  ) and select which parameters to display in the table.

These parameters include:
- Certificate Last Update — The date the certificate was last updated.
- Certificate Name — User-defined name identifying the certificate
- Certificate Status — Status of the certificate (Untrusted, Valid, Expired, Not yet valid, Wrong private key, Files missing or malformed, Invalid CA)
- Certificate Type — The type of certificate (user, CA)
- CSR Last Update
- CSR Status—To update Certificate Signing Request (CSR) status, regenerate or re-enroll the certificate.
- Expiration Date —The certificate’s expiration date
- Source—Imported (an uploaded certificate file) or Generated (a certificate generated by a certificate management system via a CSR from the router)
- Subject/Distinguished Name
- System Name
The Certificate Management page also supports filtering and sorting by any of the columns listed above. For example, you can find certificates that will expire before (or after) a certain date.

Finding Systems with No Certificates
To find systems in your fleet that do not have certificates installed, you can export certificate information in .csv format.
To export certificate information for all routers in your fleet:
Above the table on the Configuration > Certificates page, click the Export button.
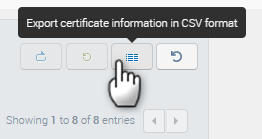
Click Export.
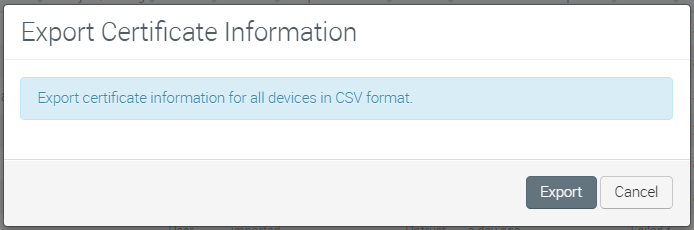


This creates and downloads a .csv file called device_certificates. The file includes certificate details for all systems (gateway entities, not SIM-only systems) in your company. You can use this file to identify systems that do not have certificates installed, or to identify systems that do not have a particular certificate installed.
Note that the .csv file does not reflect how the Certificates page is filtered. The Export action does not export what is filtered or displayed in the table. The .csv file will always contain all the devices in the fleet. For example, if you have applied a filter to show just one System Name, then export the certificate information, the .csv file will still include information for every device in the fleet.
Regenerating and Re-enrolling Generated Certificates
You can regenerate or re-enroll a single certificate by clicking an icon in the Actions column.


Or you can regenerate or re-enroll a certificate for multiple systems by selecting the systems and clicking the Regenerate or Re-enroll buttons above the table.
Click the Regenerate button to regenerate the certificate from scratch using the EST Authentication Credentials.

Click the Re-enroll button to re-enroll a certificate that is still valid. The router uses the existing certificate and private key as an authentication method instead of the EST credentials and will use the EST simplereenroll API endpoint. If the certificate has expired, then the certificate should be regenerated instead. The AirLink router automatically attempts to renew a generated certificate using the RE-ENROLL process when the certificate is within 90 days of expiry. The certificate renewal attempts repeat daily until successful.

Note that using either REGENERATE or RE-ENROLL results in a new key pair.
Note: Changing any Certificate Signing Request setting will trigger an attempt to regenerate the certificate.
The status of the REGENERATE or RE-ENROLL operation is shown in the CSR Status column. The status should transition from “Enrolling…” or “Re-enrolling…” to “Generated”. If a “Failed to enroll” status appears, check that your EST credentials are still valid and that your Certificate Signing Request settings are correctly configured to connect to your certificate management system.

You can also go to the Monitor > Operations page to select and view operations related to regenerating and re-enrolling certificates.

Configuring an Alert to Notify You When Certificates are About to Expire
You can configure an alert to notify you when device certificates are approaching their expiration date. (“Raise an alert when device certificates will expire in a specified number of days”). We recommend that all customers create a default alert rule if they use certificates. While in many cases generated certificates will automatically renew, there may be situations where the renewal is unsuccessful, and this alert rule will ensure you have sufficient notice to address any issues. Imported certificates never auto renew, and this feature will ensure appropriate notification to update those certificates.
For more information on configuring an alert rule, see What is an Alert Rule?.
Note that your User Profile must have the Device Certificates “Read” enabled to see the Alert Rule for certificate expiration.

- Under “Rule”, enter a rule name and customize the description if required.
Under “If”, select a rule condition.
Options:
- Days that any certificates will expire.
- Days that any imported certificates will expire.
- Days that any generated certificates will expire.
Operator: The only operator available is “is less than”.
Value: Select a value from 1 to 30 days. 30 is the default value. The default value is 25 days when “Days that any generated certificates will expire” is selected.
The rule is stateless.
Configure the rule action. The only action available is “Send an Email”.
Enter the recipient(s) for the “Certificate expiration notice” email notifying you:
- How many certificates will expire in the relevant company
- In how many days that the certificates will expire
- In how many days the first certificate will expire
Save the alert. It will appear in the alert rules list.
Receiving the Certificate Expiration Alert
Note: Alert rules are not evaluated immediately after they are created. Certificate expiration alerts are raised at 1:00 AM UTC every day if alert conditions are met.
The alert detail only shows the earliest days that any certificate would expire. For example, if the Alert Details page indicates that any imported certificate will expire in 16 days, that means that at least one imported certificate will expire in 16 days.
Clicking the link in the email takes you to the Configure > Certificates page, which is filtered to list the certificates that are about to expire.
Note: The expiration date in the table could be different from the value in the alert email and display on certificates page because of the:
- Time when you view the email
- Impact of daylight-saving time
Enabling User Access Rights for Certificate Management
Certificate Management features are available to all ALMS accounts. The features are enabled by default on all ALMS accounts, but the user rights for these features are not added to User Profiles by default. You need to add these new rights to the User Profiles of any users you want to access these new features.
See Managing Profiles for more information.