Monitor
Monitor helps you manage your fleet of SIMS/systems deployed on the field. It provides access to all the systems of the company along with their status, communication history, usages, configuration and management. This page is also customizable to present the information that is most important to you.
 Initializing Table Of Contents...
All the functionalities provided by AirVantage may not be available on all the devices.
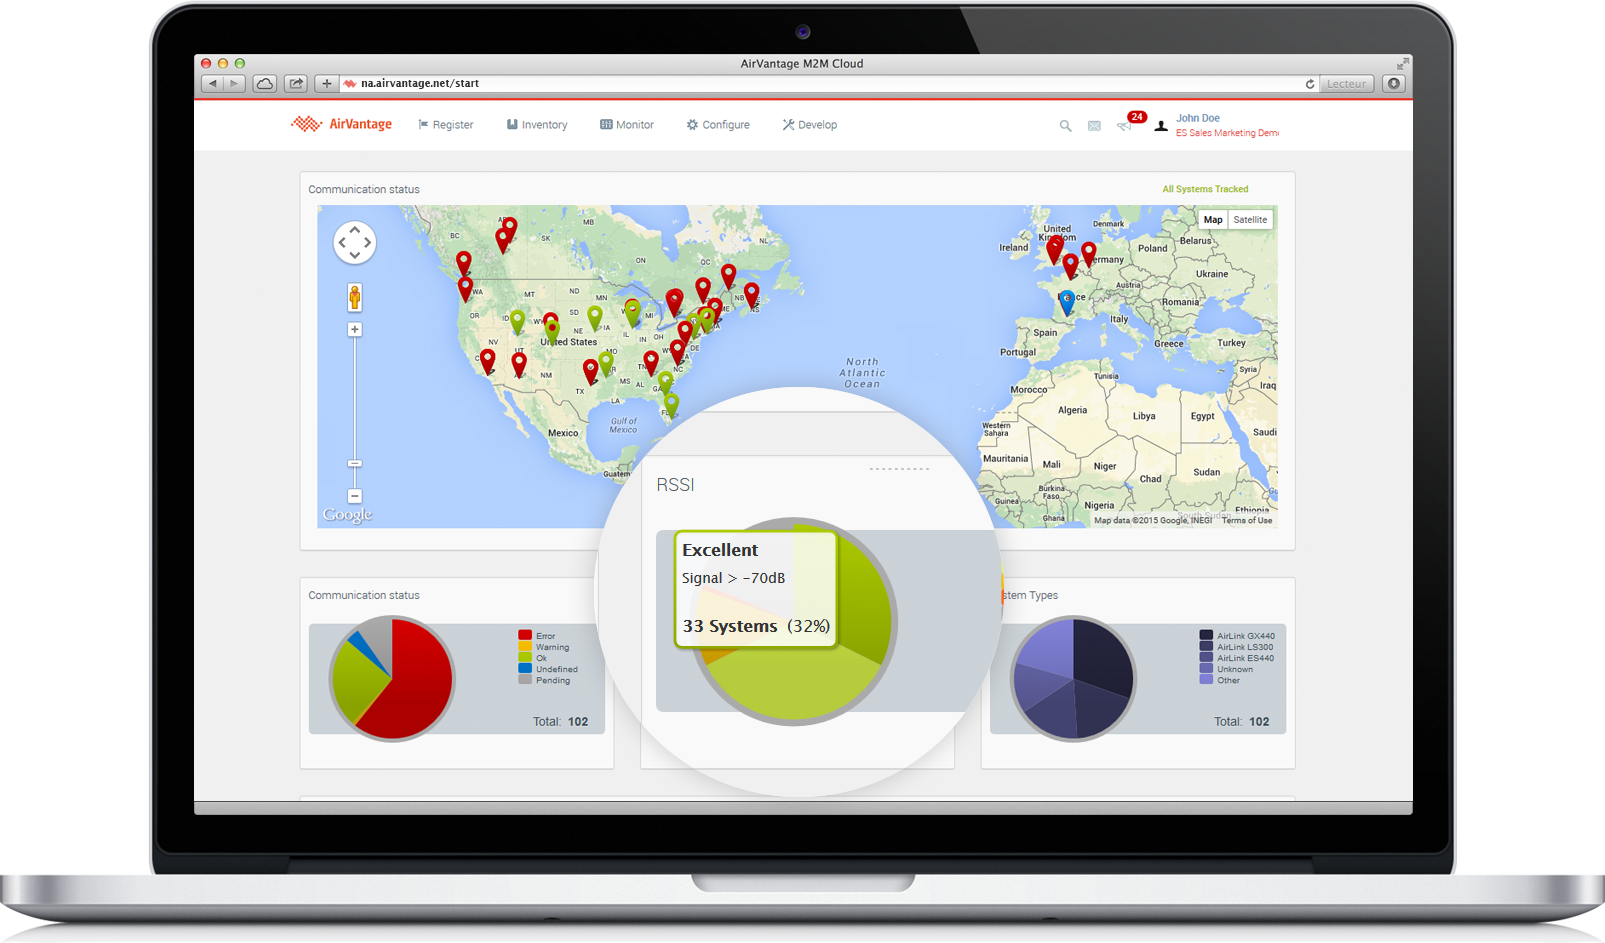
Dashboard
Configurable interactive dashboard
- The Dashboard is user configurable so you can get a quick look at the information that is most important. Online status, alerts or cellular network related information for example.
- The widgets are interactive so by clicking on a pie chart segment you will be taken directly to a list of those devices.
Birds-Eye View
- Includes a map showing the location of devices reporting GPS or configured to show fixed location via user input.
- Widgets can be configured to plot evolution of collected data, providing additional analytical capability for your fleet.
- Any numeric data can be visualized for checking the fleet trend.
- e.g. See the mean max and min values for the power input voltage of my fleet of devices.
See How to configure your dashboard? for more information.
The Monitor activity is divided in three sections:
- The Systems section. It provides access to all systems along with their status, communications history, configuration and management.
- The Alerts section shows all the alerts raised for your devices.
- An overview of all Operations launched on systems (see How to use Operations? for more information)
List View
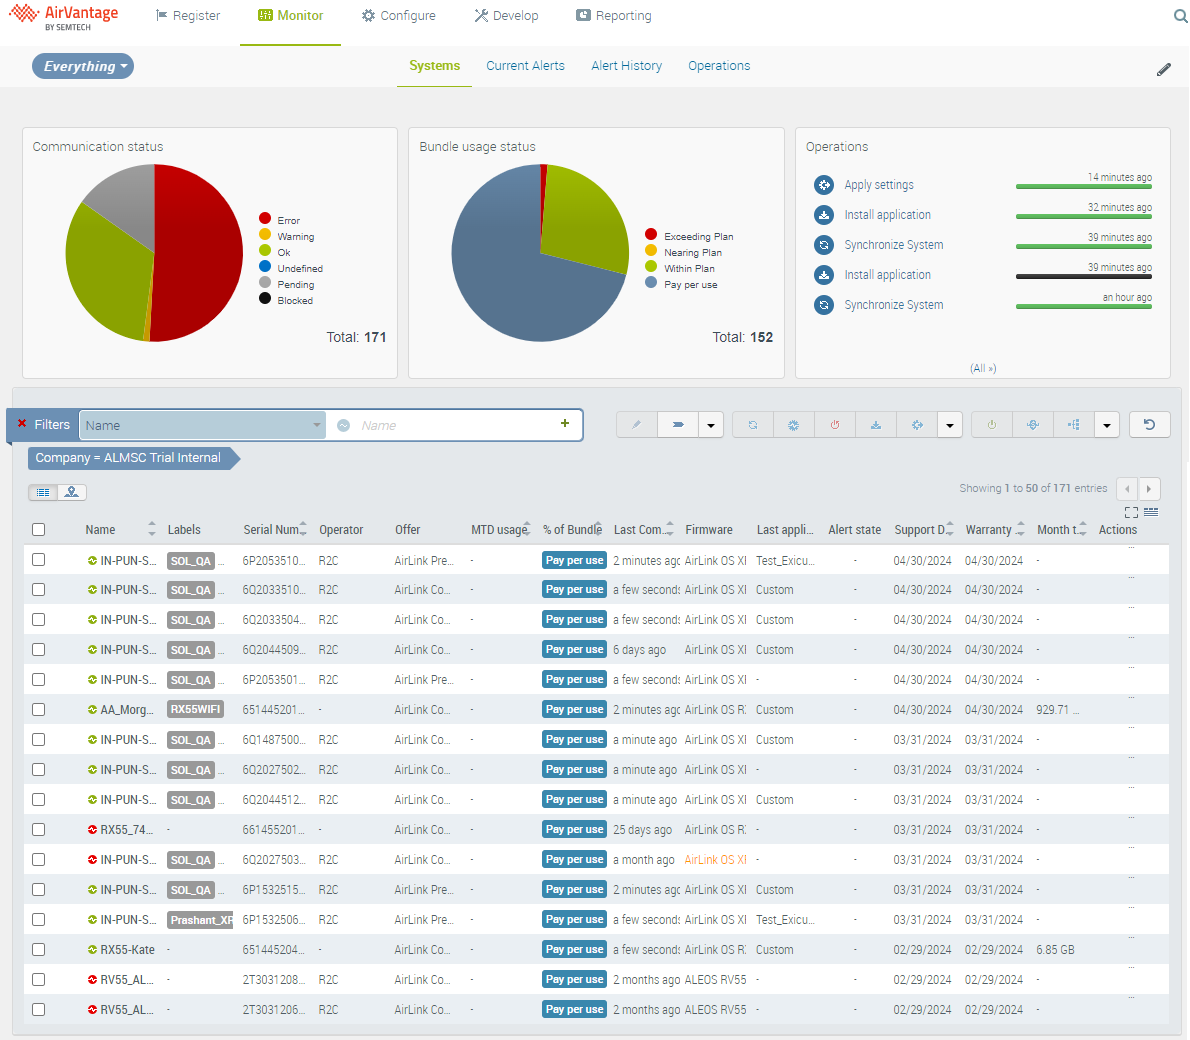
By default, the List View displays system names and their related communication status. Communication status behavior is configurable (see How to configure the communications of my system? for more information), and the following statuses are displayed:
-
 — OK (heartbeat is received)
 -
 — Warning (triggered n minutes after no heartbeat)
 -
 — Error (triggered n minutes after entering Warning state)
 -
 — Pending (device is registered but not communicating)
 — OK (heartbeat is received)
 — Warning (triggered n minutes after no heartbeat)
 — Error (triggered n minutes after entering Warning state)
 — Pending (device is registered but not communicating)
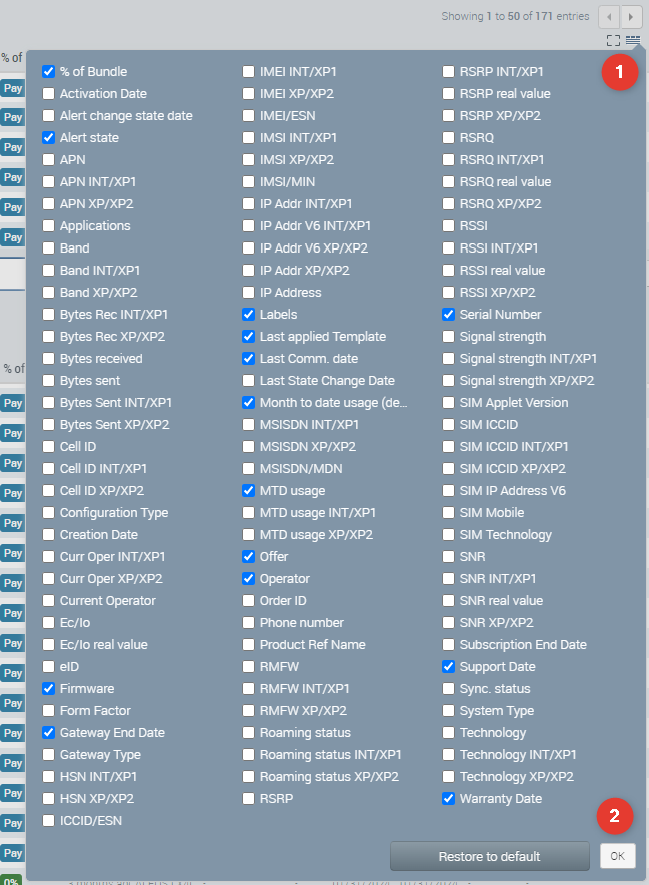
The columns displayed can be organized, resized and configured to show the parameters you need. You can select parameters from the list shown below.
- Click the Show/Hide Columns icon.
- Select the desired parameters to display in columns, and then click OK.
Lifecycle
The state defines whether the subscriptions are activated for usage or not and if the monthly charges are due or not (often used in delivery phase).
Each system state can be described as follows:
Inventory
This is the state in which the systems are created after shipment of the SIM to the customer. In this state, the SIM will not be usable, and the system will therefore not communicate. Monthly charges are also not due.
Test Ready
Test-ready-mode can be used to optimize and simplify testing and deployment processes. Test-ready-mode means that a SIM is allowed to be tested during a defined test period and with a limited volume of traffic, without being charged for the monthly fees. Note that you are still accountable of usage fees while in test ready state. Whichever of the time criteria or traffic threshold is met will automatically result in the system status being changed to Active and normal charges will be applied.
To benefit of test ready mode, you simply need to activate the system on a Test-Ready-Mode compatible offer. Upon activation, the system will be displayed in Test Ready state. At the end of the test ready period, the system will automatically switch to Active state, and start being charged based on the offer it has been activated on.
Active
The systems are Active from the date of activation. The offer will be selected as part of the activation. While Active, the system are charged for the monthly subscription fees and the SIMs are able to generate traffic corresponding to the activated services and options.
Suspended
A system in Suspended state cannot communicate any more. The corresponding SIM card will not be allowed to generate any traffic. Depending on your contract, the monthly subscription fee may still be running while Suspended.
Retired
A “Retired” system cannot be used nor re-activated again. The corresponding SIM card is blocked for usage, meaning that usage of any bearer service is not possible and will not be possible with this SIM again. If you want to reuse the device of a “Retired” system, you can still use the bulk edit to put the device in another system.
Create system management operations
To trigger a lifecycle change or provisioning change on one or multiple systems, you need to create an operation. The different operations that can be triggered are:
General and Life Cycle
| Activate | 
|
Activate one or multiple systems/SIMs on a selected offer to enable traffic. |
| Change Offer | 
|
Change the offer for one or multiple SIMs. There is no restriction in the target offer, it can be any offer of your contract. If the target offer has a different roaming configuration, the change offer is followed by a detach from network (Cancel Location) |
| Change Provisioning Options | 
|
Change provisioning options (permitted services and roaming zone templates) for one or multiple SIMs/Systems. Available options depend on the selected offer. Changing roaming configuration is followed by a detach from network (Cancel Location) |
| Change Label | 
|
Add or remove labels. |
| Suspend | 
|
Suspend one or multiple systems. A suspended system will not be able to connect to the network, and therefore will be unable to generate usage data. |
| Restore | 
|
Restore one or multiple systems. The system will be able to reconnect to the network and generate usage data. |
| Terminate | 
|
Terminate one or multiple systems. A terminated system will not be usable any more. The Terminate action cannot be reverted. |
| Import & Edit | 
|
Import systems with 3rd party SIMs & Update existing systems in bulk |
| Transfer | Transfer one or several systems to a partner, for example to a subaccount. Usages and device data consumed within the original company will remain attached to the original company and therefore will not be displayed in the target company. Transferring a system is restricted to systems without private applications. | |
| Swap SIM | 
|
Swap out the selected SIM for a replacement. This is to be used for example when a SIM card is stolen or damaged. Only the ICCID will be changed, to that of the new SIM, while keeping all identifiers related to the subscription (MSISDN, Static IP, offer, provisioning options, etc.). The ICCID of the stolen/damaged SIM will be terminated as a consequence of the Swap. |
| Export data history | 
|
Export a .csv file containing information in AirVantage for a single system. |
| Export last data | 
|
Export a .csv file containing the last known information in AirVantage for multiple systems. |
Depending on the current state of your system, only the actions that can be triggered in that state will be available.
There are no restrictions on the number of suspend or change offer operations that can be triggered within a month besides the rules imposed by the carriers. Meaning that:
- SW Advanced, SW Essentials: no restriction
- Verizon: maximum 2 suspend operations per year
Module Management and Device Management
| Apply Template | 
|
Change the configuration of one or multiple systems applying a predefined template. |
| Reboot | 
|
Reboot one or multiple systems. |
| Configure Communication | Change the frequency your systems are communicating with AirVantage, and also define datasets and frequency of these datasets. | |
| Upgrade Firmware | 
|
Upgrade one or multiple systems with a new firmware. |
| Synchronize | 
|
Create an operation to Synchronize AirVantage with your systems. |
| Retrieve > Device data | 
|
Retrieve a dataset from the device. |
| Retrieve > System logs |
|
Retrieve and then download logs from the device. See How to retrieve logs from a system? for help. |
| Export data history |
|
Export a .csv file containing information in AirVantage for a single system. |
| Export last data |
|
Export a .csv file containing the last known information in AirVantage for multiple systems. |
| Apply Workflow(s) | 
|
Apply several configuration operations in sequence to one or multiple systems. See How to configure systems using Apply Workflow(s)? for help. |
| Custom command | 
|
Send a command to a system. Commands must be defined in one of the applications running in your system. |
| Send SMS | 
|
Send a text SMS to one or multiple systems. For SW Advanced, SW Essentials and 3rd party SIMs this requires a SMS gateway to be configured in your company. See How to configure an SMS account? for help. For Enhanced Carrier Connectivity SIMs, this is straightforward. The Send SMS operation finishing in success means that the SMS has been received by the device; with the exception of SMPP based SMS accounts, for which it means received by the SMS-C. |
| Wake Up | 
|
Send a wake-up message to your systems to trigger a communication with AirVantage. A SMS gateway needs to be configured in your company. See “How to configure an SMS account?” for help. The operation needs to be supported in the firmware of your device. |
| Factory Reset | 
|
Reset to factory default one or multiple systems. The operation needs to be supported in the firmware of your device. |
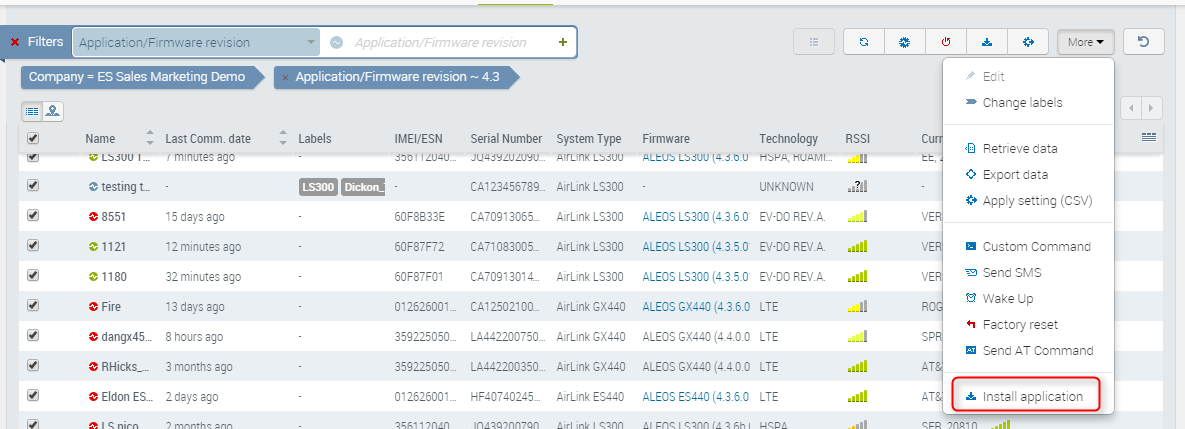
| Install Application | 
|
Install or upgrade an embedded application on your systems. |
Depending on the capabilities of your firmware/application, only some of the operations listed above may be available.
Manage large deployments
- Finding a device or group of devices of interest is easy using filters. These can be applied for single or multiple variables: filter on gateway type + firmware version.
- Labels give a powerful way to add flexibility in identifying devices. They can be used for geographic regions, vehicle types, host device types, application groups, or any other identifier that you would like to apply and use as a search term in the future. Devices can have an unlimited number of labels.
- The result of the filtered list is displayed in multiple pages if needed. You can select all the list with the check box displayed at the top left of the list.
See the simple example below:
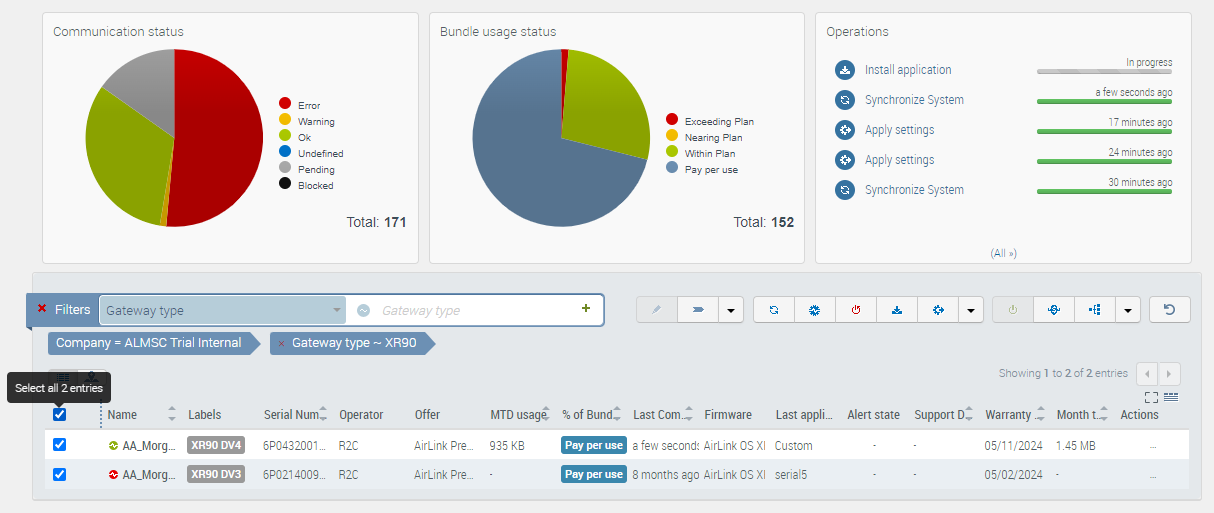
The filtered list can be saved in a group of systems using a label:
- Select all.
- Click Change labels (
 ). This action may be included under a More button.
 - Add the label for the new group.
Or directly used to perform one of the device management operations.
Map View
You can switch to see your systems and status on the map from the system grid, and toggle from one to another.
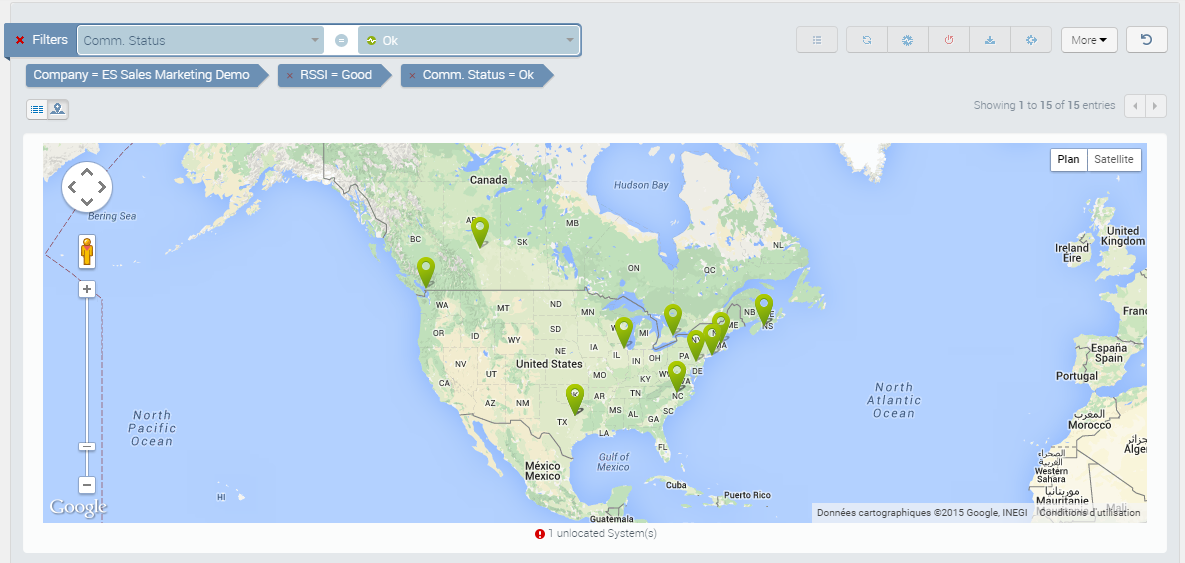
- In map view, you can still use the filters to drill down to a subset of your systems, the same way it can be done on grid view.
- By clicking on one specific system map marker icon, you will get details about this system and also direct link to launch a subset of operations on this system.
- The number of unlocated systems is reminded on the bottom of the map.
Detailed View
Most recent activity from the system is available from the system details screen. This page provides access into the device communications history as well as device configuration, direct access to AceManager by clicking on the IP address and other functions. check System View page for details.
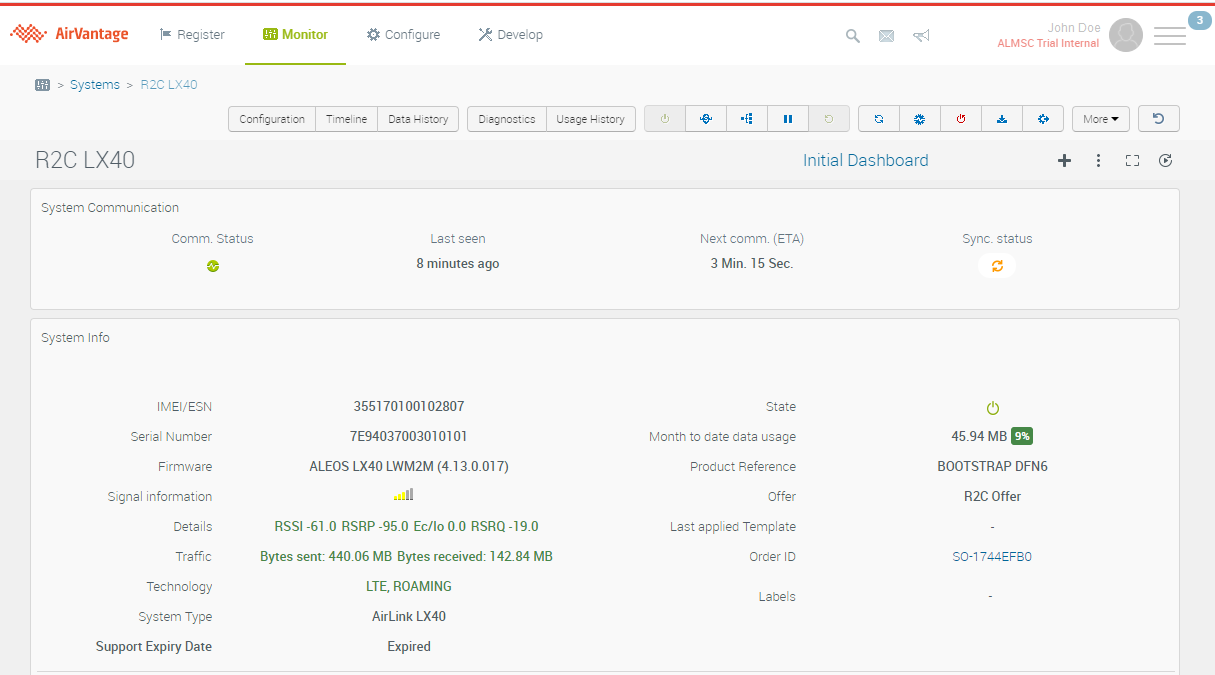
The details of a given system are accessed from the Systems list view clicking on the Details icon  in the actions toolbar after selecting a system or directly in actions column of the system.
Over the air installation
Firmware upgrade
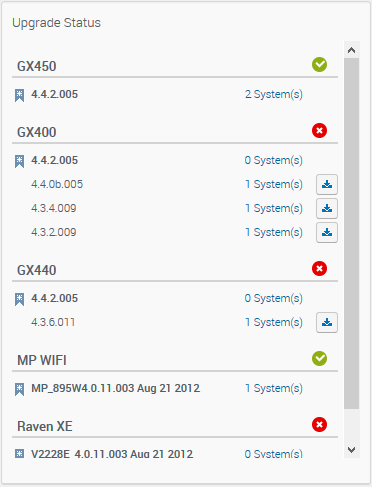
Semtech is pushing new firmware packages on AirVantage so you can keep your fleet up to date with the latest features and security patches. AirVantage also provides different widgets showing which firmware versions are actually deployed on your systems and the upgrade status compared to latest released firmware.
There are two ways to launch a firmware upgrade.
- The simplest way to launch a firmware upgrade campaign for all devices with outdated firmware is from the Upgrade Status widget on the Start Page.
- To select one or more systems whose firmware needs upgrading, click on the Upgrade menu and select Systems.
Before upgrading, please ensure that the latest firmware is certified by your carrier. (You can find certification information for each firmware revision in the release notes available from Semtech Source .
Fleet-based upgrade
The Upgrade Status widget on the Start Page Dashboard identifies systems in need of firmware upgrades, and lets you apply the latest build to all systems of a device type with a single click of the Upgrade Firmware button
.
Where all devices of a given type are already up to date, a green status icon is shown on the widget. If some or all devices of a given type need updating, an amber or red status is shown.
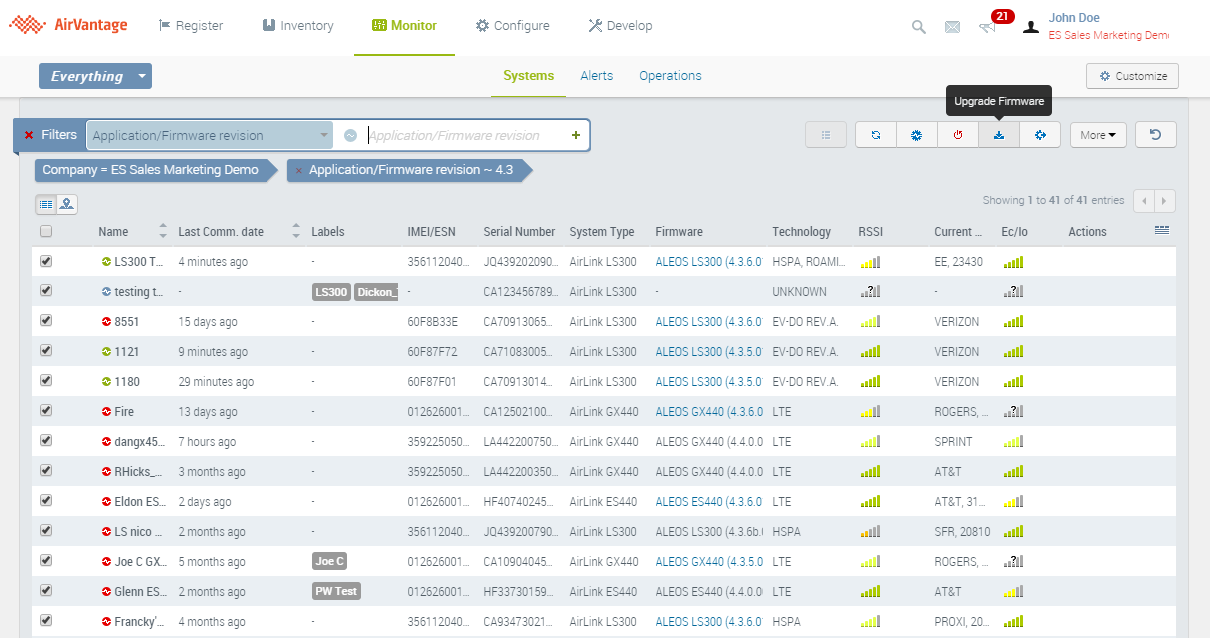
Upgrade selected systems
Upgrade the firmware of one or a group of devices:
- Go to Monitor/Systems to view your fleet of systems in the grid as on the screenshot below.
- Select the list of systems to be upgraded from the list.
- Click the Upgrade Firmware button
 .
. - Choose either the latest firmware of search for another specific firmware and click on Upgrade Firmware.
- Monitor the progress, the status of the operation. In case of failure, apply retry without redoing the setup.
For more information about ALEOS and AirLink OS upgrades and important notes regarding upgrade paths, see How to upgrade firmware on gateways and routers?
Application upgrade and install
Upgrade or install an embedded application on one or multiple devices.
- Embedded applications descriptors and update packages can be uploaded in AirVantage (see the Develop activity to release and publish a new application.) and as a consequence can be used to install the application or update an existing one on the compatible systems.
- Select the systems to upgrade from the list, click on Install application and choose the application to install. AirVantage will create an operation and execute the application installation over the air when the system will communicate.
- Monitor the progress, the status of the operation. In case of failure, apply retry without redoing the setup.
- AirVantage provides a widget showing which application versions are actually deployed on your systems.
Alerts
AirVantage supports 2 types of alert:
- stateful alerts have a duration. These alert rules have a status that is raised as long as the conditions are met, and is cleared when the conditions are not met anymore (example: alert rule on communication status error, or on usage consumption over specific threshold). They contribute to the system’s alert state.
- events (or stateless alerts) are one shot non lasting alerts. They are usually generated by rules using the CHANGE or EXISTS operators (example: alert rule on system state changes). Events or stateless alerts are generated each time the rules conditions are met. Due to their ephemeral characteristc, they don’t impact the system’s alert state.
Identify systems in alert
Each system has an alert state: a system can either be in alert  or not in alert ‘-’.
A system in alert has at least one alert rule for which an alert is currently raised on the system. As soon as the previous alert criteria is no longer met, meaning that the system goes back to expected behavior, its alert state will go back to ‘not in alert’.
If a system is in alert state due to several alerts being raised at the same time, its alert state will be cleared only once all rule violations have been fixed.
You can easily identify systems in alert in the grid of systems using the column “alert state” and “alert state change date”.
- Alert state is showing whether a system is currently in alert or not. A system in alert can be in alert due to one or more alert rules being fulfilled.
- Alert state change date informs you when the system became in alert, or back to normal. This column is not displayed by default, but can be added.
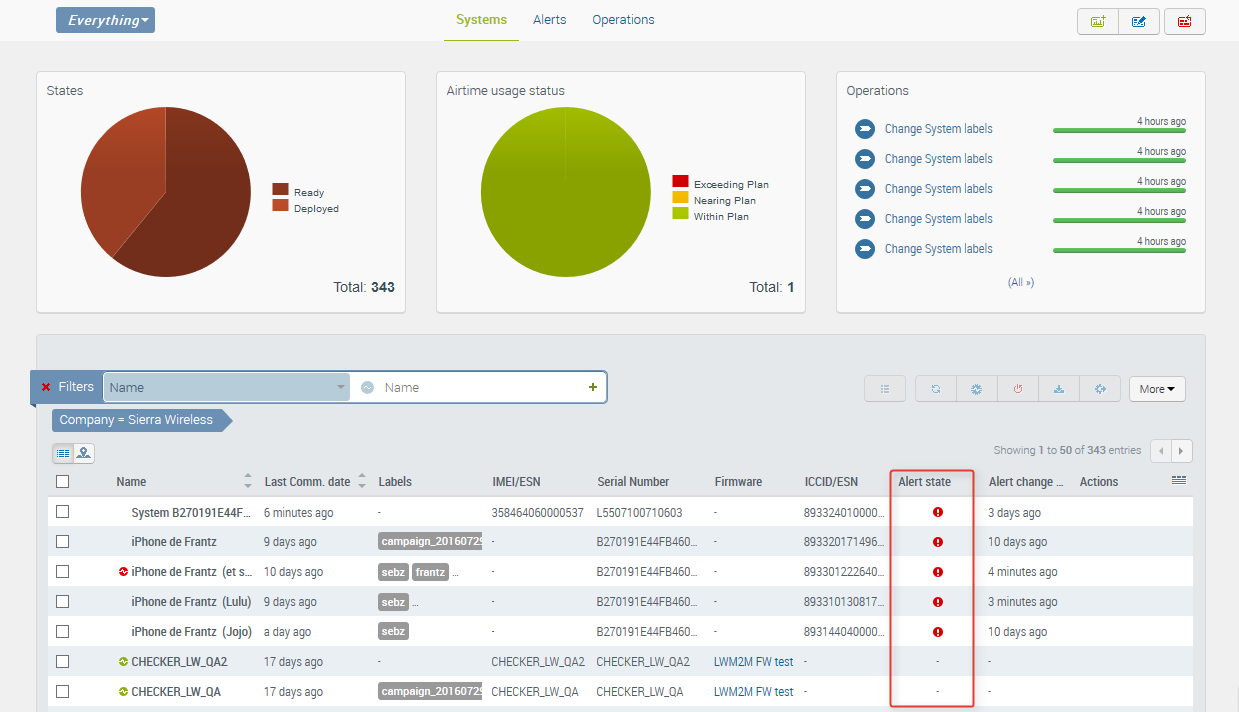
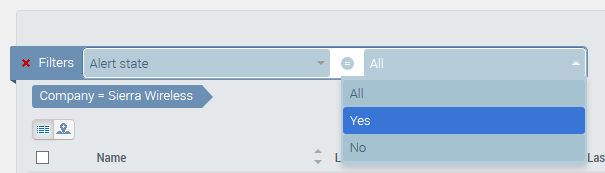
You can use the filtering capabilities with the alert state criteria to display only systems that have at least one alert currently raised.
Check Alerts
The loudspeaker with a red counter on the top banner displays the number of currently raised alarms on your fleet, with one different entry per system or offer and per alert rule. It appears as soon as you are logged in AirVantage.
The Monitor > Current Alerts section is displaying all alerts currently raised on your systems and offers. Consequently, only stateful alerts currently raised are displayed in this screen. The list can be filtered by Alert rule name, type of target (system or offer) and also on the specific system or offer.
Alert rules are created in the Configure activity: Alert section .
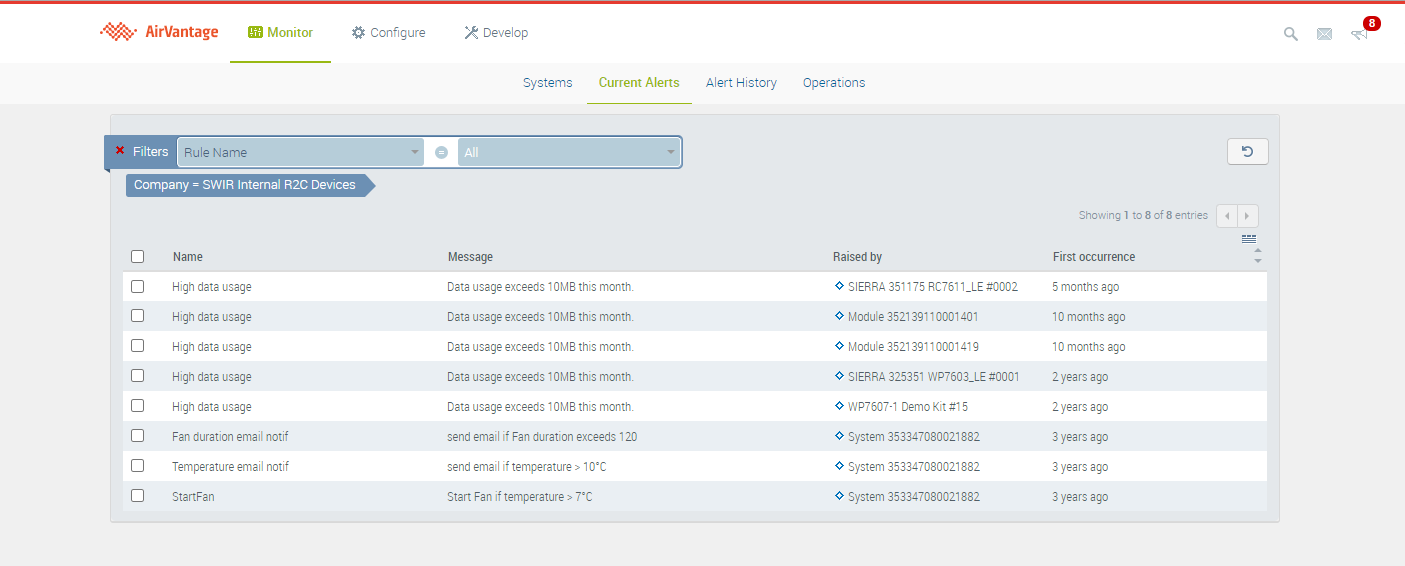
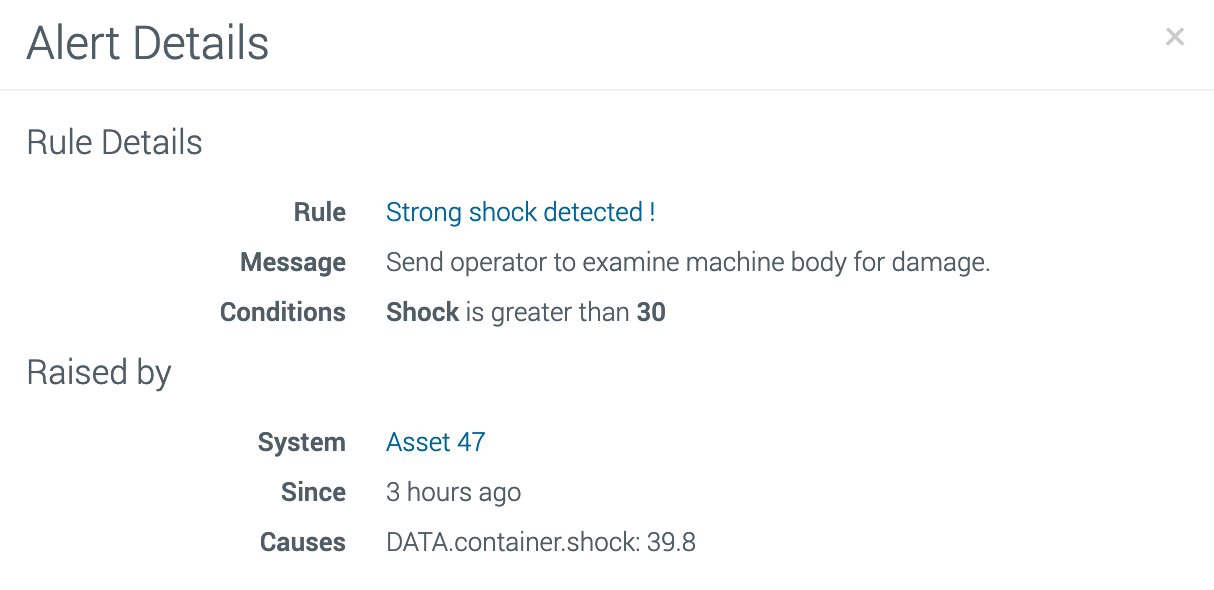
Finally you can click on an alert to show the details:
- related to the rules
- related to the conditions which raised the alert.
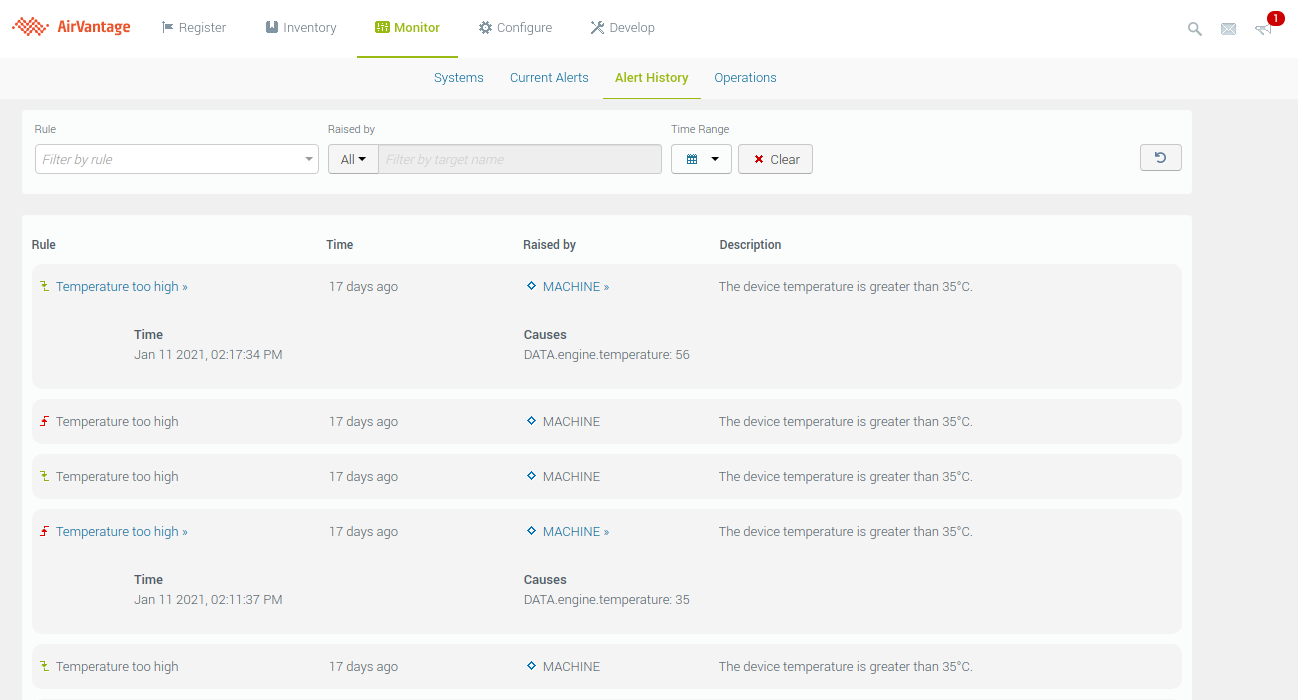
Analyze Alerts
The Monitor > Alert History section is displaying the alert history of your systems (events and for stateful alerts, when they have been raised and cleared). The list can be filtered by Alert rule name, target system, target offer, or a given period of time. In a single click, you can access to the rule, the system details, the systems with targeted offer, and the system’s timeline to analyze the system(s) behavior.
Alert rules are created in the Configure activity: Alert section .
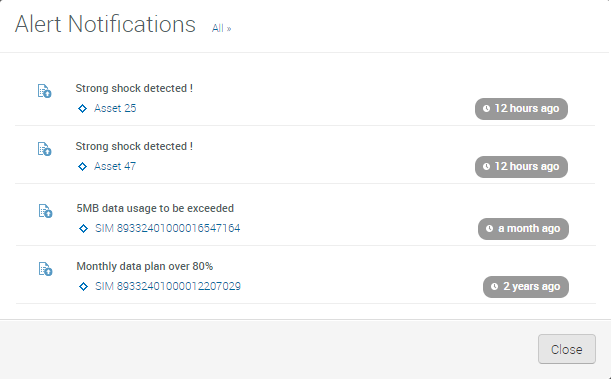
Alert notifications
You set the alert once, and will get noticed when the alert is raised, and then when the alert is over and the system working back the expected way.
Configure devices over-the-air
Mass configuration change
For mass configuration, templates can be created or modified starting from an existing device or from scratch. You can find how to create a new template in the Configure pages.

Track which template has been successfully applied to each system
- A widget tracks the percentage (%) of systems per applied configuration template
- The systems list shows the last applied Template name to each. It can be used to filter the list.
Configure different value per device
Configuring your systems, you may require to specify a different value for each. This is the case for names, identifiers, passwords, or unique configuration parameter like static IP address.

AirVantage provides a way to apply this mass configuration change. The individual settings are loaded from file (.csv format). The systems can be identified using one among:
- Name
- Serial Number or IMEI
- ICCID/ESN or IMSI
- IP address
Connectivity bill shock management
Monitor activity proposes different capabilities to track usage consumption per system and helps you prevent bill shock.
Usage consumption and status
The system list gives you a vision of your fleet along with some of their key usage information:
- The amount of data consumed in the current billing month
- The offer that has been selected for each system at activation
- The percentage of the consumed offer bundle for each SIM with a color coded status.
Note that the usage information displayed in AirVantage in bill shock related functionalities is the invoiced usage data i.e. taking into account billing increments applied to each data session.
Sorting the grid per usage consumption enables you to spot your most consuming devices within the fleet.
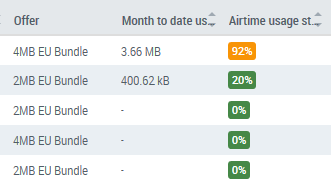
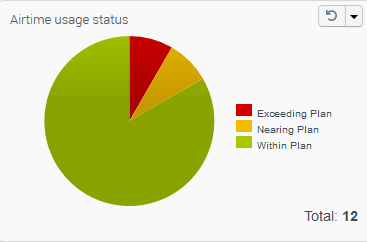
In addition to the grid, the AirTime Usage status widget tracks usage consumed against the bundle offer indicating with a color coded status:
- Which systems are operating within their monthly allotted usage within their bundle (within plan)
- Which systems are within 80% of the allotted bundle usage (nearing plan)
- Which systems have exceeded the allotted bundle usage (exceeding plan)
This widget is especially helpful in identifying systems that may be experiencing an unplanned usage surge. In case you are using a Pay-per-use model, the usage status will be undefined.
Bill shock Alerts
In addition to the widgets, bill shock can also be avoided by using alert rules dedicated to connectivity bill shock management. For a full explanation of alerts and alert statuses, see the main Alerts section of this topic.
The alert rule templates that can be used to prevent usage violations are:
- Monthly usage limit exceeded
- System usage overage
- Pool usage overage
- Usage consumption from specified countries
Connectivity Diagnosis
In case you need a sharp analysis on one SIM or facing some issues with your connectivity, AirVantage provides some functionalities for doing a deeper dive and diagnose your wireless connection.
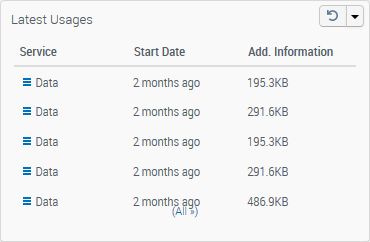
View SIM usage history
A new widget is available in the Monitor> System details to pinpoint the latest usages consumed on the selected SIM. The widget shows the type of usage along with the date at which the usage occured and the additional information related to the usage (duration, amount of data consumed, peer phone number depending on type of usage, visited network). If a session is still on-going it will be displayed as in progress.
To view the full list of usages you need to click on the All>> link at the bottom of the widget, or you can also access it by clicking on the Usage History button in the top banner. In this view, the usages displayed are the raw usage consumption i.e without the billing increments. The Usage History displays all usages consumed on the selected SIM (display is limited to 100 records at a time). You can drill down to a specific date by using the filters on top.
For data usages:
- data session START and STOP events are now displayed in usage history and timeline in near real time (usually in a matter of seconds)
- data session are updated every 15 minutes after the start of the session to provide consumption updates (INTERIM UPDATES).
For VOICE, SMS, USSD, usage history is updated every 15 minutes.
Diagnostics tool
In case you are not able to establish a communication, suspecting something wrong with the connectivity or want more details about real time status of one device, the diagnose capability helps you to understand what is going on and to troubleshoot the service.
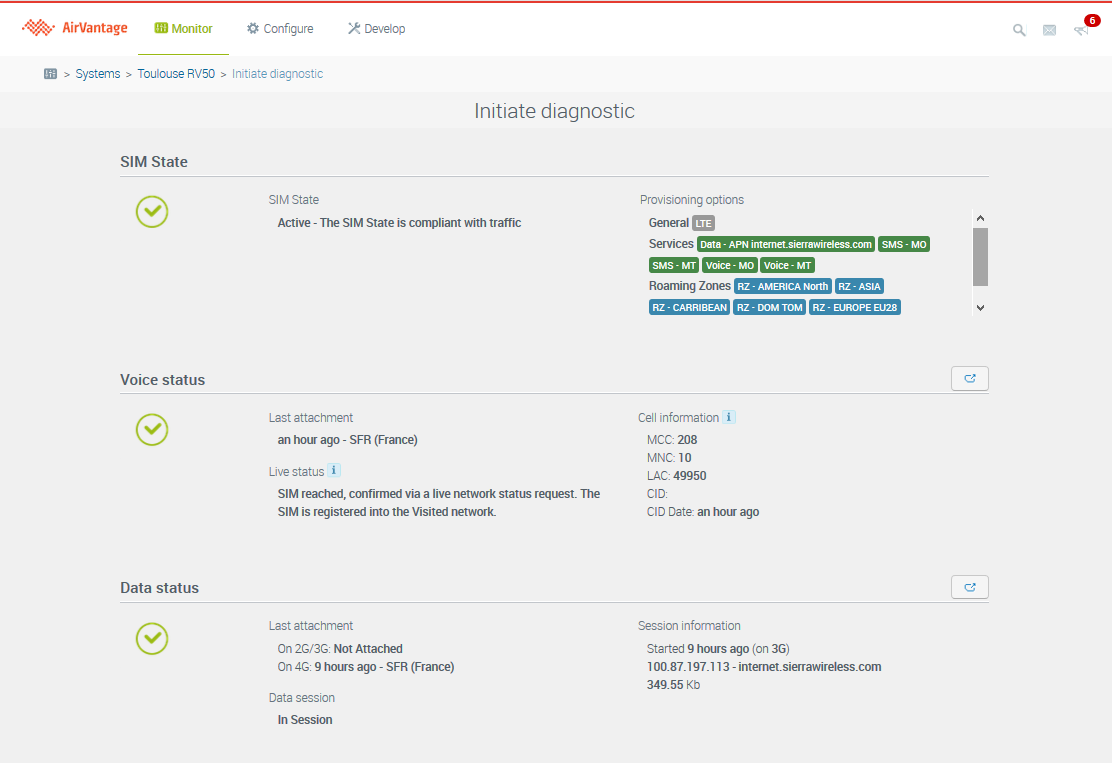
The diagnose is a 3 step operation that can be triggered from System>Details:
- SIM state: checks whether the state of your SIM is currently in a correct state to perform traffic. Aside of the SIM state, we will also display the options that are active on your SIM to ease the verification.
- Voice status: checks the attachment status for voice services. This step includes a real-time query of the visited network to confirm or not whether the device reachability for voice service. It takes around a minute. To be noted that both reachability and location information are retreived from the 2G/3G network only.
- Data status: checks the attachment status for data services and real time session information such as visited network, allocated IP address, APN, the RAT on which the device is attached, and data traffic since beginning of session.
Each step can result in one of the following statuses:
- Success: Configuration and/or connectivity behavior are normal.
- Warning: Connectivity has already been working as expected on this device but is currently temporary interrupted (device being off, or out of coverage, etc…)
- Error: Device configuration and connectivity are not working and may have never been working before.
When an error is detected, the Diagnose tool will suggest possible causes and ways to troubleshoot the issue.
Note that Diagnose takes 1 to 2 minutes to complete.
Detach the SIM from the network
The detach can be used if you suspect an issue with the wireless service: for instance, the diagnose displays that a session is on-going, but you are not able to effectively transmit data, or the diagnose shows that your device is reachable but you are not able to send SMS.
Clicking on ‘Detach’  in the Voice Status pane trigs a detach procedure from the network side, leading to the device restarting an attach procedure and also a data session establishment from the beginning. To be noted that in most cases the device will register to the same network if this network is available.
If you use a SmartSIM Advanced you can also use the ‘Detach Data only’ functionality in the Data Status pane. In that case, the SIM will automatically detect the loss of data service and the device will register to another network.
How-Tos
This section provides you with helpful procedures for common tasks.